Archive for August 2011

Installing IIS 7 from the command line on Windows 2008

Ok, so our customers are tired of having us have an IIS prerequisite in our product installer. They want us to install and configure IIS for them.

So I found this article: Installing IIS 7.0 from the Command Line

I am testing the command line provided in this article in a command prompt. I have verified the command prompt is running as Administrator.

On Windows 2008 R2, it failed with this error: -2146498548

So if at first you don’t succeed, try, try again.

Well, I don’t actually need everything in the script. So I tested this command line:

start /w PkgMgr.exe /iu:IIS-WebServerRole;

This command succeeded. The resulting installed IIS Roles and Services are these.

Note: This output is give by running this command: servermanagercmd.exe -query

[X] Web Server (IIS)  [Web-Server]
     [X] Web Server  [Web-WebServer]
         [X] Common HTTP Features  [Web-Common-Http]
             [X] Static Content  [Web-Static-Content]
             [X] Default Document  [Web-Default-Doc]
             [X] Directory Browsing  [Web-Dir-Browsing]
             [X] HTTP Errors  [Web-Http-Errors]
             [ ] HTTP Redirection  [Web-Http-Redirect]
             [ ] WebDAV Publishing  [Web-DAV-Publishing]
         [ ] Application Development  [Web-App-Dev]
             [ ] ASP.NET  [Web-Asp-Net]
             [ ] .NET Extensibility  [Web-Net-Ext]
             [ ] ASP  [Web-ASP]
             [ ] CGI  [Web-CGI]
             [ ] ISAPI Extensions  [Web-ISAPI-Ext]
             [ ] ISAPI Filters  [Web-ISAPI-Filter]
             [ ] Server Side Includes  [Web-Includes]
         [X] Health and Diagnostics  [Web-Health]
             [X] HTTP Logging  [Web-Http-Logging]
             [ ] Logging Tools  [Web-Log-Libraries]
             [X] Request Monitor  [Web-Request-Monitor]
             [ ] Tracing  [Web-Http-Tracing]
             [ ] Custom Logging  [Web-Custom-Logging]
             [ ] ODBC Logging  [Web-ODBC-Logging]
         [X] Security  [Web-Security]
             [ ] Basic Authentication  [Web-Basic-Auth]
             [ ] Windows Authentication  [Web-Windows-Auth]
             [ ] Digest Authentication  [Web-Digest-Auth]
             [ ] Client Certificate Mapping Authentication  [Web-Client-Auth]
             [ ] IIS Client Certificate Mapping Authentication  [Web-Cert-Auth]
             [ ] URL Authorization  [Web-Url-Auth]
             [X] Request Filtering  [Web-Filtering]
             [ ] IP and Domain Restrictions  [Web-IP-Security]
         [X] Performance  [Web-Performance]
             [X] Static Content Compression  [Web-Stat-Compression]
             [ ] Dynamic Content Compression  [Web-Dyn-Compression]
     [X] Management Tools  [Web-Mgmt-Tools]
         [X] IIS Management Console  [Web-Mgmt-Console]
         [ ] IIS Management Scripts and Tools  [Web-Scripting-Tools]
         [ ] Management Service  [Web-Mgmt-Service]
         [ ] IIS 6 Management Compatibility  [Web-Mgmt-Compat]
             [ ] IIS 6 Metabase Compatibility  [Web-Metabase]
             [ ] IIS 6 WMI Compatibility  [Web-WMI]
             [ ] IIS 6 Scripting Tools  [Web-Lgcy-Scripting]
             [ ] IIS 6 Management Console  [Web-Lgcy-Mgmt-Console]
     [ ] FTP Server  [Web-Ftp-Server]
         [ ] FTP Service  [Web-Ftp-Service]
         [ ] FTP Extensibility  [Web-Ftp-Ext]
     [ ] IIS Hostable Web Core  [Web-WHC]

This is almost enough but I also need these more than the default. I also need the ones below that I have put an “I” in.

[X] Web Server (IIS)  [Web-Server]
     [X] Web Server  [Web-WebServer]
         [X] Common HTTP Features  [Web-Common-Http]
             [X] Static Content  [Web-Static-Content]
             [X] Default Document  [Web-Default-Doc]
             [X] Directory Browsing  [Web-Dir-Browsing]
             [X] HTTP Errors  [Web-Http-Errors]
             [ ] HTTP Redirection  [Web-Http-Redirect]
             [ ] WebDAV Publishing  [Web-DAV-Publishing]
         [ ] Application Development  [Web-App-Dev]
             [ ] ASP.NET  [Web-Asp-Net]
             [ ] .NET Extensibility  [Web-Net-Ext]
             [I] ASP  [Web-ASP]
             [I] CGI  [Web-CGI]
             [I] ISAPI Extensions  [Web-ISAPI-Ext]
             [ ] ISAPI Filters  [Web-ISAPI-Filter]
             [I] Server Side Includes  [Web-Includes]
         [X] Health and Diagnostics  [Web-Health]
             [X] HTTP Logging  [Web-Http-Logging]
             [ ] Logging Tools  [Web-Log-Libraries]
             [X] Request Monitor  [Web-Request-Monitor]
             [ ] Tracing  [Web-Http-Tracing]
             [ ] Custom Logging  [Web-Custom-Logging]
             [ ] ODBC Logging  [Web-ODBC-Logging]
         [X] Security  [Web-Security]
             [ ] Basic Authentication  [Web-Basic-Auth]
             [I] Windows Authentication  [Web-Windows-Auth]
             [ ] Digest Authentication  [Web-Digest-Auth]
             [ ] Client Certificate Mapping Authentication  [Web-Client-Auth]
             [ ] IIS Client Certificate Mapping Authentication  [Web-Cert-Auth]
             [ ] URL Authorization  [Web-Url-Auth]
             [X] Request Filtering  [Web-Filtering]
             [ ] IP and Domain Restrictions  [Web-IP-Security]
         [X] Performance  [Web-Performance]
             [X] Static Content Compression  [Web-Stat-Compression]
             [ ] Dynamic Content Compression  [Web-Dyn-Compression]
     [X] Management Tools  [Web-Mgmt-Tools]
         [X] IIS Management Console  [Web-Mgmt-Console]
         [ ] IIS Management Scripts and Tools  [Web-Scripting-Tools]
         [ ] Management Service  [Web-Mgmt-Service]
         [I] IIS 6 Management Compatibility  [Web-Mgmt-Compat]
             [I] IIS 6 Metabase Compatibility  [Web-Metabase]
             [ ] IIS 6 WMI Compatibility  [Web-WMI]
             [ ] IIS 6 Scripting Tools  [Web-Lgcy-Scripting]
             [ ] IIS 6 Management Console  [Web-Lgcy-Mgmt-Console]
     [ ] FTP Server  [Web-Ftp-Server]
         [ ] FTP Service  [Web-Ftp-Service]
         [ ] FTP Extensibility  [Web-Ftp-Ext]
     [ ] IIS Hostable Web Core  [Web-WHC]

So the article was somewhat correct. Turns out this command line works:

start /w PkgMgr.exe /iu:IIS-WebServerRole;IIS-CommonHttpFeatures;IIS-StaticContent;IIS-DirectoryBrowsing;IIS-HttpRedirect;IIS-ApplicationDevelopment;IIS-ASP;IIS-CGI;IIS-ISAPIExtensions;IIS-ServerSideIncludes;IIS-Security;IIS-WindowsAuthentication;IIS-WebServerManagementTools;IIS-ManagementConsole;IIS-IIS6ManagementCompatibility;IIS-Metabase

And this command line satisfies all my requirements.

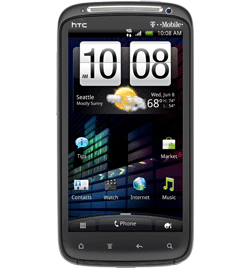
HTC Sensation Battery Life meets the low expectations I’ve heard

Update: A system update just came out and it claims longer battery life, so I will have to test again…

My HTC Sensation looks like it will probably have a battery life of 1.5 days for me before it hit 9% battery. I have heard that even though it boasts That is less than I hoped. I was hoping for two days, so I would only have to plug it in every other evening. Maybe 9% would last me till tonight, but I doubt it.

A few notes on this 1.5 days.

  • I used my HTC Sensation for browsing the web for a good 45 minutes straight in the evening, so maybe I used more battery life than normal last night.
  • I was on the phone no more than 10 minutes
  • I made sure to keep all services, GPS, Wi-fi, etc., off during most of this time as I am fine turning them on when I use them.

So I also may have used less battery than some who must have these services enabled all the time.

I hoped that since I turned off these services, I would get much more than two days, even with good hour of use at some point during that span. But alas, the HTC Sensation Battery Life meets the low expectations I’ve heard from others. I have already bought a car charger (well, actually I bought an iGo tip to go with my iGo Car Charger) and I will certainly buy a an extra charger to have at my desk at work as well.

C Sharp Development 101 – Application Deployment (from BinaryWasteland.com)

Found a quality development blog recently that had a post on a topic I have been interested in but haven’t got around to working on. The topic is publishing a project using Visual Studio.

C Sharp Development 101 – Application Deployment

In this post you will learn the following:

  1. How to set up application publishing.
  2. How to publish your app to an FTP Site.
  3. How to install the published app.


Transfering contacts to my HTC Sensation 4G

So as I mentioned previously, I just got a new T-Mobile HTC Sensation 4G and of course I had to transfer my files.

UPDATE: I just realized you can skip transferring to a PC and connect your old phone to your new phone via Bluetooth and just transfer the files straight from your old phone to your new phone, eliminating the computer as the middle man.

Retrieving contacts from a deactivated phone to your Computer or to your HTC Sensation 4G

First I had to get them off my Motorola RAZR V3m, which I did using this guys steps:

Tutorial: Move your Verizon contacts from your deactivated RAZR to your iPhone

Though there was no copyright listed, I want to give the author credit, especially since I am including a copy of these steps here (though I am modifying them) in case his site ever goes dark.

You can use these steps to transfer your contacts to a computer or to transfer them directly to your HTC Sensation 4G.

Step 1 – Enable Bluetooth

  1. Turn your Bluetooth on, and make sure it’s discoverable.  Do this for each device.
  2. On either device, scan for or add a new Bluetooth device.
  3. Connect/Pair the two devices.
  4. Enter the pin in both devices to pair them.

Step 2 – Send the Contacts

  1. On your old RAZR V3m, select Contacts on your phone.
  2. Select Options.
  3. Scroll all the way to the bottom of that ridiculous list.  See the one that says, “Send Name Card.”  Select it.
  4. Only one card will have been selected (likely the first on your contacts list).  Hit the “Add” softkey option, and select “Add All.”
  5. Press “Send.”  It’s going to ask you where to send them.  You’re going to tell it to send to the computer to which you just paired your phone.
  6. On your computer or HTC, notice automatic activity.  You will need to confirm that it’s okay with you for the transfer to happen.

You should now have a bunch of .vcf files.

On Windows 7, they are here: C:\Users\UserName\Documents\Bluetooth Exchange Folder

Hopefully, you will find similar steps for your phone if it is not a RAZR V3m

Transferring Contacts to your HTC Sensation 4G

If you transferred the contacts to your HTC Sensation 4g, skip directly to Step 4.

Step 1 – Turn on Bluetooth

  1. Click on the bottom left icon to go to All Apps.
  2. Scroll down and select Settings.
  3. Click on Wireless & Networks.
  4. Turn on Bluetooth by clicking it (make sure the check box is green).

Step 2 – Connect the HTC Sensation 4G to your computer via Bluetooth

  1. On your computer (I used Windows 7) click Add device from your Bluetooth options.
  2. Windows searches for you device. Click it when it is found.
  3. Enter the number that pops up on the screen into your HTC Sensation 4G.

You are now connected via Bluetooth from your laptop and on your laptop the Bluetooth device control window should appear.

Step 3 – Send your .vcf files to the HTC Sensation 4G

  1. On your laptop, in the Bluetooth device control window, click the link under file transfer: “Send files to your (HTC Sensation 4G) phone”.
  2. Click Browse Files.
  3. Add all the .vcf files that you previously transferred to this folder: C:\Users\UserName\Documents\Bluetooth Exchange Folder
  4. Click Send.
  5. On your HTC Sensation 4G, you will get prompted to allow the transfer. Allow it.

The .vcf files should now be on the SD card in your HTC Sensation 4G.

Step 4 – Import all the .vcf files to your HTC Sensation 4G

  1. On your HTC Sensation 4G, click Contacts.
  2. Click the second icon below the screen (has one longer horizontal line above three shorter horizontal lines).
  3. Select Import/Export.
  4. Select Import from SD Card.
  5. Choose the account to import to, I used Google.
  6. Choose to import All vCard files.
  7. Click Ok.

You should now have imported all your contacts.

Hope this helps you.

I just got an Android Phone at a discount

So my new HTC Sensation with T-Mobile arrived today, and I got it for less than $199 it would have cost through T-Mobile direct.

I just thought I would tell you how I got the discount. This discount is not limited to T-Mobile or the HTC Sensation, but is pretty much with any phone you get, and for any company, including Verizon, that you choose to use as your carrier. The discount is different on different phones, but it can save you some money.

Linda Barneck, is an Independent Business Owner in a multi-level-marketing (MLM) company called ACN (Yes, this is the company that was promoted on The Apprentice) but I didn’t get this deal due to family relation. It turns out that anybody who orders through Linda Barneck’s Independent Business Owner site can get this discount.

So click this link and order you new phone with this discount now.

Get your Android Phone at a discount with ACN Wireless Exclusive Deals! 

There are a lot more products that you can get through ACN. You could get a Tablet with a data plan, or a Video Phone, or Satellite TV, or other cool products. See a what products are available in your area here:

Shop for ACN Products & Services

I have personally chosen to not participate directly in MLMs, though I have no problem buying product from an MLM especially if it saves me money, which is what I am doing in this instance. I benefit in no way from you ordering your phone through ACN. My mother did not solicit this post. I am writing this only because I got my phone at a discount.

I almost joined ACN. With ACN being a “techie’s MLM”, I was almost tempted to join. If you are interested in an MLM and you are a bit high-tech, you can become an Independent Business Owner and then buy yourself a new phone through you own account. Just go check out Linda Barneck’s ACN Independent Business Owner page and then click on the “Get Started” link.


A Developer’s Resume

I saw some alternate resumes for designers and I thought I would do an alternate resume for a developer. Make sure that if you use this, you are applying at a company that will appreciate it and not just throw the resume away.

namespace Resume {
  public class Candidate {
  
    public ContactInfo Info {
      get { return new Person {FirstName = "Jared", LastName = "Barneck", 
                Street = "9110 Rigewood Place", City = "West Jordan", 
                State = "Utah", Zip = "84088", Email = "Rhyous@yahoo.com"}
      }
    }
    public List<Experience> WorkHistory {
      get { List<Experience> exp = new List<Experience>(); 
            exp.Add(new Experience() { Start = "3/2012", End = "Present",
              Company = "Caradigm",
              Positions = new string [] { "Lead Software Developer"};

            exp.Add(new Experience() { Start = "9/2004", End = "3/2012",
              Company = "LANDesk",
              Positions = new string [] { "Software Developer", 
                "Systems Analyst Developer", "Product Support Expert/Lead",
                "Channel Support Manager"}};
           
            exp.Add(new Experience() { Start = "1/2000", End = "9/2004",
              Company = "Convergys – Nortel Networks Account",
              Positions = new string [] { "Advanced Networking Trainer", 
              "Technical Lead", "Support Engineer"}};

	      return experience;
      }
    } 
    public List<Education> Education {
      get { List<Education> edu = new List<Education>(); 
            edu.Add(new Education() { Start = "8/1999", End = "8/2004"
              College = "Brigham Young University",
              Degree = "BA – Technical Writing"};

            edu.Add(new Education() { Start = "9/2006", End = "4/2009"
              College = "Brigham Young University",
              Description = "Various Computer Science courses"};

            return edu;
      }
    }
    public List<String> Certifications {
      get { List<String> cert = new List<String>(); 
            cert.Add("Certified LANDesk Engineer");
            cert.Add("Nortel Networks - Routers");
            cert.Add("Nortel Networks – L3 Switches");
            cert.Add("MSCE NT 4.0" };
            return cert;
      }
    }
    public List<String> Skills {
      get { List<String> skills = new List<String>(); 
            skills.Add("C#"); skills.Add("WPF"); skills.Add( "MVVM");
            skills.Add("PHP"); skills.Add("MySQL"); skills.Add("Apache");
            skills.Add("Shell Scripts"); skills.Add("Batch Files");
            skills.Add("FreeBSD"); skills.Add("Linux"); skills.Add("Mono");
            return skills;
      }
    }
  }
}

Data Bound

When you bind a WPF Control’s property to another object, you have data bound that object.

Only Dependency Properties of a WPF Control can be data bound.

For more information go here:

WPF Data Binding Tutorial

TextBox Validation – How to bind to properties of the Validation of a TextBox?

Have you ever wanted to have a TextBox that requires data or specifically formatted data and you want to enforce this validation and display this to the user.

Well, I figured this out, with a great deal of pain, but hey, it works.

You can download this project in it’s entirety here:

WpfTextBoxValidation.zip

I started with a new WPF Project in Visual Studio. Here is a general overview of the steps I took to make this example project happen.

MainWindow.xaml

  1. Here, create a simple form to fill out using TextBlock and TextBox pairs in a Grid.
  2. Configure the TextBox elements to use binding.
  3. Configure the TextBox elements to use the appropriate Validation. (See the validation examples we will create below.)
  4. Below the form you created in a StackPanel, add some TextBlock elements to display the Validation’s ErrorConent.
  5. Bind each TextBlock element to the TextBox in the form they pertain to.
  6. Bind the Visibility of each TextBlock to the Errors. (We will use the converter below to return Visible if there is ErrorContent and Collapsed if not.)
<Window x:Class="WpfTextBoxValidation.MainWindow"
        xmlns="http://schemas.microsoft.com/winfx/2006/xaml/presentation"
        xmlns:x="http://schemas.microsoft.com/winfx/2006/xaml"
        xmlns:local="clr-namespace:WpfTextBoxValidation"
        Title="MainWindow" Height="350" Width="525">
    <Grid Name="MainGrid">
        <Grid.Resources>
            <Style TargetType="TextBox">
                <Setter Property="MaxWidth" Value="200" />
            </Style>
        </Grid.Resources>
        <Grid.ColumnDefinitions>
            <ColumnDefinition Width="Auto" />
            <ColumnDefinition Width="Auto" MinWidth="200" />
        </Grid.ColumnDefinitions>
        <Grid.RowDefinitions>
            <RowDefinition Height="Auto" />
            <RowDefinition Height="Auto" />
            <RowDefinition Height="Auto" />
            <RowDefinition Height="Auto" />
            <RowDefinition Height="Auto" />
            <RowDefinition Height="*" />
        </Grid.RowDefinitions>

        <!-- Labels -->
        <TextBlock Text="FirstName" />
        <TextBlock Text="LastName" Grid.Row="1" />
        <TextBlock Text="Age" Grid.Row="2" />
        <TextBlock Text="Phone" Grid.Row="3" />

        <!-- TextBlocks -->
        <TextBox Name="TextBoxFirstName" Grid.Column="1">
            <TextBox.Text>
                <Binding Path="FirstName" UpdateSourceTrigger="PropertyChanged" >
                    <Binding.ValidationRules>
                        <local:TextBoxNotEmptyValidationRule x:Name="FirstNameValidation" ValidatesOnTargetUpdated="True" 
                                                             Message="You must enter a first name."/>
                    </Binding.ValidationRules>
                </Binding>
            </TextBox.Text>
        </TextBox>
        <TextBox Name="TextBoxLastName" Grid.Row="1" Grid.Column="1">
            <TextBox.Text>
                <Binding Path="LastName" UpdateSourceTrigger="PropertyChanged" >
                    <Binding.ValidationRules>
                        <local:TextBoxNotEmptyValidationRule x:Name="LastNameValidation" ValidatesOnTargetUpdated="True" 
                                                             Message="You must enter a last name."/>
                    </Binding.ValidationRules>
                </Binding>
            </TextBox.Text>
        </TextBox>
        <TextBox Name="TextBoxAge" Grid.Row="2" Grid.Column="1">
            <TextBox.Text>
                <Binding Path="Age" UpdateSourceTrigger="PropertyChanged" >
                    <Binding.ValidationRules>
                        <local:OverThirteenValidationRule x:Name="AgeValidation" ValidatesOnTargetUpdated="True"/>
                    </Binding.ValidationRules>
                </Binding>
            </TextBox.Text>
        </TextBox>
        <TextBox Name="TextBoxPhone" Grid.Row="3" Grid.Column="1">
            <TextBox.Text>
                <Binding Path="Phone" UpdateSourceTrigger="PropertyChanged" >
                    <Binding.ValidationRules>
                        <local:TextBoxNotEmptyValidationRule x:Name="PhoneValidation" ValidatesOnTargetUpdated="True" 
                                                             Message="You must enter a phone number."/>
                    </Binding.ValidationRules>
                </Binding>
            </TextBox.Text>
        </TextBox>

        <!-- Validation List -->
        <StackPanel Grid.Row="4" Grid.ColumnSpan="2">
            <StackPanel.Resources>
                <Style TargetType="TextBlock">
                    <Setter Property="Foreground" Value="Red" />
                </Style>
                <local:ErrorCollectionToVisibility x:Key="ToVisibility" />
            </StackPanel.Resources>
            <TextBlock Visibility="{Binding ElementName=TextBoxFirstName, Path=(Validation.Errors), Converter={StaticResource ToVisibility}}">
                <TextBlock.Text>
                    <MultiBinding StringFormat="FirstName - {0}">
                        <Binding ElementName="TextBoxFirstName" Path="(Validation.Errors)[0].ErrorContent"/>
                    </MultiBinding>
                </TextBlock.Text>
            </TextBlock>
            <TextBlock Visibility="{Binding ElementName=TextBoxLastName, Path=(Validation.Errors), Converter={StaticResource ToVisibility}}">>
                <TextBlock.Text>
                    <MultiBinding StringFormat="LastName - {0}">
                        <Binding ElementName="TextBoxLastName" Path="(Validation.Errors)[0].ErrorContent"/>
                    </MultiBinding>
                </TextBlock.Text>
            </TextBlock>
            <TextBlock Visibility="{Binding ElementName=TextBoxAge, Path=(Validation.Errors), Converter={StaticResource ToVisibility}}">>
                <TextBlock.Text>
                    <MultiBinding StringFormat="Age - {0}">
                        <Binding ElementName="TextBoxAge" Path="(Validation.Errors)[0].ErrorContent"/>
                    </MultiBinding>
                </TextBlock.Text>
            </TextBlock>
            <TextBlock Visibility="{Binding ElementName=TextBoxPhone, Path=(Validation.Errors), Converter={StaticResource ToVisibility}}">>
                <TextBlock.Text>
                    <MultiBinding StringFormat="Phone - {0}">
                        <Binding ElementName="TextBoxPhone" Path="(Validation.Errors)[0].ErrorContent"/>
                    </MultiBinding>
                </TextBlock.Text>
            </TextBlock>
            <!--Text="{Binding ElementName=DirectoryBox, Path=(Validation.Errors)[0].ErrorContent}"-->
        </StackPanel>
    </Grid>
</Window>

MainWindow.xaml.cs

To this file we add a Person class and then create and instance of it and set it the instance as the DataContext.

using System;
using System.Windows;
using System.ComponentModel;

namespace WpfTextBoxValidation
{
    /// <summary>
    /// Interaction logic for MainWindow.xaml
    /// </summary>
    public partial class MainWindow : Window
    {
        public MainWindow()
        {
            InitializeComponent();
            Person p = new Person();
            MainGrid.DataContext = p;
        }
    }

    public class Person
    {
        public String FirstName { get; set; }
        public String LastName { get; set; }
        public int Age { get; set; }
        public String Phone { get; set; }
    }
}

ErrorCollectionToVisibility.cs

This class is used to convert the Validation.Error collection to a Visibility.

There is a property Validation.HasError but for some reason it is not available to bind to. If it were, I would bind to it and use the built-in BooleanToVisibility converter. But since, I can’t, I used this ErrorCollectionToVisibility converter which simply returns Visible if there is at least one item in the collection or Collapse if the Collection is null or empty.

using System;
using System.Collections.ObjectModel;
using System.Windows;
using System.Windows.Controls;
using System.Windows.Data;

namespace WpfTextBoxValidation
{
    class ErrorCollectionToVisibility : IValueConverter
    {
        public object Convert(object value, Type targetType, object parameter, System.Globalization.CultureInfo culture)
        {
            ReadOnlyCollection<ValidationError> collection = value as ReadOnlyCollection<ValidationError>;
            if (collection != null && collection.Count > 0)
                return Visibility.Visible;
            else
                return Visibility.Collapsed;
        }

        public object ConvertBack(object value, Type targetType, object parameter, System.Globalization.CultureInfo culture)
        {
            return new object();
        }
    }
}

OverThirteenValidationRule.cs

Here we check if the value is greater than 13 and if not, we return the false ValidationResult.

using System;
using System.Windows.Controls;

namespace WpfTextBoxValidation
{
    public class OverThirteenValidationRule : ValidationRule
    {
        public override ValidationResult Validate(object value, System.Globalization.CultureInfo cultureInfo)
        {
            if (value != null)
            {
                int age = 0;
                try
                {
                    age = Convert.ToInt32(value);
                }
                catch
                {
                    return new ValidationResult(false, "You must be older than 13!");
                }

                if (age > 13)
                    return ValidationResult.ValidResult;

            }
            return new ValidationResult(false, "You must be older than 13!");
        }
    }
}

TextBoxNotEmptyValidationRule.cs

This validation just makes sure there is at least one character in a TextBlock.

using System;
using System.Windows.Controls;

namespace WpfTextBoxValidation
{
    public class TextBoxNotEmptyValidationRule : ValidationRule
    {
        public override ValidationResult Validate(object value, System.Globalization.CultureInfo cultureInfo)
        {
            string str = value as string;
            if (str != null)
            {
                if (str.Length > 0)
                    return ValidationResult.ValidResult;
            }
            return new ValidationResult(false, Message);
        }

        public String Message { get; set; }
    }
}

You have now learned to bind to Validation.ErrorContent.


Array in C# – Tutorial

Arrays in c# are powerful and full-featured.

Simple Array in C#

The simple array is a single-dimensional array. The idea of an array is to be a list of items. Lets give you two examples.

Example 1 – Single-dimensional array example with integers

This list of numbers is an array.

1, 2, 3, 4, 5

To create an array in C# with the above list of numbers you would use the following code:

    int[] nums = new int[] { 1, 2, 3, 4, 5 };

The variable “nums” now holds all five number values.  These can be accessed with bracket notation with an index starting at 0. That means that nums[0] would return the first item in the array, which is 1.
nums[4] would return 5.  However, be aware that you cannot overstep your bounds. You only have nums[0] through nums[4] and if you try to access any index out of the range, such as nums[5] you will get an exception.

You can change any item in the array as well.

    nums[1] = 100;

After running the above statement, your array now looks like this:

1, 100, 3, 4, 5

Example 2 – Single-dimensional array example with chars

This list of characters is an array.

‘A’, ‘a’, ‘B’, ‘b’, ‘C’, ‘c’, ‘D’, ‘d’, ‘E’, ‘e’, ‘F’, ‘f’

To create an array in C# with the above list of characters you would use the following code:

    char[] alphas = new char[] { 'A', 'a', 'B', 'b', 'C', 'c', 'D', 'd', 'E', 'e', 'F', 'f' };

The variable “alphas ” now holds all the listed character values.  These can be accessed with bracket notation with an index starting at 0. That means that alphas[0] would return the first item in the array, which is A. alphas[2] would return B.  alphas[11] would return f.  However, be aware that you cannot overstep your bounds. You only have alphas[0] through alphas[11] and if you try to access any index out of the range, such as alphas[12] you will get an exception.

You can change any item in the array as well.

    alphas[0] = '@';

After running the above statement, your character array now looks like this:

‘@’, ‘a’, ‘B’, ‘b’, ‘C’, ‘c’, ‘D’, ‘d’, ‘E’, ‘e’, ‘F’, ‘f’

Example 3 – Single-dimensional array example with chars

This list of strings is an array.

“apple”, “orange”, “banana”, “peach”, “pear”, “grapefruit”

To create an array in C# with the above list of numbers you would use the following code:

    string[] fruit= new string[] { "apple", "orange", "banana", "peach", "pear" };

The variable “fruit” now holds all the listed string values.  These can be accessed with bracket notation with an index starting at 0. That means that fruit[0] would return the first item in the array, which is “apple”. fruit[2] would return “banana”.  fruit[5] would return “grapefruit”.  However, be aware that you cannot overstep your bounds. You only have fruit[0] through fruit[5] and if you try to access any index out of the range, such as fruit[6] you will get an exception.

You can change any item in the array as well.

    fruit[2] = "plantain'';

Before this statement, fruit[2] was assigned the string “banana”, but after running the above statement, it is assigned the string “plantain”. So now your character array now looks like this:

“apple”, “orange”, “plantain”, “peach”, “pear”

Arrays of Arrays in C#

There are different kinds of Arrays of . Lets discuss them as they are not the same.

  • multidimensional
  • jagged arrays.

With multidimensional arrays, the arrays are arrays of lists, but the lists themselves are not exactly formed into an official C# array object. Some might argue that these are not actually arrays but it that is all semantics.

With jagged arrays, the arrays are arrays of lists, and the lists themselves are also C# array objects.

Multidimensional Array in C#

A multi-dimensional array is an array of fixed size arrays and is often depicted at a table.  Lets learn by some examples.

Two-dimensional array examples

First lest have three examples of two-dimensional arrays.

Example 1 – A multidimensional array of number pairs

Imagine you have the following pairs of numbers:

{ 10, 11 }, { 20, 21 }, { 30, 31 }, { 40, 41 }, { 50, 51 }

The table representation would look like this.

10 11
20 21
30 31
40 41
50 51

You would code this as follows:

    int[,] numgrid = new int[,]{ { 10, 11 }, { 20, 21 }, { 30, 31 }, { 40, 41 }, { 50, 51 } };

Since no size was specified the size was automatically determined for you. Alternately you can specify the size:

    int[,] numgrid = new int[5,2]{ { 10, 11 }, { 20, 21 }, { 30, 31 }, { 40, 41 }, { 50, 51 } };

You can now access any of the numbers using the following syntax.

    int val = numgrid[0,0];

The above will return the first item in the first pair. Or to get the second item in the last pair do this:

    int val = numgrid[4,1];

However, because this is a multi-dimensional array, you cannot access a pair as array. The following is NOT allowed.

    int[] pair = numgrid[0];

That gives you a compile error. That is because the number pairs are not really stored in memory as C# array objects.

Example 2 – A multidimensional array of three numbers

Imagine you have the following groups of numbers, where the groups are always three numbers.

{ 10, 11, 12 }, { 20, 21, 22 }, { 30, 31, 32 }, { 40, 41, 42 }, { 50, 51, 52 }

The table representation would look like this.

10 11 12
20 21 22
30 31 32
40 41 42
50 51 52

You would code this as follows:

    int[,] threeColumnsOfNumbers = new int[,] { { 10, 11, 12 }, { 20, 21, 22 }, { 30, 31, 32 }, { 40, 41, 42 }, { 50, 51, 52 }  };

Since no size was specified the size was automatically determined for you. Alternately you can specify the size:

    int[,] threeColumnsOfNumbers = new int[5,3] { { 10, 11, 12 }, { 20, 21, 22 }, { 30, 31, 32 }, { 40, 41, 42 }, { 50, 51, 52 }  };

You can now access any of the numbers using the following syntax.

    int val = threeColumnsOfNumbers[0,0];

The above will return the first item in the first group of three. Or to get the last or third item in the last group do this:

    int val = threeColumnsOfNumbers[4,2];

However, because this is a multi-dimensional array, you cannot access a group of three as an array. The following is NOT allowed.

    int[] groupOfThree = threeColumnsOfNumbers[0];

That gives you a compile error. That is because the groups of three are not really stored in memory as C# array objects.

Example 3 – A multidimensional array of characters

Imagine you have the following list of upper and lowercase characters.

{ ‘A’, ‘a’ }, { ‘B’, ‘b’ }, { ‘C’, ‘c’ }, { ‘D’, ‘d’ }, { ‘E’, ‘e’ }, { ‘F’, ‘f’ }

The table representation would look like this.

A a
B b
C c
D d
E e

You would code this as follows:

    char[,] alphaUpperAndLower = new char[,]{ { 'A', 'a' }, { 'B', 'b' }, { 'C', 'c' }, { 'D', 'd' }, { 'E', 'e' }, { 'F', 'f' } };

Since no size was specified the size was automatically determined for you. Alternately you can specify the size:

    char[,] alphaUpperAndLower = new int[6,2]{ { 'A', 'a' }, { 'B', 'b' }, { 'C', 'c' }, { 'D', 'd' }, { 'E', 'e' }, { 'F', 'f' } };

The first digit inside the brackets, 6, indicates  the number of groups. The second digit, 2, indicates the number of items in the group.

You can now access any of the numbers using the following syntax.

    char val = alphaUpperAndLower[0,0];

The above will return the first item in the first pair, which is ‘A’. Or to get the second item in the last pair do this:

    char val = alphaUpperAndLower[5,1];

However, because this is a multi-dimensional array, you cannot access the character pairs as an array. The following is NOT allowed.

    char[] pair = alphaUpperAndLower[0];

That gives you a compile error. That is because the number pairs are not really stored in memory as C# array objects.

Three-dimensional array examples

We have already shown you some two-dimensional examples, now here are some three-dimensional examples.

Note: Of course, there is no limit to the number of dimensions you can create, but each dimension becomes exponentially more complex.

Example 4 – A three-dimensional array of numbers

Imagine you have the following groups of number groups, where the number groups are always three numbers, and there are always three groups.

{ 10, 11, 12 }, { 20, 21, 22 }, { 30, 31, 32 },

{ 40, 41, 42 }, { 50, 51, 52 } , { 60, 61, 62 },

{70, 71, 72 }, { 80, 81, 82 }, { 90, 91, 92 }

So if two-dimensional was displayed as a grid, you can assume that three-dimensional is displays similar to a cube. We have 3 groups of three groups of three numbers or 3x3x3, which is a cube.

You would code this as follows:

int[, ,] cube = new int[,,] { { { 10, 11, 12 }, { 20, 21, 22 }, { 30, 31, 32 } },
                              { { 40, 41, 42 }, { 50, 51, 52 }, { 60, 61, 62 } },
                              { { 70, 71, 72 }, { 80, 81, 82 }, { 90, 91, 92 } } };

Since no size was specified the size was automatically determined for you. Alternately you can specify the size:

int[, ,] cube = new int[3,3,3] { { { 10, 11, 12 }, { 20, 21, 22 }, { 30, 31, 32 } },
                                 { { 40, 41, 42 }, { 50, 51, 52 }, { 60, 61, 62 } },
                                 { { 70, 71, 72 }, { 80, 81, 82 }, { 90, 91, 92 } } };

The first digit inside the brackets, 3, indicates  the number of groups of groups. The second digit, 2, indicates the number of groups of numbers, and the third digit indicates the count of numbers in the group.

You can now access any of the numbers using the following syntax.

    int val = cube[0,0,0];

The above will return the first item in the first pair, which is 10. Or to get the last number in the last group of number in the last group of groups do this:

    int val = cube[2,2,2];

However, because this is a multi-dimensional array, you cannot access the number groups or the groups of groups as arrays. The following two statements are NOT allowed.

    int[] singleD = cube[0,0];
    int[] twoD = cube[0,0];

That gives you a compile error. That is because the number pairs are not really stored in memory as C# array objects.

Jagged Array in C#

A jagged array is an array of variable-sized arrays.  For example, imagine you have the following arrays of numbers and you want an array of these arrays.

{ 10, 11, 12 }, { 20, 21, 22, 23, 24 }, { 30, 31 }, { 40, 41, 42, 43, 44, 45 }, { 50, 51, 52 }

This is often depicted as follows:

10 11 12
20 21 22 23 24
30 31
40 41 42 43 44 45
50 51 52

You would code this as follows:

    int[][] jagged = new int[][] { new int[]{ 10, 11, 12 }, new int[]{ 20, 21, 22, 23, 24 },
                                   new int[]{ 30, 31 }, new int[]{ 40, 41, 42, 43, 44, 45 },
                                   new int[]{ 50, 51, 52 } };

Notice that you have to actually instantiate each individual array inside the jagged array.

You can now access any of the numbers using the following syntax.

    int val = jagged[0][0];

The above will return the first item in the first pair, which is 10. Or to get the last number in the last group of number in the last group of groups do this:

    int val = jagged[4][2];

And because this is an array of arrays, you CAN access the internal groups as arrays. The following statement is VALID.

    int[] array1 = jagged[0];

Other tutorials


How to make the WPF Canvas mouse click event work?

The problem with Canvas is that when you click on it, you don’t actually get the click event to occur unless you have a background that is not white.

One trick if you want white is to use white -1 or #FFFFFE or possibly Transparent (unless the parent is not white). So no one can tell it isn’t white, because it is as close to white as can be without actually being white.

Now your click event can occur.

Also you need to make the Canvas focusable.

Example 1 – Getting a Canvas to take keyboard focus from a TextBox with a mouse click

Here is how you make this happen.

  1. First create a new WPF Project.
  2. Add a Canvas and clear the any sizing.
  3. Change the Canvas Background to #FFFFFE.
  4. Set the Canvas to be Focusable.
  5. Add a TextBox in the Canvas.
  6. Create a mouse down event for the Canvas.

MainWindow.xaml

<Window x:Class="TextBoxInCanvas.MainWindow"
 xmlns="http://schemas.microsoft.com/winfx/2006/xaml/presentation"
 xmlns:x="http://schemas.microsoft.com/winfx/2006/xaml"
        Title="MainWindow" Height="350" Width="525">
    <Grid Name="MainGrid">
 <canvas name="<span class=" span="" class="hiddenSpellError" pre="class ">hiddenspellerror="" pre="">canvas1" Focusable="True" Background="#FFFFFE" MouseDown="canvas1_MouseDown"></canvas>
 <TextBox Height="23" Name="textBox1" Width="120" IsEnabled="True" Canvas.Left="81" Canvas.Top="115"
                     PreviewKeyDown="textBox1_PreviewKeyDown"/>
        </Canvas>
    </Grid>
</Window>

MainWindow.xaml.cs

using System.Windows;
using System.Windows.Input;
namespace TextBoxInCanvas
{
    /// <summary>
    /// Interaction logic for MainWindow.xaml
    /// </summary>
    public partial class MainWindow : Window
    {
        public MainWindow()
        {
            InitializeComponent();
        }

        private void canvas1_MouseDown(object sender, MouseButtonEventArgs e)
        {
            Keyboard.Focus(canvas1);
        }

        private void textBox1_PreviewKeyDown(object sender, KeyEventArgs e)
        {
            if (Key.Enter == e.Key)
                Keyboard.Focus(canvas1);
        }
    }
}

Now your click event occurs when the Canvas is clicked and keyboard focus is taken from the TextBox.

C# is

C# is

…a higher level programming language.

…a developer friendly language.

…your garbage man, because it cleans up your garbage for you.

…a cross-platform language that can run anywhere the framework exists…use Mono for non-windows platforms.

…the development language of business.

…the fastest growing development language.

…an object-oriented programming language.

…the most popular language for interacting with .NET Framework.

A Hello World Android App in C#

This post is a continuation of Writing Android apps in C# using MonoDroid.

Writing your first MonoDroid project

Now that you have installed and configured MonoDroid and its prerequisites, you are ready to create your first project.

  1. Open Visual Studio.
  2. Go to File | New | Project.
  3. Choose “Mono for Android”. This is a new project type added by the Mono for Android Visual Studio 2010 Plugin.
  4. Give the project a name and click OK.

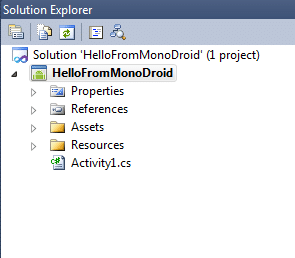
You now have a sample MonoDroid app.

Running your first MonoDroid App in an Emulator

Now that you have a sample MonoDroid app, learning to deploy it to an Android device and to test it is the next step.

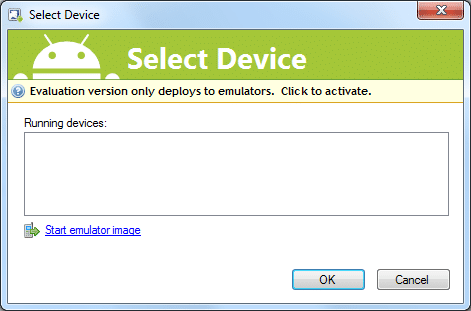
  1. Simply press F5 in your “Mono for Android” Visual Studio project. The following screen appears however, there are no running Android devices.
  2. Click the link to “Start emulator image”.
  3. Wait until your Android emulator starts and you see the graphical display and not just a text display.
  4. Select your emulator from the Running Devices list and click OK.
  5. Wait. It is going to deploy the mono library to your emulator and deploy your app and this can take time.

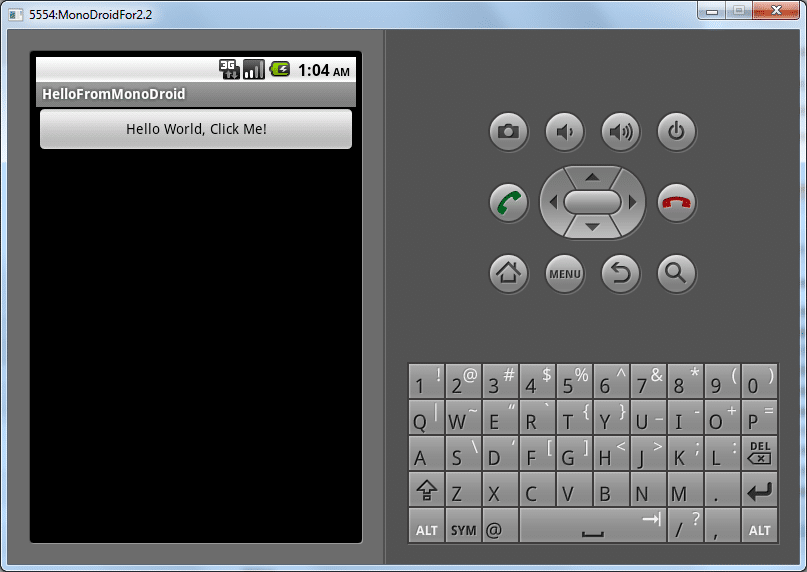
You application should now be running in your Android emulator.

This is just a sample application that increments a counter and displays how many times you have click the button.

You are now ready to start writing your own application.

More Tutorials

Xamarin has multiple Tutorials to help you get a little further along.

MonoDroid Tutororials by Xamarin

Writing Android apps in C# using MonoDroid

As C# developers, many of us would prefer to write Android Apps in C# as well. Novell had promised us MonoDroid, but we were quite concerned as to whether MonoDroid would ever be released when Novell was dismantled.

However, Xamarin spawned from the ashes like a phoenix to restore the viability of MonoDroid, restoring our hopes to writing in C# for the Android platform.

Though I am hopeful that MonoDroid will become popular allowing C# to be a commonly used language for Android devices, there is still some question as to whether Xamarin and its MonoDroid product will survive.

Xamarin is a new company and needs to survive first. Its business is to sell MonoDroid, which is not open source, but is a proprietary product. Unfortunately, MonoDroid may cost too much, preventing adoption among app developers. Xamarin requires a customer base and a continual adoption rate if it is going to survive. If the company folds, what is going to happen to the library and the apps that use it?

Is Development with MonoDroid Free? Yes and No!

Yes and no.

Yes because anybody can use and develop with MonoDroid at no cost. It isn’t until you need to publish an app to the app store that you need to buy a license. You can use the MonoDroid trial for as long as you want. Here is a quote from the trial website. [2]

The evaluation version of Mono for Android does not expire, but enables development and testing against the Android Emulator only.

No, because you need to buy a license once either of the following become true:

  1. You need to test your code directly on a real device and not just an emulated device
  2. You are ready to publish an app to the app store

So what is the cost of MonoDroid? Depends on if you buy Professional, Enterprise, or Enterprise Priority. On the Xamarin store, the following table can be found. To see it you have to add MonoDroid to your cart and then click the “Show product comparison” link. [1]

Professional Enterprise Enterprise Priority
Deploy to your devices Has this feature Has this feature Has this feature
Publish to app stores Has this feature Has this feature Has this feature
Enterprise distribution Has this feature Has this feature
Priority support queue Has this feature
Guaranteed response time Has this feature
License expiration Never Never Never
Update subscription 1 Year 1 Year 1 Year
License usage Original User Seat Seat
Price (USD) $399 $999 $2,499

These costs are very low for business or enterprise customers who have C# developers and want to write Android apps.  The cost of training a C# developer to develop apps for Android in Java may be far greater than training them to develop apps for Android using C# and buying a MonoDroid license.

Is MonoDroid easy to set up?

Update
MonoDroid is not down to a one-click installer.

Here is the old method of Installing without the One-click Installer

MonoDroid is simple to set up.  Xamarin has some simple steps that can be found on their web site. They have MonoDroid installation instructions for installing MonoDroid for use with any of three environments.

  1. Visual Studio  (Important! Visual Studio Express is not supported)
  2. MonoDevelop on Windows
  3. MonoDevelop on Mac OSX

If you don’t have a Visual Studio license and you can’t afford one, then go with MonoDevelop because Visual Studio Express is noted to be enough [3].

However, the Visual Studio install is four simple steps.

  1. Install the Java SDK
  2. Install the Android SDK
  3. Configure your simulator
  4. Install the Mono for Android Visual Studio 2010 Plugin

These are very easy steps to complete, and I won’t repeat the steps here, but once you complete them, you are ready to start writing Android apps in C#.

Once you feel you have everything installed, click the following link to continue reading.

Writing your first MonoDroid project

http://android.xamarin.com/Installation/Windows

In C#, how to determine if a class or an instance of the class implements an interface

I needed to determine if a class or one of its instances implements and interface.  So I created this test project to see if this works.

Turns out it is really easy to do. Here is a test project that I used to learn. Just create a new console project and stick this code in the Program.cs and check it out.

namespace TestIfThisImplementsInterface
{
    class Program
    {
        static void Main(string[] args)
        {
            // Test if the type or its parent implements the interface
            bool bCarClass = typeof(IDrivable).IsAssignableFrom(typeof(Car));             // True
            bool bFordFocusClass = typeof(IDrivable).IsAssignableFrom(typeof(FordFocus)); // True
            bool bJunkerClass = typeof(IDrivable).IsAssignableFrom(typeof(Junker));       // False

            // Test if the exact type and not its parent implements the derived type
            bool bCarClassEx = typeof(Car).GetInterface(typeof(IDrivable).FullName) != null;           // True
            bool bFordFocusClassEx = typeof(Vehicle).GetInterface(typeof(IDrivable).FullName) != null; // False
            bool bJunkerClassEx = typeof(Junker).GetInterface(typeof(IDrivable).FullName) != null;     // True

            // Test if an instance implements or derivces from an oject that implements the interface
            bool bCarInstance = new Car() is IDrivable;             // True
            bool bFordFocusInstance = new FordFocus() is IDrivable; // True
            bool bJunkerInstance = new Junker() is IDrivable;       // False

            // Test if an instance implements or derivces from an oject that implements the interface
            bool bCarInstanceEx = new Car().GetType().GetInterface(typeof(IDrivable).FullName) != null;             // True
            bool bFordFocusInstanceEx = new FordFocus().GetType().GetInterface(typeof(IDrivable).FullName) != null; // False
            bool bJunkerInstanceEx = new Junker().GetType().GetInterface(typeof(IDrivable).FullName) != null;       // False

            // Show that the test can be in the parent class but the actual class is what is tested
            // This is actually what I needed. Glad it worked!
            bool bCarParentFunction = new Car().IsDrivable;             // True
            bool bFordFocusParentFunction = new FordFocus().IsDrivable; // True
            bool bJunkerParentFunction = new Junker().IsDrivable;       // False
        }
    }

    public interface IDrivable
    {
        void Drive();
    }

    public class Vehicle
    {
        public virtual bool IsDrivable
        {
            get { return this is IDrivable; }
        }
    }

    public class Car : Vehicle, IDrivable
    {
        #region IDrivable Members
        public void Drive()
        {
            // Drive code here
        }
        #endregion
    }

    public class FordFocus : Car
    {
    }

    public class Junker : Vehicle
    {

    }
}

Resource:
http://www.hanselman.com/blog/DoesATypeImplementAnInterface.aspx

LANDesk Support Tools vs Windows Side by Side (SXS)

I work for LANDesk, in case you have forgotten, and I have this LANDesk add-on called LANDesk Support Tools.

So I couldn’t figure out why my Send Message command in my LANDesk Support Tools wouldn’t work in 64 bit. It kept saying that msg.exe wasn’t on the remote client. Of course, I checked and it was right there in c:\windows\system32\msg.exe.

However, I was able to spend some more time on this and it turns out that if a 32 bit application (such as the LANDesk agent) goes to work, an executable that only exists in 64 bit form, such as msg.exe, is not exactly “visible” to the 32 bit application.

So I have to call it using c:\windows\sysnative\msg.exe. Now I just have to figure out how best to implement this difference in my LANDesk Support Tools so the command works for both 32 bit and 64 bit versions of Windows 7.