Archive for the ‘WPF’ Category.

WPFSharp: A WPF Searchable TextBlock Control with Highlighting

So I needed a TextBlock that was searchable and from searching online, it seems a lot of people need one too. So I decided to inherit TextBlock and write a SearchableTextBox. It is really easy to use. I wrote the blog post over on my other site:

A WPF Searchable TextBlock Control with Highlighting

WPF Localization at run-time

I needed a better WPF Localization solution and I came up with one and posted it over on my WPF blog.

I would love some feed back, so if you are interested, check it out.

How to change language at run-time in WPF with loadable Resource Dictionaries and DynamicResource Binding (Example 1)

WPF MVVM Tutorial

WPF jobs trend up according to Indeed.com

According to Indeed.com the amount of WPF job trends up rapidly.

Since XAML is going to be used in Windows 8 as well, it is not going away any time in the next decade. Also, declarative UI will improve in the future, not disappear. So there is job security in this.

A snippet for Properties in a ViewModel

If you are using MVVM you probably should create a snippet very similar to the following to save time.

C:\Program Files (x86)\Microsoft Visual Studio 10.0\VC#\Snippets\1033\Visual C#\propvm.snippet

<?xml version="1.0" encoding="utf-8" ?>
<CodeSnippets  xmlns="http://schemas.microsoft.com/VisualStudio/2005/CodeSnippet">
	<CodeSnippet Format="1.0.0">
		<Header>
			<Title>propvm</Title>
			<Shortcut>propvm</Shortcut>
			<Description>Code snippet for property and backing field for a ViewModel that calls NotifyPropertyChanged.</Description>
			<Author>Jared Barneck</Author>
			<SnippetTypes>
				<SnippetType>Expansion</SnippetType>
			</SnippetTypes>
		</Header>
		<Snippet>
			<Declarations>
				<Literal>
					<ID>type</ID>
					<ToolTip>Property type</ToolTip>
					<Default>int</Default>
				</Literal>
				<Literal>
					<ID>property</ID>
					<ToolTip>Property name</ToolTip>
					<Default>MyProperty</Default>
				</Literal>
			</Declarations>
			<Code Language="csharp"><![CDATA[public $type$ $property$
	{
		get { return _$property$;}
		set 
		{ 
			_$property$ = value;
			NotifyPropertyChanged("$property$");
		}
	} private $type$ _$property$;
	$end$]]>
			</Code>
		</Snippet>
	</CodeSnippet>
</CodeSnippets>

WPF Binding to a property of a static class

Binding to a property of a static class is quite straight forward.

The binding string looks like this:

{x:Static s:MyStaticClass.StaticValue2}

For an example do this:

  1. Create a new folder in your project called Statics.
  2. Add the following class to the Statics folder.
    using System;
    
    namespace BindingToStaticClassExample.Statics
    {
        public static class MyStaticClass
        {
            static MyStaticClass()
            {
                Title = "Binding to properties of Static Classes";
                StaticValue1 = "Test 1";
                StaticValue2 = "Test 2";
                StaticValue3 = "Test 3";
            }
    
            public static String Title { get; set; }
            public static String StaticValue1 { get; set; }
            public static String StaticValue2 { get; set; }
            public static String StaticValue3 { get; set; }
        }
    }
    
  3. Add a reference to the BindingToStaticClassExample.Statics namespace. (See line 4.)
  4. Bind the title to the Title string value of MyStaticClass.
  5. Change the <Grid> to a <StackPanel> (not required just for ease of this example).
  6. Add TextBox elements and bind them to the two string values in MyStaticClass object.
    <Window x:Class="BindingToStaticClassExample.MainWindow"
            xmlns="http://schemas.microsoft.com/winfx/2006/xaml/presentation"
            xmlns:x="http://schemas.microsoft.com/winfx/2006/xaml"
            xmlns:s="clr-namespace:BindingToStaticClassExample.Statics"
            Title="{x:Static s:MyStaticClass.Title}" Height="350" Width="525">
        <StackPanel>
            <TextBox Text="{x:Static s:MyStaticClass.StaticValue1}" />
            <TextBox Text="{x:Static s:MyStaticClass.StaticValue2}" />
            <!-- Not supported and won't work
            <TextBox>
                <TextBox.Text>
                    <Binding Source="{x:Static s:MyStaticClass.StaticValue3}" />
                </TextBox.Text>
            </TextBox>
            -->
        </StackPanel>
    </Window>
    

You now know how to bind to properties of a static class.

Data Bound

When you bind a WPF Control’s property to another object, you have data bound that object.

Only Dependency Properties of a WPF Control can be data bound.

For more information go here:

WPF Data Binding Tutorial

TextBox Validation – How to bind to properties of the Validation of a TextBox?

Have you ever wanted to have a TextBox that requires data or specifically formatted data and you want to enforce this validation and display this to the user.

Well, I figured this out, with a great deal of pain, but hey, it works.

You can download this project in it’s entirety here:

WpfTextBoxValidation.zip

I started with a new WPF Project in Visual Studio. Here is a general overview of the steps I took to make this example project happen.

MainWindow.xaml

  1. Here, create a simple form to fill out using TextBlock and TextBox pairs in a Grid.
  2. Configure the TextBox elements to use binding.
  3. Configure the TextBox elements to use the appropriate Validation. (See the validation examples we will create below.)
  4. Below the form you created in a StackPanel, add some TextBlock elements to display the Validation’s ErrorConent.
  5. Bind each TextBlock element to the TextBox in the form they pertain to.
  6. Bind the Visibility of each TextBlock to the Errors. (We will use the converter below to return Visible if there is ErrorContent and Collapsed if not.)
<Window x:Class="WpfTextBoxValidation.MainWindow"
        xmlns="http://schemas.microsoft.com/winfx/2006/xaml/presentation"
        xmlns:x="http://schemas.microsoft.com/winfx/2006/xaml"
        xmlns:local="clr-namespace:WpfTextBoxValidation"
        Title="MainWindow" Height="350" Width="525">
    <Grid Name="MainGrid">
        <Grid.Resources>
            <Style TargetType="TextBox">
                <Setter Property="MaxWidth" Value="200" />
            </Style>
        </Grid.Resources>
        <Grid.ColumnDefinitions>
            <ColumnDefinition Width="Auto" />
            <ColumnDefinition Width="Auto" MinWidth="200" />
        </Grid.ColumnDefinitions>
        <Grid.RowDefinitions>
            <RowDefinition Height="Auto" />
            <RowDefinition Height="Auto" />
            <RowDefinition Height="Auto" />
            <RowDefinition Height="Auto" />
            <RowDefinition Height="Auto" />
            <RowDefinition Height="*" />
        </Grid.RowDefinitions>

        <!-- Labels -->
        <TextBlock Text="FirstName" />
        <TextBlock Text="LastName" Grid.Row="1" />
        <TextBlock Text="Age" Grid.Row="2" />
        <TextBlock Text="Phone" Grid.Row="3" />

        <!-- TextBlocks -->
        <TextBox Name="TextBoxFirstName" Grid.Column="1">
            <TextBox.Text>
                <Binding Path="FirstName" UpdateSourceTrigger="PropertyChanged" >
                    <Binding.ValidationRules>
                        <local:TextBoxNotEmptyValidationRule x:Name="FirstNameValidation" ValidatesOnTargetUpdated="True" 
                                                             Message="You must enter a first name."/>
                    </Binding.ValidationRules>
                </Binding>
            </TextBox.Text>
        </TextBox>
        <TextBox Name="TextBoxLastName" Grid.Row="1" Grid.Column="1">
            <TextBox.Text>
                <Binding Path="LastName" UpdateSourceTrigger="PropertyChanged" >
                    <Binding.ValidationRules>
                        <local:TextBoxNotEmptyValidationRule x:Name="LastNameValidation" ValidatesOnTargetUpdated="True" 
                                                             Message="You must enter a last name."/>
                    </Binding.ValidationRules>
                </Binding>
            </TextBox.Text>
        </TextBox>
        <TextBox Name="TextBoxAge" Grid.Row="2" Grid.Column="1">
            <TextBox.Text>
                <Binding Path="Age" UpdateSourceTrigger="PropertyChanged" >
                    <Binding.ValidationRules>
                        <local:OverThirteenValidationRule x:Name="AgeValidation" ValidatesOnTargetUpdated="True"/>
                    </Binding.ValidationRules>
                </Binding>
            </TextBox.Text>
        </TextBox>
        <TextBox Name="TextBoxPhone" Grid.Row="3" Grid.Column="1">
            <TextBox.Text>
                <Binding Path="Phone" UpdateSourceTrigger="PropertyChanged" >
                    <Binding.ValidationRules>
                        <local:TextBoxNotEmptyValidationRule x:Name="PhoneValidation" ValidatesOnTargetUpdated="True" 
                                                             Message="You must enter a phone number."/>
                    </Binding.ValidationRules>
                </Binding>
            </TextBox.Text>
        </TextBox>

        <!-- Validation List -->
        <StackPanel Grid.Row="4" Grid.ColumnSpan="2">
            <StackPanel.Resources>
                <Style TargetType="TextBlock">
                    <Setter Property="Foreground" Value="Red" />
                </Style>
                <local:ErrorCollectionToVisibility x:Key="ToVisibility" />
            </StackPanel.Resources>
            <TextBlock Visibility="{Binding ElementName=TextBoxFirstName, Path=(Validation.Errors), Converter={StaticResource ToVisibility}}">
                <TextBlock.Text>
                    <MultiBinding StringFormat="FirstName - {0}">
                        <Binding ElementName="TextBoxFirstName" Path="(Validation.Errors)[0].ErrorContent"/>
                    </MultiBinding>
                </TextBlock.Text>
            </TextBlock>
            <TextBlock Visibility="{Binding ElementName=TextBoxLastName, Path=(Validation.Errors), Converter={StaticResource ToVisibility}}">>
                <TextBlock.Text>
                    <MultiBinding StringFormat="LastName - {0}">
                        <Binding ElementName="TextBoxLastName" Path="(Validation.Errors)[0].ErrorContent"/>
                    </MultiBinding>
                </TextBlock.Text>
            </TextBlock>
            <TextBlock Visibility="{Binding ElementName=TextBoxAge, Path=(Validation.Errors), Converter={StaticResource ToVisibility}}">>
                <TextBlock.Text>
                    <MultiBinding StringFormat="Age - {0}">
                        <Binding ElementName="TextBoxAge" Path="(Validation.Errors)[0].ErrorContent"/>
                    </MultiBinding>
                </TextBlock.Text>
            </TextBlock>
            <TextBlock Visibility="{Binding ElementName=TextBoxPhone, Path=(Validation.Errors), Converter={StaticResource ToVisibility}}">>
                <TextBlock.Text>
                    <MultiBinding StringFormat="Phone - {0}">
                        <Binding ElementName="TextBoxPhone" Path="(Validation.Errors)[0].ErrorContent"/>
                    </MultiBinding>
                </TextBlock.Text>
            </TextBlock>
            <!--Text="{Binding ElementName=DirectoryBox, Path=(Validation.Errors)[0].ErrorContent}"-->
        </StackPanel>
    </Grid>
</Window>

MainWindow.xaml.cs

To this file we add a Person class and then create and instance of it and set it the instance as the DataContext.

using System;
using System.Windows;
using System.ComponentModel;

namespace WpfTextBoxValidation
{
    /// <summary>
    /// Interaction logic for MainWindow.xaml
    /// </summary>
    public partial class MainWindow : Window
    {
        public MainWindow()
        {
            InitializeComponent();
            Person p = new Person();
            MainGrid.DataContext = p;
        }
    }

    public class Person
    {
        public String FirstName { get; set; }
        public String LastName { get; set; }
        public int Age { get; set; }
        public String Phone { get; set; }
    }
}

ErrorCollectionToVisibility.cs

This class is used to convert the Validation.Error collection to a Visibility.

There is a property Validation.HasError but for some reason it is not available to bind to. If it were, I would bind to it and use the built-in BooleanToVisibility converter. But since, I can’t, I used this ErrorCollectionToVisibility converter which simply returns Visible if there is at least one item in the collection or Collapse if the Collection is null or empty.

using System;
using System.Collections.ObjectModel;
using System.Windows;
using System.Windows.Controls;
using System.Windows.Data;

namespace WpfTextBoxValidation
{
    class ErrorCollectionToVisibility : IValueConverter
    {
        public object Convert(object value, Type targetType, object parameter, System.Globalization.CultureInfo culture)
        {
            ReadOnlyCollection<ValidationError> collection = value as ReadOnlyCollection<ValidationError>;
            if (collection != null && collection.Count > 0)
                return Visibility.Visible;
            else
                return Visibility.Collapsed;
        }

        public object ConvertBack(object value, Type targetType, object parameter, System.Globalization.CultureInfo culture)
        {
            return new object();
        }
    }
}

OverThirteenValidationRule.cs

Here we check if the value is greater than 13 and if not, we return the false ValidationResult.

using System;
using System.Windows.Controls;

namespace WpfTextBoxValidation
{
    public class OverThirteenValidationRule : ValidationRule
    {
        public override ValidationResult Validate(object value, System.Globalization.CultureInfo cultureInfo)
        {
            if (value != null)
            {
                int age = 0;
                try
                {
                    age = Convert.ToInt32(value);
                }
                catch
                {
                    return new ValidationResult(false, "You must be older than 13!");
                }

                if (age > 13)
                    return ValidationResult.ValidResult;

            }
            return new ValidationResult(false, "You must be older than 13!");
        }
    }
}

TextBoxNotEmptyValidationRule.cs

This validation just makes sure there is at least one character in a TextBlock.

using System;
using System.Windows.Controls;

namespace WpfTextBoxValidation
{
    public class TextBoxNotEmptyValidationRule : ValidationRule
    {
        public override ValidationResult Validate(object value, System.Globalization.CultureInfo cultureInfo)
        {
            string str = value as string;
            if (str != null)
            {
                if (str.Length > 0)
                    return ValidationResult.ValidResult;
            }
            return new ValidationResult(false, Message);
        }

        public String Message { get; set; }
    }
}

You have now learned to bind to Validation.ErrorContent.


How to make the WPF Canvas mouse click event work?

The problem with Canvas is that when you click on it, you don’t actually get the click event to occur unless you have a background that is not white.

One trick if you want white is to use white -1 or #FFFFFE or possibly Transparent (unless the parent is not white). So no one can tell it isn’t white, because it is as close to white as can be without actually being white.

Now your click event can occur.

Also you need to make the Canvas focusable.

Example 1 – Getting a Canvas to take keyboard focus from a TextBox with a mouse click

Here is how you make this happen.

  1. First create a new WPF Project.
  2. Add a Canvas and clear the any sizing.
  3. Change the Canvas Background to #FFFFFE.
  4. Set the Canvas to be Focusable.
  5. Add a TextBox in the Canvas.
  6. Create a mouse down event for the Canvas.

MainWindow.xaml

<Window x:Class="TextBoxInCanvas.MainWindow"
 xmlns="http://schemas.microsoft.com/winfx/2006/xaml/presentation"
 xmlns:x="http://schemas.microsoft.com/winfx/2006/xaml"
        Title="MainWindow" Height="350" Width="525">
    <Grid Name="MainGrid">
 <canvas name="<span class=" span="" class="hiddenSpellError" pre="class ">hiddenspellerror="" pre="">canvas1" Focusable="True" Background="#FFFFFE" MouseDown="canvas1_MouseDown"></canvas>
 <TextBox Height="23" Name="textBox1" Width="120" IsEnabled="True" Canvas.Left="81" Canvas.Top="115"
                     PreviewKeyDown="textBox1_PreviewKeyDown"/>
        </Canvas>
    </Grid>
</Window>

MainWindow.xaml.cs

using System.Windows;
using System.Windows.Input;
namespace TextBoxInCanvas
{
    /// <summary>
    /// Interaction logic for MainWindow.xaml
    /// </summary>
    public partial class MainWindow : Window
    {
        public MainWindow()
        {
            InitializeComponent();
        }

        private void canvas1_MouseDown(object sender, MouseButtonEventArgs e)
        {
            Keyboard.Focus(canvas1);
        }

        private void textBox1_PreviewKeyDown(object sender, KeyEventArgs e)
        {
            if (Key.Enter == e.Key)
                Keyboard.Focus(canvas1);
        }
    }
}

Now your click event occurs when the Canvas is clicked and keyboard focus is taken from the TextBox.

Loading rich text file links in a browser from a WPF Navigation Application

Previously, I discussed loading a rich text file in a regular WPF Application in this post.
Loading a RichTextBox from an RTF file using binding or a RichTextFile control

UPDATE: If you use the new version of RichTextFile located at this link, then you don’t even need to do this.

The following use cases must be met:

  1. Load and display a rich text file in read only mode
  2. The links must open inside a browser and not in the application

We created a RichTextFile control that inherits RichTextBox and configured it to support binding. Now we are going to use this same object in a WPF Navigation Application.

A WPF Navigation Application is going to react differently. Links are going work by default, so the Hyperlink.Click event doesn’t have to be used. However, there is a problem, the links open in the actual application’s window and not in a browser. Lets fix this.

Part 2 – Using the RichTextFile class in a WPF Navigation Application

Use Case 1 – Loading a rich text file

Create a new WPF Application in Visual Studio.

Add a Frame element and set the source to RTF.xaml, which we will create next.

<Window x:Class="RichTextFileTest.MainWindow"
        xmlns="http://schemas.microsoft.com/winfx/2006/xaml/presentation"
        xmlns:x="http://schemas.microsoft.com/winfx/2006/xaml"
        Title="MainWindow" Height="350" Width="525">
    <Grid>
        <Frame Source="RTF.xaml" />
    </Grid>
</Window>

There is no code behind for this, yet.

Create a new WPF Page called RTF.xaml.

Add the above RichTextFile object to the project.

Add an xmlns reference to our new object. Then add our new object. Notice in our new object that we set IsReadOnly=”True” but we also set IsDocumentEnabled=”True”. This allows for clicking a link even though the document is read only.

<Page x:Class="RichTextFileTest.RTF"
      xmlns="http://schemas.microsoft.com/winfx/2006/xaml/presentation"
      xmlns:x="http://schemas.microsoft.com/winfx/2006/xaml"
      xmlns:mc="http://schemas.openxmlformats.org/markup-compatibility/2006" 
      xmlns:d="http://schemas.microsoft.com/expression/blend/2008" 
      mc:Ignorable="d" 
      d:DesignHeight="300" d:DesignWidth="300"
      Title="RTF"
      xmlns:controls="clr-namespace:System.Windows.Controls">
    <Grid>
        <controls:RichTextFile File="{Binding File}" IsReadOnly="True" IsDocumentEnabled="True"/>
    </Grid>
</Page>

Code Behind

using System;
using System.Diagnostics;
using System.Windows;
using System.Windows.Controls;
using System.Windows.Documents;

namespace RichTextFileTest
{
    /// <summary>
    /// Interaction logic for RTF.xaml
    /// </summary>
    public partial class RTF : Page
    {
        public RTF()
        {
            InitializeComponent();
            Example example = new Example() { File = "File.rtf" };
            DataContext = example;
        }
    }

    public class Example
    {
        public String File { get; set; }
    }
}

Now the first use case is complete, the rich text file is loading into the RichTextFile control and is visible in the application. However, the second use case is incomplete, but not because the links aren’t loading, but because they are not loading in a browser. Instead they are loading inside the Frame element.

Use Case 2 – Getting the links to open in a browser

Getting the links to open in a browser is not straight forward and it took me quite some time to find an easy solution. Somehow, the link must be open in a browser and then the Navigation event must be canceled.

The easiest way to do this is to implement the Nagivating function on the Frame element in our MainWindow.

<Window x:Class="RichTextFileTest.MainWindow"
        xmlns="http://schemas.microsoft.com/winfx/2006/xaml/presentation"
        xmlns:x="http://schemas.microsoft.com/winfx/2006/xaml"
        Title="MainWindow" Height="350" Width="525">
    <Grid>
        <Frame Source="RTF.xaml" Navigating="Frame_Navigating"/>
    </Grid>
</Window>

Now implement the code behind for the Frame_Navigating method.

using System.Diagnostics;
using System.Windows;
using System.Windows.Controls;

namespace RichTextFileTest
{
    /// <summary> 
    /// Interaction logic for MainWindow.xaml
    /// </summary>
    public partial class MainWindow : Window
    {
        public MainWindow()
        {
            InitializeComponent();
        }

        private void Frame_Navigating(object sender, System.Windows.Navigation.NavigatingCancelEventArgs e)
        {
            Frame frame = sender as Frame;
            if (frame != null && frame.Source != null)
            {
                // See if we are hitting a link using HTTP or HTTPS
                if (frame.Source.ToString().StartsWith("http://", System.StringComparison.CurrentCultureIgnoreCase)
                    || frame.Source.ToString().StartsWith("https://", System.StringComparison.CurrentCultureIgnoreCase))
                {
                    // Open the URL in a browser
                    Process.Start(frame.Source.ToString());

                    // Cancel the Navigation event
                    e.Cancel = true;
                }
            }
        }
    }
}

The links should now be opening in your browser and not in your application.

Here is the sample project that demonstrates this.
RichTextFileNavigation.zip

Loading a RichTextBox from an RTF file using binding or a RichTextFile control

Sometimes you have a rich text document that exists as an actual file and you simply want to load the file and display it.

My exact use cases are these:

  1. Load and display a rich text file in read only mode
  2. The links must open inside a browser and not in the application

I like to use MVVM, so my goal is to use binding to pass in the file name. Unfortunately the RichTextBox class is not designed to bind to a file name. However, extending this control to have this functionality is quite easy.

RichTextFile extending RichTextBox

Here is my new class. I have extended RichTextBox with four additional items in a new derived class called RichTextFile.

  1. Added a String Property called File.
  2. Added a DependecyProperty called FileProperty
  3. Added a PropertyChangedCallback function called OnFileChanged
  4. Added a ReadFile function that reads a .rtf file into a FlowDocument
  5. Added a Constructor that adds a handler for the Hyperlink.RequestNavigateEvent.
  6. Added a Property called OpenLinksInBrowser.
using System.Diagnostics;
using System.IO;
using System.Windows.Documents;

namespace System.Windows.Controls
{
    internal class RichTextFile : RichTextBox
    {

        public RichTextFile()
        {
            AddHandler(Hyperlink.RequestNavigateEvent, new RoutedEventHandler(HandleHyperlinkClick));
        }

        private void HandleHyperlinkClick(object inSender, RoutedEventArgs inArgs)
        {
            if (OpenLinksInBrowser)
            {
                Hyperlink link = inArgs.Source as Hyperlink;
                if (link != null)
                {
                    Process.Start(link.NavigateUri.ToString());
                    inArgs.Handled = true;
                }
            }
        }

        #region Properties
        public bool OpenLinksInBrowser { get; set; }

        public String File
        {
            get { return (String)GetValue(FileProperty); }
            set { SetValue(FileProperty, value); }
        }

        public static DependencyProperty FileProperty =
            DependencyProperty.Register("File", typeof(String), typeof(RichTextFile),
            new PropertyMetadata(OnFileChanged));

        private static void OnFileChanged(DependencyObject d, DependencyPropertyChangedEventArgs e)
        {
            RichTextFile rtf = d as RichTextFile;
            if (rtf == null)
                return;

            ReadFile(rtf.File, rtf.Document);
        }
        #endregion

        #region Functions
        private static void ReadFile(string inFilename, FlowDocument inFlowDocument)
        {
            if (System.IO.File.Exists(inFilename))
            {
                TextRange range = new TextRange(inFlowDocument.ContentStart, inFlowDocument.ContentEnd);
                FileStream fStream = new FileStream(inFilename, FileMode.Open, FileAccess.Read, FileShare.Read);

                range.Load(fStream, DataFormats.Rtf);
                fStream.Close();
            }
        }
        #endregion
    }
}

You can use this new object to load a .rtf file quite easily. I am going to show you how I am succeeding in my two use cases using both a regular WPF Application and a WPF Navigation Application.

Part 1 – Using the RichTextFile class in a WPF Application

Use Case 1 – Loading a rich text file

Create a new WPF Application in Visual Studio.

Add the above RichTextFile object to the project.

Add an xmlns reference to our new object. Then add our new object. Notice in our new object that we set IsReadOnly=”True” but we also set IsDocumentEnabled=”True”. This allows for clicking a link even though the document is read only.

<Window x:Class="RichTextFileTest.MainWindow"
        xmlns="http://schemas.microsoft.com/winfx/2006/xaml/presentation"
        xmlns:x="http://schemas.microsoft.com/winfx/2006/xaml"
        Title="MainWindow" Height="350" Width="525"
        xmlns:controls="clr-namespace:System.Windows.Controls">
    <Grid>
        <controls:RichTextFile File="{Binding File}" IsReadOnly="True" IsDocumentEnabled="True" />
    </Grid>
</Window>

Code Behind

using System;
using System.Diagnostics;
using System.Windows;
using System.Windows.Documents;

namespace RichTextFileTest
{
    /// <summary>
    /// Interaction logic for MainWindow.xaml
    /// </summary>
    public partial class MainWindow : Window
    {
        public MainWindow()
        {
            InitializeComponent();
            Example example = new Example() { File = "File.rtf" };
            DataContext = example;
        }
    }

    public class Example
    {
        public String File { get; set; }
    }
}

Now the first use case is complete, the rich text file is loading into the RichTextFile control and is visible in the application. However, the second use case is incomplete as clicking the link does nothing.

Use Case 2 – Getting the links to open in a browser

The links can easily made to open in a browser now by simply setting OpenLinksInBrowser=”True” on the RichTextFile object.

<Window x:Class="RichTextFileTest.MainWindow"
        xmlns="http://schemas.microsoft.com/winfx/2006/xaml/presentation"
        xmlns:x="http://schemas.microsoft.com/winfx/2006/xaml"
        Title="MainWindow" Height="350" Width="525"
        xmlns:controls="clr-namespace:System.Windows.Controls">
    <Grid>
        <controls:RichTextFile File="{Binding File}" IsEnabled="True" IsReadOnly="True" IsDocumentEnabled="True" OpenLinksInBrowser="True"/>
    </Grid>
</Window>

The links should now be opening in your browser.

Here is the sample project that demonstrates this.
RichTextFileTest.zip

Part 2 – Using the RichTextFile class in a WPF Navigation Application

How to have the TextBlock in a left column of a Grid in a ListView Template expand or shrink with text wrapping?

Ok, lets say you want to have a Grid where each item is a row of data in a Grid. The left most column should expand or shrink, and yes the text should wrap when it shrinks.

Not so easy…but it can be done if you use the right tools.

  • Use a DockPanel not a Grid
  • Make the left most column the last one added
<Window x:Class="ListBoxWithWrap.MainWindow"
        xmlns="http://schemas.microsoft.com/winfx/2006/xaml/presentation"
        xmlns:x="http://schemas.microsoft.com/winfx/2006/xaml"
        Title="MainWindow"
        mc:Ignorable="d" xmlns:d="http://schemas.microsoft.com/expression/blend/2008"
        xmlns:mc="http://schemas.openxmlformats.org/markup-compatibility/2006"
        d:DesignHeight="242"
        d:DesignWidth="388"
        >
    <Grid>
        <DockPanel Name="MainGrid" HorizontalAlignment="Stretch">
            <!-- These four blocks will have other content eventually, but only need to be 45 wide -->
            <TextBlock Text="X" Grid.Column="1" HorizontalAlignment="Center" Width="45" DockPanel.Dock="Right"/>
            <TextBlock Text="X" Grid.Column="2" HorizontalAlignment="Center" Width="45" DockPanel.Dock="Right"/>
            <TextBlock Text="X" Grid.Column="3" HorizontalAlignment="Center" Width="45" DockPanel.Dock="Right"/>
            <TextBlock Text="X" Grid.Column="4" HorizontalAlignment="Center" Width="45" DockPanel.Dock="Right"/>
            <!-- This is the TextBlock that needs to wrap its content (and
                             change the height of the row (so the full content is still
                             visible) to whatever the available space is, but should not
                             make overall ListView wider than the parent's width. -->
            <TextBlock Text="A very long string that should wrap when the window is small." Padding="20,6,6,6" TextWrapping="Wrap" DockPanel.Dock="Right"/>
        </DockPanel>
    </Grid>
</Window>

You will see that this works as you desire.

Now put this in a ListView’s Template and set it to use Binding.

<Window x:Class="ListBoxWithWrap.MainWindow"
        xmlns="http://schemas.microsoft.com/winfx/2006/xaml/presentation"
        xmlns:x="http://schemas.microsoft.com/winfx/2006/xaml"
        Title="MainWindow"
        mc:Ignorable="d"
        xmlns:d="http://schemas.microsoft.com/expression/blend/2008"
        xmlns:mc="http://schemas.openxmlformats.org/markup-compatibility/2006"
        d:DesignHeight="242"
        d:DesignWidth="388"
        SizeToContent="WidthAndHeight">
    <Grid>
        <ListView Name="lvWrap" ItemsSource="{Binding}">
            <ListView.ItemTemplate>
                <DataTemplate>
                    <DockPanel Name="MainGrid" HorizontalAlignment="Stretch">
                        <!-- These four blocks will have other content eventually, but only need to be 45 wide -->
                        <TextBlock Text="X" Grid.Column="1" HorizontalAlignment="Center" Width="45" DockPanel.Dock="Right"/>
                        <TextBlock Text="X" Grid.Column="2" HorizontalAlignment="Center" Width="45" DockPanel.Dock="Right"/>
                        <TextBlock Text="X" Grid.Column="3" HorizontalAlignment="Center" Width="45" DockPanel.Dock="Right"/>
                        <TextBlock Text="X" Grid.Column="4" HorizontalAlignment="Center" Width="45" DockPanel.Dock="Right"/>
                        <!-- This is the TextBlock that needs to wrap its content (and
                             change the height of the row (so the full content is still
                             visible) to whatever the available space is, but should not
                             make overall ListView wider than the parent's width. -->
                        <TextBlock Text="{Binding Content}" Padding="20,6,6,6" TextWrapping="Wrap" DockPanel.Dock="Right"/>
                    </DockPanel>
                </DataTemplate>
            </ListView.ItemTemplate>
        </ListView>
    </Grid>
</Window>

Now give it some data to bind to.

using System.Collections.Generic;
using System.Windows;
using System.Windows.Documents;

namespace ListBoxWithWrap
{
    /// <summary>
    /// Interaction logic for MainWindow.xaml
    /// </summary>
    public partial class MainWindow : Window
    {
        public MainWindow()
        {
            InitializeComponent();

            List<SomeItem> list = new List<SomeItem>();
            list.Add(new SomeItem() { Content = "Some very long string with so many words there should be some wrapping going on to prevent a line of text that is too long" });
            list.Add(new SomeItem() { Content = "Some very long string with so many words there should be some wrapping going on to prevent a line of text that is too long" });
            list.Add(new SomeItem() { Content = "Some very long string with so many words there should be some wrapping going on to prevent a line of text that is too long" });
            list.Add(new SomeItem() { Content = "Some very long string with so many words there should be some wrapping going on to prevent a line of text that is too long" });
            list.Add(new SomeItem() { Content = "Some very long string with so many words there should be some wrapping going on to prevent a line of text that is too long" });

            lvWrap.DataContext = list;
        }

        public class SomeItem
        {
            public string Content { get; set; }
        }
    }
}

The shrink with text wrapping no longer works once inside of the ListView. So that tells you that something to do with the ListView is breaking the feature you want.

Here is how you fix this:

1. Open your project in Expression Blend. (If you don’t have Expression Blend, maybe just look at my code below and copy it)

2. Right-Click on the ListView in the Object and Timeline tab and choose Edit Template | Edit a Copy.

3. Click OK on the next Window.

This will create the following resource code.

<Window.Resources>
		<SolidColorBrush x:Key="ListBorder" Color="#828790"/>
		<Style x:Key="ListViewStyle1" TargetType="{x:Type ListView}">
			<Setter Property="Background" Value="{DynamicResource {x:Static SystemColors.WindowBrushKey}}"/>
			<Setter Property="BorderBrush" Value="{StaticResource ListBorder}"/>
			<Setter Property="BorderThickness" Value="1"/>
			<Setter Property="Foreground" Value="{DynamicResource {x:Static SystemColors.ControlTextBrushKey}}"/>
			<Setter Property="ScrollViewer.HorizontalScrollBarVisibility" Value="Auto"/>
			<Setter Property="ScrollViewer.VerticalScrollBarVisibility" Value="Auto"/>
			<Setter Property="ScrollViewer.CanContentScroll" Value="true"/>
			<Setter Property="ScrollViewer.PanningMode" Value="Both"/>
			<Setter Property="Stylus.IsFlicksEnabled" Value="False"/>
			<Setter Property="VerticalContentAlignment" Value="Center"/>
			<Setter Property="Template">
				<Setter.Value>
					<ControlTemplate TargetType="{x:Type ListView}">
						<Border x:Name="Bd" BorderBrush="{TemplateBinding BorderBrush}" BorderThickness="{TemplateBinding BorderThickness}" Background="{TemplateBinding Background}" Padding="1" SnapsToDevicePixels="true">
							<ScrollViewer Focusable="false" Padding="{TemplateBinding Padding}">
								<ItemsPresenter SnapsToDevicePixels="{TemplateBinding SnapsToDevicePixels}"/>
							</ScrollViewer>
						</Border>
						<ControlTemplate.Triggers>
							<Trigger Property="IsEnabled" Value="false">
								<Setter Property="Background" TargetName="Bd" Value="{DynamicResource {x:Static SystemColors.ControlBrushKey}}"/>
							</Trigger>
							<Trigger Property="IsGrouping" Value="true">
								<Setter Property="ScrollViewer.CanContentScroll" Value="false"/>
							</Trigger>
						</ControlTemplate.Triggers>
					</ControlTemplate>
				</Setter.Value>
			</Setter>
		</Style>
	</Window.Resources>

4. Now look at what is surrounding the ItemPresenter. Yes, you see the ScrollViewer, which is your problem. Delete it.

5. Build you project.

Success! Now your feature to both expand or shrink with text wrapping is back.

Here is the final XAML.

<Window x:Class="ListBoxWithWrap.MainWindow"
        xmlns="http://schemas.microsoft.com/winfx/2006/xaml/presentation"
        xmlns:x="http://schemas.microsoft.com/winfx/2006/xaml"
        Title="MainWindow"
        mc:Ignorable="d"
        xmlns:d="http://schemas.microsoft.com/expression/blend/2008"
        xmlns:mc="http://schemas.openxmlformats.org/markup-compatibility/2006"
        d:DesignHeight="242"
        d:DesignWidth="388"
        SizeToContent="WidthAndHeight">
    <Window.Resources>
        <SolidColorBrush x:Key="ListBorder" Color="#828790"/>
        <Style x:Key="ListViewStyle1" TargetType="{x:Type ListView}">
            <Setter Property="Background" Value="{DynamicResource {x:Static SystemColors.WindowBrushKey}}"/>
            <Setter Property="BorderBrush" Value="{StaticResource ListBorder}"/>
            <Setter Property="BorderThickness" Value="1"/>
            <Setter Property="Foreground" Value="{DynamicResource {x:Static SystemColors.ControlTextBrushKey}}"/>
            <Setter Property="ScrollViewer.HorizontalScrollBarVisibility" Value="Auto"/>
            <Setter Property="ScrollViewer.VerticalScrollBarVisibility" Value="Auto"/>
            <Setter Property="ScrollViewer.CanContentScroll" Value="true"/>
            <Setter Property="ScrollViewer.PanningMode" Value="Both"/>
            <Setter Property="Stylus.IsFlicksEnabled" Value="False"/>
            <Setter Property="VerticalContentAlignment" Value="Center"/>
            <Setter Property="Template">
                <Setter.Value>
                    <ControlTemplate TargetType="{x:Type ListView}">
                        <Border x:Name="Bd" BorderBrush="{TemplateBinding BorderBrush}" BorderThickness="{TemplateBinding BorderThickness}" Background="{TemplateBinding Background}" Padding="1" SnapsToDevicePixels="true">
                            <ItemsPresenter SnapsToDevicePixels="{TemplateBinding SnapsToDevicePixels}"/>
                        </Border>
                        <ControlTemplate.Triggers>
                            <Trigger Property="IsEnabled" Value="false">
                                <Setter Property="Background" TargetName="Bd" Value="{DynamicResource {x:Static SystemColors.ControlBrushKey}}"/>
                            </Trigger>
                            <Trigger Property="IsGrouping" Value="true">
                                <Setter Property="ScrollViewer.CanContentScroll" Value="false"/>
                            </Trigger>
                        </ControlTemplate.Triggers>
                    </ControlTemplate>
                </Setter.Value>
            </Setter>
        </Style>
    </Window.Resources>
    <Grid>
        <ListView Name="lvWrap" ItemsSource="{Binding}" Style="{DynamicResource ListViewStyle1}">
            <ListView.ItemTemplate>
                <DataTemplate>
                    <DockPanel Name="MainGrid" HorizontalAlignment="Stretch">
                        <!-- These four blocks will have other content eventually, but only need to be 45 wide -->
                        <TextBlock Text="X" Grid.Column="1" HorizontalAlignment="Center" Width="45" DockPanel.Dock="Right"/>
                        <TextBlock Text="X" Grid.Column="2" HorizontalAlignment="Center" Width="45" DockPanel.Dock="Right"/>
                        <TextBlock Text="X" Grid.Column="3" HorizontalAlignment="Center" Width="45" DockPanel.Dock="Right"/>
                        <TextBlock Text="X" Grid.Column="4" HorizontalAlignment="Center" Width="45" DockPanel.Dock="Right"/>
                        <!-- This is the TextBlock that needs to wrap its content (and
                             change the height of the row (so the full content is still
                             visible) to whatever the available space is, but should not
                             make overall ListView wider than the parent's width. -->
                        <TextBlock Text="{Binding Content}" Padding="20,6,6,6" TextWrapping="Wrap" DockPanel.Dock="Right"/>
                    </DockPanel>
                </DataTemplate>
            </ListView.ItemTemplate>
        </ListView>
    </Grid>
</Window>

You should now have a little bit more understanding of the ListView template and how to manipulate it, which should translate to other objects in WPF as well.

A quick overview of MVVM

Model View ViewModel (MVVM) is a design pattern based on Model View Controller (MVC) but specifically tailored to Windows Presentation Foundation (WPF).

MVVM is not a framework per se but many frameworks have been created. Here is a list of MVVM Frameworks from Wikipedia.

See the Wikipedia site here: Open Source MVVM Frameworks.

Another blog, has some basic information on many of these here: A quick tour of existing MVVM frameworks

A framework is actually not necessary to implement MVVM and you should seriously consider whether using one is right for your WPF application or not. Many applications do not need much of the features the frameworks provide. However, there are two common classes that all MVVM frameworks contain. These are ViewModelBase and RelayCommand. Though some frameworks may give them different names or implement them slightly differently, they all have these classes. For example, MVVM Foundation names the ViewModelBase differently. It is called ObservableObject, which is more appropriate because it is incorrect to assume that all objects that implement INotifyPropertyChanged are going to be ViewModel objects.

Instead of installing and using an MVVM framework, you could simply include these classes in your application, as these are all you need to implement MVVM.

  • ObservableObject
  • RelayCommand

While these two classes are enough, you may want to investigate how different MVVM Frameworks implement and what else they implement and why. You may find that another feature implemented is exactly what you need in your application and knowing about it could save you time.

A WPF front-end for LDPing

I wrote a front-end to LDPing last week-end. You can check it out here:

LDPing

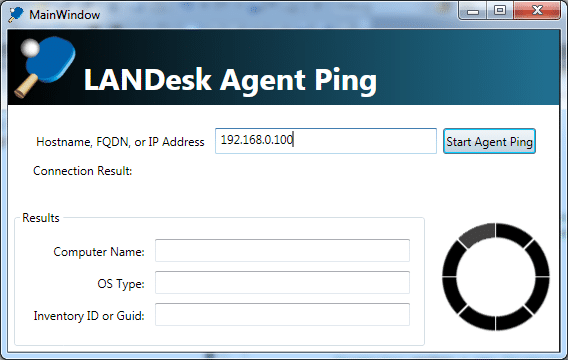
So I was writing a WPF front-end for LDPing, which is a method of querying a LANDesk Agent for its computer name and Inventory Id. There is a button that you click to launch the ping and I couldn’t get the thing to enable…Anyway, I figured it out and posted the resolution here:

Refreshing a button enabled/disabled by RelayCommand.CanExecute()

So here is a screen shot of LDPing.

How to disable row selection in a WPF DataGrid?

Disabling row selection in the WPF DataGrid included in .NET Framework 4 is not really easy. It is extremely difficult to do, unless you have the right tools and know exactly how to do it.

But all the difficulty is in figuring out how to do it. Once you know how to do it, the steps are quite easy to perform.

First, you basically have to use a copy of the default DataGrid style. However, the easiest way to get a copy of the default DataGrid style is using Expression Blend.

Read more one my new WPF Sharp site here:

How to disable row selection in a WPF DataGrid?