Archive for the ‘Visual Studio’ Category.

Configuring Visual Studio to open the browser InPrivate or Incognito

Sometimes, when coding a web application in visual studio, you may want to have the project start in an InPrivate or Incognito window. Browsers, such as Chrome, Edge, Firefox, and others, have a special way to open them that is clean as in no cookies or history or logins and it isn’t tied to your normal browser session. This is called Private browsing. They each brand it a little differently, with Edge being InPrivate and Chrome using Incognito, but they are all private browsing.

Visual Studio can easily be configured to open the browser in private browsing.

Configure Visual Studio to Launch the Browser in Private Mode

  1. Open Visual Studio
  2. Locate your Asp.Net Application and open it
    or
    Create a new Asp.Net Project (you can throw away this project afterward)
  3. Once the project is open, locate the Debug Target icon, which is a green triangle that looks like a start icon:
  4. Click the drop-down arrow just to the right of it.
  5. Select Browse with:
  6. In the Browse With screen, click Add.
  7. Enter one or more of these values: (I entered both)

    Edge
    Program: C:\Program Files (x86)\Microsoft\Edge\Application\msedge.exe
    Arguments: -InPrivate
    Friendly Name: Edge (InPrivate)

    Chrome
    Program: C:\Program Files\Google\Chrome\Application\chrome.exe
    Arguments: -incognito
    Friendly Name: Google Chrome (Incognito)

  8. Click OK.
  9. Now you can change the default if you desire.
    My default was set to Edge.

    To change the default, highlight the desired browser setting and click Set as Default button.
  10. Click Browse and your app will start in debugging and browse to the local url with your configured default browser.

Happy coding!


Excluding Integration and other tests when running Unit Tests locally in Visual Studio

Often, a solution may have both Unit Tests and Integration Tests. Unit Tests should be highly specific, and should be testing one class object. Integration Test could be vastly more complex and could use Selenium, or require a real database server, etc. Even if a solution doesn’t have Integration Tests, it may have slow Unit Tests. For example, I have a test that takes about 2 minutes to run because it is testing that when creating 10 million random strings, the character distribution is pretty equal.

I don’t want to either slow Unit Tests or Integration Tests to run every single time I build on my local dev box. I do have an automated build system and builds kick off on check-in. At that time, these slow tests will run every time. But locally, it is just an unnecessary delay.

Usually I am writing in a specific project and that project has specific tests and I can easily choose to only run tests in my current project. But what if I am updating a library that many projects use. I want to know quickly if anything is broke, so I need to run most of the tests in the entire solution.

Visual Studio allows for tests to be tagged with a TestCategoryAttribute.

You can mark different tests with different names: [TestCategory(“Slow”)], [TestCategory(“Integration”)], [TestCategory(“Performance”)], [TestCategory(“Selenium”)]

Example:

[TestMethod]
[TestCategory("Slow")]
public void TestDistributionInTenMillionCharacters()
{
    // some code here
}

All other tests are left without a test category. Now, if you want to run all tests that aren’t slow, you can do this in Visual Studio Test Explorer by grouping tests using the “Traits” selection option.

Once you have marked all tests with an appropriate TestCategoryAttribute, you can sort by Trait. Now it is simple to click-to-highlight the No Traits group and click Run | Selected Tests.

Cleaning a customer folder in Visual Studio project

I have a Plugins directory in a Visual Studio project. I would like to delete all files from it when I clean.

Here is how I did this:

  1. Edit the .csproj file.
  2. Add the following to the very bottom of the .csproj file, just above the terminating </Project> tag.
      <Target Name="afterClean">
          <ItemGroup>
            <FilesToDelete Include="Plugins\**\*"/>
        </ItemGroup>
        <Delete Files="@(FilesToDelete)" />
      </Target>
    
  3. Save the .csproj file.

That should do it.

Update 12/14/2016:
You should be aware that when doing a custom clean, that in Visual Studio choosing Clean and then Build in two steps is not the same as doing Rebuild.

Clean <-- Cleans all projects Build <-- Builds all projects Rebuild <-- For each project, clean the project, then rebuild the project. So Rebuild is a huge problem and here is why: Since my code is pretty decoupled, my plugins don't reference the project hosting the plugins. So there is not dependency to guarantee the plugin-hosting project cleans and builds first. So when running reubild, a plugin might clean and build and then copy its files to the plugin directory. This could happen before the plugin-hosting project cleans and builds. So you can imagine that once the plugin-hosting project cleans and builds, the newly copied plugin files are cleaned. To fix this, I had to manually add a dependency or just not use Rebuild.

NuGet for Source Using Add As Link (Part 1)

Update: Projects using NuGet for Source with Add as Link. If you have a project using this please comment and let me know.

  1. https://github.com/rhyous/SimpleArgs
  2. https://github.com/rhyous/EasyXml
  3. https://github.com/rhyous/EasyCsv
  4. https://github.com/rhyous/SimplePluginLoader
  5. https://github.com/rhyous/StringLibrary

So I have a project on GitHub called SimpleArgs. This project makes command line arguments easy in a C# project. However, one of the requirements is to have an option to use the SimpleArgs dll or to have a single file executable. Yes, everything in one single exe, so referencing a dll is not an option.

So I created two separate NuGet packages from this project:

  1. SimpleArgs – This NuGet package uses a dll
  2. SimpleArgs.Sources – This NuGet package adds source

I use SimpleArgs.Sources the most. I quickly realized that NuGet for source does not scale. I have a Solution with four different projects where each project is a single file executable. The result was many copies of the SimpleArgs code.

MySolution
    /Packages    &amp;lt;-- Copy of SimpleArgs source
    /SingleExe1  &amp;lt;-- Copy of SimpleArgs source
    /SingleExe2  &amp;lt;-- Copy of SimpleArgs source
    /SingleExe3  &amp;lt;-- Copy of SimpleArgs source
    /SingleExe4  &amp;lt;-- Copy of SimpleArgs source

That is 5 copies of the SimpleArgs source. Now at first, this doesn’t seem to be a big problem, in fact, it seems little more than an annoyance. One of the first changes I made, was to exclude the duplicate copies of source from Git. This helped but not enough. There are still problems that occur with multiple copies of source. For example, I ran into a bug with SimpleArgs. I fixed it, and then some time later I ran into the same bug with another project in the same solution. Oh, yeah. I only fixed the bug in one copy of the SimpleArgs source.

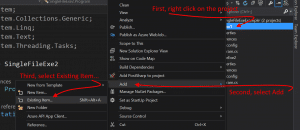
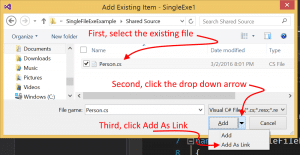
I decided the best solution was to reference the source using Add as link. Add as link is the ability to include a file into your Visual Studio project but without making a copy of the file in your project.

See: How to Add As Link in Visual Studio

I quickly changed the projects so the source was included not as copies but using the Add As Link capability. I manually did this. Then I finally pushed my changes to SimpleArgs Git repository and released a new version of the SimpleArgs.Sources NuGet package. That basically wiped out my manual work to Add As Link.

I needed the NuGet packages include the source using Add As Link for me.

How to create NuGet package using Add As Source

Well, to my dismay, NuGet didn’t have this feature built in. At first I was exciting about the possibility that this feature would be added as part of NuGet 3.3 and the contentFiles feature, but unfortunately, this feature is for Universal Windows projects, and not for Console Application, Windows Forms, or WPF projects.

However, NuGet does run a PowerShell script on install and another on uninstall, called install.psi and uninstall.ps1. It took some work, I even gave up once, but eventually I found the right library and the documentation for it to help me solve this.

Step 1 – Create a NuGet Packager Project in Visual Studio

  1. Open Visual Studio and go to File | New Project.
    Note: Steps 2 thru 7 installs the NuGet Packager project from online. If you have already done this, then you probably can create your project without these steps. 🙂
  2. At the bottom of the list on the right, click Online to expand it.
    Note: For some reason, Visual Studio hung for about ten to twenty seconds when I clicked this.
  3. In the search bar on the top right, enter NuGet.
  4. Select NuGet Packager.
  5. Give your project a Name.
    Note: Mine is named SimpleArgs.Sources.
  6. Give your solution a Name.
  7. Click Ok.
    See steps 2 – 7 in this image:
    NuGet Package Visual Studio Project Template
    When you click OK, the template will install. It will prompt you a few times but once installed, your project will be created.Note: From now on, you can find the NuGet Packager project in Installed | Templates | Visual C# | NuGet.

Step 2 – Fill out the Package.nuspec file metadata

The package.nusepc is an Xml file. It is created as follows:

 
&amp;lt;?xml version=&amp;quot;1.0&amp;quot;?&amp;gt;
&amp;lt;package &amp;gt;
  &amp;lt;metadata&amp;gt;
    &amp;lt;id&amp;gt;SimpleArgs.Sources&amp;lt;/id&amp;gt;
    &amp;lt;version&amp;gt;1.0.0&amp;lt;/version&amp;gt;
    &amp;lt;title&amp;gt;SimpleArgs.Sources&amp;lt;/title&amp;gt;
    &amp;lt;authors&amp;gt;Jjbarneck&amp;lt;/authors&amp;gt;
    &amp;lt;owners&amp;gt;&amp;lt;/owners&amp;gt;
    &amp;lt;description&amp;gt;A long description of the package. This shows up in the right pane of the Add Package Dialog as well as in the Package Manager Console when listing packages using the Get-Package command.&amp;lt;/description&amp;gt;
    &amp;lt;releaseNotes&amp;gt;&amp;lt;/releaseNotes&amp;gt;
    &amp;lt;summary&amp;gt;A short description of the package. If specified, this shows up in the middle pane of the Add Package Dialog. If not specified, a truncated version of the description is used instead.&amp;lt;/summary&amp;gt;
    &amp;lt;language&amp;gt;en-US&amp;lt;/language&amp;gt;
    &amp;lt;projectUrl&amp;gt;https://nuget.org/packages/SimpleArgs.Sources&amp;lt;/projectUrl&amp;gt;
    &amp;lt;iconUrl&amp;gt;https://nuget.org/Content/Images/packageDefaultIcon-50x50.png&amp;lt;/iconUrl&amp;gt;
    &amp;lt;requireLicenseAcceptance&amp;gt;false&amp;lt;/requireLicenseAcceptance&amp;gt;
    &amp;lt;licenseUrl&amp;gt;http://opensource.org/licenses/Apache-2.0&amp;lt;/licenseUrl&amp;gt;
    &amp;lt;copyright&amp;gt;Copyright  2016&amp;lt;/copyright&amp;gt;
    &amp;lt;dependencies&amp;gt;
        &amp;lt;group targetFramework=&amp;quot;net40&amp;quot;&amp;gt;
          &amp;lt;dependency id=&amp;quot;log4net&amp;quot; version=&amp;quot;1.2.10&amp;quot; /&amp;gt;
        &amp;lt;/group&amp;gt;
    &amp;lt;/dependencies&amp;gt;
    &amp;lt;references&amp;gt;&amp;lt;/references&amp;gt;
    &amp;lt;tags&amp;gt;&amp;lt;/tags&amp;gt;
  &amp;lt;/metadata&amp;gt;
  &amp;lt;files&amp;gt;
    &amp;lt;file src=&amp;quot;lib\&amp;quot; target=&amp;quot;lib&amp;quot; /&amp;gt;
    &amp;lt;file src=&amp;quot;tools\&amp;quot; target=&amp;quot;tools&amp;quot; /&amp;gt;
    &amp;lt;file src=&amp;quot;content\&amp;quot; target=&amp;quot;content&amp;quot; /&amp;gt;
  &amp;lt;/files&amp;gt;
&amp;lt;/package&amp;gt;
Package.nuspec Changes

I can’t go over every possible nuspec setting. That is in the Nuspec Reference. However, I’ll give you the basics of what I changed.

  1. id – Set this to your package name. If you named your project correctly, this is already named correctly. I’ll leave the above unchanged.
  2. version – This is your version. If this is your first release, 1.0.0 is perfect. I am changing mine to 1.1.0 as my last version was 1.0.9.
  3. title – Often the same as the id, but not always. I’ll leave mine as is.
  4. authors – This is me. I want something other than the Visual Studio username. I changed this to Jared Barneck (Rhyous)
  5. owners – This is me or my business. I’ll change this to Rhyous Publishing LLC
  6. description – Long description. This is defined in the Xml. Change it to describe your NuGet package.
  7. releaseNotes – I just put a link to the release notes in my GitHub repo: https://github.com/rhyous/SimpleArgs/blob/master/ReleaseNotes.txt
  8. summary – Short description. This is also defined in the xml. This is usually shorter than the description.
  9. language – This is the 5 digit language IETF language tag. I left mine at en-US.
  10. projectUrl – I changed this to my GitHub location: https://github.com/rhyous/SimpleArgs
  11. iconUrl – I changed this to the icon file in my GitHub source. Unlike the release notes and the license file, I used the raw GitHub link for the image: https://raw.githubusercontent.com/rhyous/SimpleArgs/master/Docs/Images/SimpleArgs.Logo.png
  12. requireLicenseAcceptance – I left this as false. Only set this to true if your license requires an agreement.
  13. licenseUrl – I set this to the license file in my GitHub repository:
    https://github.com/rhyous/SimpleArgs/blob/master/Fork%20and%20Contribute%20License.txt
  14. copyright – I set this to Copyright Rhyous Publishing LLC
  15. dependencies – This project has no dependencies, so I deleted this entire section.
  16. references – I deleted this tag. Source NuGet packages probably won’t have any references.
  17. tags – Since my project is for command line arguments, I set my tags to: args, arguments
  18. files – This was preconfigured, however, I replaced the libs\ with src\ because I didn’t have any libs but I have source.

You can see my final nuspec file in the GitHub repo: SimpleArgs.Sources Package.nuspec

Step 3 – Add Shared Source Files

Default Items in Solution Explorer for a NuGet Packager Project
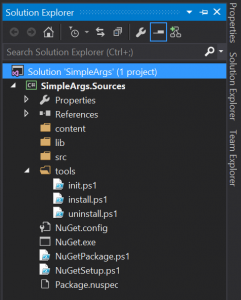
In Visual Studio, in Solution Explorer, you should see that there are already four folders provided for you. See the image to your right. ———–>

  • content – This is what is going to be copied to your project. Since we don’t want all our source copied, we aren’t going to put our source here.
    Note: I would delete this folder, but it turns out, I have one source file that isn’t shared. ArgsHandler.cs will be customized in each project, which makes sense because each project will have different args and handle args differently. ArgsHandler.cs will go here.
  • libs – I have no libs. I can delete this folder and the associated xml for it in the nuspec.
  • src – Stuff I put here isn’t copied to my projects. I am going to put all my shared source in this folder.
  • tools – this has the PowerShell scripts: init.ps1, install.ps1, and uninstall.ps1

Now that we understand our folder structure, let’s get to work.

  1. In Visual Studio’s Solution Explorer, create a folder called App_Packages under the src directory.
    Note: I was going to use App_Sources but NuGet recommends that we follow what other community members follow and others have already started putting source files under App_Packages, so I am following that community convention. Also, this is important for the PowerShell scripts, as this convention plays a part in them. If you don’t follow this convention, you will have to edit the and uninstall.psi PowerShell scripts, which I’ll be providing later.
  2. In Visual Studio’s Solution Explorer, create a Folder with the project name and version. In my case, the folder name is this: SimpleArgs.Sources.1.1.0.
    Note: Again, this was by community convention. Others were doing this. You don’t have to follow this exactly, again, If you don’t follow this convention, you will have to edit the install.ps1 and uninstall.psi PowerShell scripts, which I’ll be providing later.
  3. In Windows Explorer, not in Visual Studio, put your source under the project name and version directory.
    Note: In Visual Studio’s Solution Explorer, I only have these two directories: App_Packages/SimpleArgs.Sources.1.1.0.
    Note: In Windows Explorer, My directory structure ended up as follows:

    \App_Packages
    \App_Packages\SimpleArgs.Sources.1.1.0\
    \App_Packages\SimpleArgs.Sources.1.1.0\Business
    \App_Packages\SimpleArgs.Sources.1.1.0\Business\Args.cs
    \App_Packages\SimpleArgs.Sources.1.1.0\Business\ArgsHandlerCollection.cs
    \App_Packages\SimpleArgs.Sources.1.1.0\Business\ArgsManager.cs
    \App_Packages\SimpleArgs.Sources.1.1.0\Business\ArgsReader.cs
    \App_Packages\SimpleArgs.Sources.1.1.0\Business\ArgumentMessageBuilder.cs
    \App_Packages\SimpleArgs.Sources.1.1.0\Business\CommonAllowedValues.cs
    \App_Packages\SimpleArgs.Sources.1.1.0\Extensions
    \App_Packages\SimpleArgs.Sources.1.1.0\Extensions\ArgumentExtensions.cs
    \App_Packages\SimpleArgs.Sources.1.1.0\Extensions\StringExtensions.cs
    \App_Packages\SimpleArgs.Sources.1.1.0\Interfaces
    \App_Packages\SimpleArgs.Sources.1.1.0\Interfaces\IArgumentMessageBuilder.cs
    \App_Packages\SimpleArgs.Sources.1.1.0\Interfaces\IArgumentsHandler.cs
    \App_Packages\SimpleArgs.Sources.1.1.0\Interfaces\IReadArgs.cs
    \App_Packages\SimpleArgs.Sources.1.1.0\Model
    \App_Packages\SimpleArgs.Sources.1.1.0\Model\Argument.cs
    \App_Packages\SimpleArgs.Sources.1.1.0\Model\ArgumentAddedEventArgs.cs
    \App_Packages\SimpleArgs.Sources.1.1.0\Model\ArgumentDictionary.cs
    \App_Packages\SimpleArgs.Sources.1.1.0\Model\ArgumentList.cs
    \App_Packages\SimpleArgs.Sources.1.1.0\Model\ArgumentsHandlerBase.cs
    

    Note: There is a good reason that I don’t include these in the NuGet Packager Visual Studio project, which I will explain later.

Step 4 – Add Source Files

As mentioned earlier, the ArgsHandler.cs file isn’t shared. Each project does need its own copy of this file. So we need to add it so that it supports Source Code Transformations.

  1. In Visual Studio’s Solution Explorer, copy any source files into the Content directory. You may put them in sub directories if you wish. I created an Arguments folder.
  2. Add .pp to the end of any source files.
  3. Change the namespace to $rootnamespace$ in any source files. You may also add a sub namespace to the end of $rootnamespace$ as I did.
using SimpleArgs;
using System;
using System.Collections.Generic;

namespace $rootnamespace$.Arguments
{
    // Add this line of code to Main() in Program.cs
    //
    //   ArgsManager.Instance.Start(new ArgsHandler(), args);
    //

    /// &amp;lt;summary&amp;gt;
    /// A class that implements IArgumentsHandler where command line
    /// arguments are defined.
    /// &amp;lt;/summary&amp;gt;
    public sealed class ArgsHandler : ArgsHandlerBase
    {
         // content snipped see full file here: https://github.com/rhyous/SimpleArgs/blob/master/NuGet/SimpleArgs.NuGet/content/Arguments/ArgsHandler.cs.pp
    }
}

Step 5 – Add As Link in NuGet using PowerShell scripts

There are three PowerShell scripts.

  • init.ps1
  • install.ps1
  • uninstall.ps1

We are only going to modify install.ps1 and uninstall.ps1.

Note: The following are written to be very generic and have been tested in various Visual Studio projects, which means some common bugs are already fixed, such as not failing on creation of App_Packages just because it is already there.

  1. Update install.ps1.

    Note: For the latest versions of install1.ps1 and uninstall.ps1, go to the tools directory on my GitHub repo.

    # Runs every time a package is uninstalled
    
    param($installPath, $toolsPath, $package, $project)
    
    # $installPath is the path to the folder where the package is installed.
    # $toolsPath is the path to the tools directory in the folder where the package is installed.
    # $package is a reference to the package object.
    # $project is a reference to the project the package was installed to.
    
    # Variables
    $src = &amp;quot;src&amp;quot;
    $packageName = [System.IO.Path]::GetFileName($installPath)
    
    #logging
    write-host &amp;quot;project: &amp;quot; $project.FullName
    write-host &amp;quot;installPath: &amp;quot; $installPath
    write-host &amp;quot;toolsPath: &amp;quot; $toolsPath
    write-host &amp;quot;package: &amp;quot; $package
    write-host &amp;quot;project: &amp;quot; $project
    
    $srcPath = [System.IO.Path]::Combine($installPath, $src)
    write-host &amp;quot;srcPath: &amp;quot; $srcPath
    
    $solutionDir = [System.IO.Path]::GetDirectoryName($dte.Solution.FullName)
    $projectDir = [System.IO.Path]::GetDirectoryName($project.FullName)
    write-host &amp;quot;solutionDir: &amp;quot; $solutionDir
    write-host &amp;quot;projectDir: &amp;quot; $projectDir
    
    $areSameDir = $solutionDir -eq $projectDir
    write-host &amp;quot;areSameDir: &amp;quot; $areSameDir
    
    function AddLinkedFiles($path, $addLocation, $canLink) 
    { 
        write-host &amp;quot;path: &amp;quot; $path
        write-host &amp;quot;addLocation: &amp;quot; $addLocation.FullName
        write-host &amp;quot;canLink: &amp;quot; $canLink
        foreach ($item in Get-ChildItem $path)
        {
            write-host &amp;quot;item: &amp;quot; $item $item.FullName
            if (Test-Path $item.FullName -PathType Container) 
            {
                if ( $canLink) {
                    $addFolder = $project.ProjectItems|Where-Object {$_.FullName -eq $item.FullName}
                    if (!$addFolder) {
                        $addFolder = $addLocation.ProjectItems.AddFolder($item)
                    }
                    write-host &amp;quot;addFolder: &amp;quot; $addFolder.FullName
                    AddLinkedFiles $item.FullName $addFolder $canLink
                } else
                {
                    AddLinkedFiles $item.FullName $addLocation $canLink
                }            
            } 
            else 
            {             
                write-host &amp;quot;Adding &amp;quot; $item.FullName &amp;quot; to &amp;quot; $addLocation.FullName
                $addLocation.ProjectItems.AddFromFile($item.FullName)
            }
        } 
    }
    
    write-host &amp;quot;Calling AddLinkedFiles&amp;quot;
    AddLinkedFiles $srcPath $project (!$areSameDir)
    
  2. Update uninstall.ps1.
    # Runs every time a package is uninstalled
    
    param($installPath, $toolsPath, $package, $project)
    
    # $installPath is the path to the folder where the package is installed.
    # $toolsPath is the path to the tools directory in the folder where the package is installed.
    # $package is a reference to the package object.
    # $project is a reference to the project the package was installed to.
    
    # Variables
    $packages = &amp;quot;Packages&amp;quot;
    $app_packages = &amp;quot;App_Packages&amp;quot;
    $src = &amp;quot;src&amp;quot;
    $packageName = [System.IO.Path]::GetFileName($installPath)
    
    #logging
    write-host &amp;quot;project: &amp;quot; $project.FullName
    write-host &amp;quot;installPath: &amp;quot; $installPath
    write-host &amp;quot;toolsPath: &amp;quot; $toolsPath
    write-host &amp;quot;package: &amp;quot; $package
    write-host &amp;quot;project: &amp;quot; $project
    
    
    $srcPath = [System.IO.Path]::Combine($installPath, $src)
    write-host &amp;quot;srcPath: &amp;quot; $srcPath
    
    $solutionDir = [System.IO.Path]::GetDirectoryName($dte.Solution.FullName)
    $projectDir = [System.IO.Path]::GetDirectoryName($project.FullName)
    write-host &amp;quot;solutionDir: &amp;quot; $solutionDir
    write-host &amp;quot;projectDir: &amp;quot; $projectDir
    
    $areSameDir = $solutionDir -eq $projectDir
    write-host &amp;quot;areSameDir: &amp;quot; $areSameDir
    
    
    if ($areSameDir) {
        $packagesItem = $project.ProjectItems|Where-Object {$_.Name -eq $packages}    
        write-host &amp;quot;packageFolder: &amp;quot; $packagesItem.Name
        $item = $packagesItem.ProjectItems|Where-Object {$_.Name -eq [System.IO.Path]::GetFileName($installPath)}
        write-host &amp;quot;item: &amp;quot; $item.Name
        $item.Remove()
        if ($packagesItem.ProjectItems.Count -eq 0) {
            $packagesItem.Remove()
        }            
    } else {
        $app_packagesItem = $project.ProjectItems|Where-Object {$_.Name -eq $app_packages}
        write-host &amp;quot;app_packagesItem: &amp;quot; $app_packagesItem.Name
        $app_packagesFolder = [System.IO.Path]::Combine($srcPath,$app_packages)
        foreach ($subDir in (Get-ChildItem $app_packagesFolder)) {
            $item = $app_packagesItem.ProjectItems|Where-Object {$_.Name -eq $subDir.Name}
            write-host &amp;quot;item: &amp;quot; $item.Name
            if ($item) {
                $item.Delete()
            }
        }
        if ($app_packagesItem.ProjectItems.Count -eq 0 -and (Get-ChildItem ([System.IO.Path]::Combine($projectDir, $app_packages))).Count -eq 0) {
            $app_packagesItem.Delete()
        }
    }
    

    Step 6 – Build the solution and NuGet package

    The NuGet Packager project template is pretty awesome. When you use it, it builds the NuGet package for you on build. Also, if you build in release mode, it will try to upload the NuGet package to the public NuGet Package Gallary.

    1. In Visual Studio, make sure the Solution Configuration is set to Debug.
    2. Choose to Build | Build Solution.
    3. In your project directory, you should have a NuGet package built. Mine is called SimpleArgs.Sources.1.1.1.nupkg.

    Stay Tuned

    Stay tuned for NuGet for Source Using Add As Link (Part 2 – Testing & Deploying)

    If you subscribe, you will never miss a post.

How to Add As Link in Visual Studio

There may be times when you need to share source between projects but you can’t reference a dll. This would happen if you are writing multiple single file executables and you wanted to share source between them. By definition, a single file executable doesn’t reference a dll or it would not be a single file.

You can still share source using Visual Studio’s Add As Link feature.

To use Add As Link in Visual Studio, follow these steps.

  1. Right-click on your project in Solution Explorer and choose Add | Existing Item.
    Visual Studio Add Existing Item
  2. Next navigate to your shared file and click to highlight the file.
  3. Next click the drop down arrow next to Add and choose Add As Link.
    Visual Studio Add As link
  4. Verify that the file was added as a link. You can tell because it has a different icon to distinguish it from other source files.Icon for Add As Link Source
  5. Verify that the Build Action is set to Compile. It should be as this is the default Build Action for a .cs file.
    Visual Studio Build Action Compile

You can now share source without using a dll.

Microsoft to Acquire Xamarin

XamarinMicrosoft is to acquire Xamarin. Read the article here. Xamarin is far and away the best tool for writing cross-platform mobile apps, but their business model greatly slowed the company’s customer acquisition.

A new mobile developer could easily install Eclipse for free and develop a mobile app without zero cost. The minimum Xamarin fee cost $25 a month but it did not work with Visual Studio. The minimum Xamarin version that worked with Visual Studio cost $1000 a month.

Better business models existed. I long recommended that Xamarin be completely free to for developers to download and use, but the compiled code should have been time-bombed for one day. Of course, with IL editors such time-bombing could be removed, but doing so would not be easy. This model would have allowed them to gather all the indie developers who had an idea and quickly get their application to work on iOS, Android, and Windows. Then at release time, charging a fee to publish the app would have been more palatable. In the long run it would have resulted in more customers and users. It would have skyrocketed the number of xamarin developers. I believe Xamarin would have ended up making far more money by charging less to way more users. But Xamarin disagreed.

Microsoft sees the need to make Xamarin the go to language from cross-platform apps. The flaky and hacked together html5 stack is the only other option for true cross-platform development. Microsoft and Visual Studio has a marge larger user base than Xamarin. If Microsoft’s intention to maintain Xamarin’s model, they would be making a huge mistake.

Microsoft should immediately add Xamarin to the Visual Studio Enterprise subscribers. Enterprise is the top-level and should get everything. There will be some loss of revenue as some Xamarin customers are also Enterprise subscribers, but that loss in negligible and would probably be made up by higher renewal rates and less downgrades. However, if Miocrosoft were to add all of Xamarin also to their Visual Studio Professional subscribers, Xamarin might lose a huge portion of revenue, as most Xamarin customers are also Visual Studio Subscribers. If they want to keep this revenue, then they could easily add a mobile subscription level for mobile only developers and then a professional plus mobile subscription level entices current professional developers to upgrade.

However, what if Microsoft doesn’t care about Xamarin’s revenue at all. What if what they care about is getting mobile developers to primarily use Visual Studio. What if they give Xamarin in its entirety away free in Community Edition so everyone at any Visual Studio level would have it. And what if they open source it?

How many more users would flock to Visual Studio Community Edition? This could be the catalyst to dethrone JavaScript. To bring thousands of users to the Microsoft development ecosystem that also includes Azure. What types of increases in their cloud users could this bring? Perhaps the Xamarin acquistion is not intended to continue to make its own revenue. Perhaps the acquisition is nothing more than a feature add to their existing technology stack.

Were I Microsoft’s CEO, Satya Nadella, I would go the Community Edition route. But I’m not him and I do not know what he is going to do. We are left to wait and see.


Setting File Properties in a NuGet Package: Build Action, Copy to Output Directory, Custom Tool

So I have a bunch of files in a NuGet package that need the File Properties set as follows:

Build Action Content
Copy to Output Directory Copy if newer
Custom Tool
Custom Tool Namespace

I am using the NuGet package Project that you can find in the Online projects.

I was able to set these values in a NuGet package as follows using the Install.ps1 PowerShell script. I found this out thanks to Workabyte’s answer on StackOverflow

$item = $project.ProjectItems.Item("MyContentFile.xml")
$item.Properties.Item("BuildAction").Value = 2
$item.Properties.Item("CopyToOutputDirectory").Value = 2
$item.Properties.Item("CustomTool").Value = ""

I would just set something to what I wanted it to be, then I would look at its value.

Here is my full Install.ps1

# Runs every time a package is installed in a project

param($installPath, $toolsPath, $package, $project)

# $installPath is the path to the folder where the package is installed.
# $toolsPath is the path to the tools directory in the folder where the package is installed.
# $package is a reference to the package object.
# $project is a reference to the project the package was installed to.

function SetFilePropertiesRecursively
{
	$folderKind = "{6BB5F8EF-4483-11D3-8BCF-00C04F8EC28C}";
	foreach ($subItem in $args[0].ProjectItems)
	{
		$path = $args[1]
	    if ($subItem.Kind -eq $folderKind)
		{
			SetFilePropertiesRecursively $subItem ("{0}{1}{2}" -f $path, $args[0].Name, "\")
		}
		else
		{
			Write-Host -NoNewLine ("{0}{1}{2}" -f $path, $args[0].Name, "\")
			SetFileProperties $subItem 2 2 ""
		}
	}
}

function SetFileProperties
{
	param([__ComObject]$item, [int]$buildAction, [int]$copyTo, [string]$customTool)
	Write-Host $item.Name
	Write-Host "  Setting Build Action to Content"
	$item.Properties.Item("BuildAction").Value = $buildAction
	Write-Host "  Setting Copy To Output Directory to Copy if newer"
	$item.Properties.Item("CopyToOutputDirectory").Value = $copyTo
	Write-Host "  Setting Custom Tool to blank"
	$item.Properties.Item("CustomTool").Value = $customTool
}

SetFilePropertiesRecursively $project.ProjectItems.Item("Globalization")
SetFilePropertiesRecursively $project.ProjectItems.Item("Styles")
SetFileProperties $project.ProjectItems.Item("App.xaml") 4 0 "MSBuild:Compile"

Life is good.

MSVCR100.dll Download or MSVCP100.dll Download

In a previous post, Avoiding the MSVCR100.dll, MSVCP100D.dll, or MSVCR100D.dll is missing error, I explain what the MSVCR100.dll is and how to solve problems with it.

Many have asked for an MSVCR100.dll download. Turns out that Visual Studio has a redistributable folder that contains these dlls. So I zipped it up and I am redistributing it.

Here it is:

Download MSVCR100.dll and MSVCP100.dll

Visual Studio Black Theme

For those of you who want a black background in Visual Studio with colored text as shown in the image below, go ahead and download the settings here.

DOWNLOAD: Visual Studio Black.zip

Here is a screen shot of what this looks like.

Visual Studio 2008 Text Editor with black background

Visual Studio 2008 Text Editor with black background

How to import the theme

  1. Extract the zip file.
  2. In Visual Studio, go to Tools | Import and Export Settings.
  3. Choose Import selected environment settings and click Next.
  4. Choose yes to save your settings and click Next (you never know if you don’t like the theme and you want to go back).
  5. Browse to the extracted Black.vssettings file, make sure it is highlighted, and click Finish.
Happy colors on black.


Avoiding the MSVCR110.dll or MSVCR110D.dll is missing error

MSVCR110.dll

This MSVCR110.dll is the Microsoft Visual C++ Redistributable dll that is needed for projects built with Visual Studio 2011. The dll letters spell this out.

MS = Microsoft
V = Visual
C = C++
R = Redistributable

If you create a C++ project in Visual Studio 2011, this file is probably needed.

MSVCR110D.dll

The MSVCR110D.dll is almost the same file only the D at the end stands for Debug. This file has debugging enabled.

Why the error?

Ok, so recently I switched to Visual Studio 2011.  I had a C++ application that worked perfectly in Visual Studio 2008.  Once I compiled it with Visual Studio 2011 and ran it on a clean 2008 server (fully patched but otherwise clean), it failed to run with the following error.

TestWin32.exe – System Error

The program can’t start because MSVCR110.dll is missing from your computer. Try reinstalling the program to fix this problem.

Here is the screen shot:

MSVCR110.dll

The same things happens with the debug version of the file, only it is a the debug version of the same DLL as noted by the fact that the DLL name ends with D.

Autorun – System Error

The program can’t start because MSVCR110.dll is missing from your computer. Try reinstalling the program to fix this problem.

The screen shot is identical except for the D in the dll name.

MSVCR110d.dll

I create a new project in Visual Studio 2011 using the project type of C++ Win32 Project and without making a single change to the default project, I built the file and tested it on my clean machine and the same issue occurred.

So obviously that is not acceptable.  It seems like this should just not happen by default, but unfortunately it does.

Solution

It was actually really easy to resolve for my one project.

Here is what I did.

You can solve this any of the following ways:

  1. Statically link to the dll files so they are compiled into my executable instead of referenced as separate dll files.
  2. Included the dll in the same directory as the exe (I actually didn’t try this but I assume it would work).
  3. Forced everyone to install the VC++ Runtime Redistributable before running the app.

The first option seems the most stable and robust and easiest for a single executable. So that is the one I am going to use.

The second option doesn’t really make sense to me and I would probably never do it.  Maybe if I had dozens of executable files that all required the same DLL and I didn’t have an installer, and I wanted to conserve size, which probably wouldn’t happen for me since I am pretty good at creating a quick installer. Though you might be in this a situation.

The third option would make sense if I was planning on running my executable after an install.  During the install I could include the VC++ Runtime Redistributable and all would be fine.

Statically Linking the DLLs

Make sure you resolve it for both Release and Debug.  The steps are slightly different.

Release

  1. In Visual Studio, I went to the project Properties.
  2. I changed my Configuration to Release.
  3. I went under Configuration Properties | C/C++ | Code Generation
  4. Look at the Runtime Library setting.  It is set to this: Multi-threaded DLL (/MD)
    Change it to this: Multi-threaded (/MT)
  5. Rebuild.

Debug

Almost exactly the same as release.

  1. In Visual Studio, I went to the project Properties.
  2. I changed my Configuration to Debug.
  3. I went under Configuration Properties | C/C++ | Code Generation
  4. Look at the Runtime Library setting.  It is set to this: Multi-threaded Debug DLL (/MDd)
    Change it to this: Multi-threaded Debug (/MTd)
  5. Rebuild the debug

It might be a good idea for me to figure out how to change the project so when I create a new project of this type, those settings are the default.

A snippet for Properties in a ViewModel

If you are using MVVM you probably should create a snippet very similar to the following to save time.

C:\Program Files (x86)\Microsoft Visual Studio 10.0\VC#\Snippets\1033\Visual C#\propvm.snippet

<?xml version="1.0" encoding="utf-8" ?>
<CodeSnippets  xmlns="http://schemas.microsoft.com/VisualStudio/2005/CodeSnippet">
	<CodeSnippet Format="1.0.0">
		<Header>
			<Title>propvm</Title>
			<Shortcut>propvm</Shortcut>
			<Description>Code snippet for property and backing field for a ViewModel that calls NotifyPropertyChanged.</Description>
			<Author>Jared Barneck</Author>
			<SnippetTypes>
				<SnippetType>Expansion</SnippetType>
			</SnippetTypes>
		</Header>
		<Snippet>
			<Declarations>
				<Literal>
					<ID>type</ID>
					<ToolTip>Property type</ToolTip>
					<Default>int</Default>
				</Literal>
				<Literal>
					<ID>property</ID>
					<ToolTip>Property name</ToolTip>
					<Default>MyProperty</Default>
				</Literal>
			</Declarations>
			<Code Language="csharp"><![CDATA[public $type$ $property$
	{
		get { return _$property$;}
		set 
		{ 
			_$property$ = value;
			NotifyPropertyChanged("$property$");
		}
	} private $type$ _$property$;
	$end$]]>
			</Code>
		</Snippet>
	</CodeSnippet>
</CodeSnippets>

C Sharp Development 101 – Application Deployment (from BinaryWasteland.com)

Found a quality development blog recently that had a post on a topic I have been interested in but haven’t got around to working on. The topic is publishing a project using Visual Studio.

C Sharp Development 101 – Application Deployment

In this post you will learn the following:

  1. How to set up application publishing.
  2. How to publish your app to an FTP Site.
  3. How to install the published app.


A Hello World Android App in C#

This post is a continuation of Writing Android apps in C# using MonoDroid.

Writing your first MonoDroid project

Now that you have installed and configured MonoDroid and its prerequisites, you are ready to create your first project.

  1. Open Visual Studio.
  2. Go to File | New | Project.
  3. Choose “Mono for Android”. This is a new project type added by the Mono for Android Visual Studio 2010 Plugin.
  4. Give the project a name and click OK.

You now have a sample MonoDroid app.

Running your first MonoDroid App in an Emulator

Now that you have a sample MonoDroid app, learning to deploy it to an Android device and to test it is the next step.

  1. Simply press F5 in your “Mono for Android” Visual Studio project. The following screen appears however, there are no running Android devices.
  2. Click the link to “Start emulator image”.
  3. Wait until your Android emulator starts and you see the graphical display and not just a text display.
  4. Select your emulator from the Running Devices list and click OK.
  5. Wait. It is going to deploy the mono library to your emulator and deploy your app and this can take time.

You application should now be running in your Android emulator.

This is just a sample application that increments a counter and displays how many times you have click the button.

You are now ready to start writing your own application.

More Tutorials

Xamarin has multiple Tutorials to help you get a little further along.

MonoDroid Tutororials by Xamarin

Writing Android apps in C# using MonoDroid

As C# developers, many of us would prefer to write Android Apps in C# as well. Novell had promised us MonoDroid, but we were quite concerned as to whether MonoDroid would ever be released when Novell was dismantled.

However, Xamarin spawned from the ashes like a phoenix to restore the viability of MonoDroid, restoring our hopes to writing in C# for the Android platform.

Though I am hopeful that MonoDroid will become popular allowing C# to be a commonly used language for Android devices, there is still some question as to whether Xamarin and its MonoDroid product will survive.

Xamarin is a new company and needs to survive first. Its business is to sell MonoDroid, which is not open source, but is a proprietary product. Unfortunately, MonoDroid may cost too much, preventing adoption among app developers. Xamarin requires a customer base and a continual adoption rate if it is going to survive. If the company folds, what is going to happen to the library and the apps that use it?

Is Development with MonoDroid Free? Yes and No!

Yes and no.

Yes because anybody can use and develop with MonoDroid at no cost. It isn’t until you need to publish an app to the app store that you need to buy a license. You can use the MonoDroid trial for as long as you want. Here is a quote from the trial website. [2]

The evaluation version of Mono for Android does not expire, but enables development and testing against the Android Emulator only.

No, because you need to buy a license once either of the following become true:

  1. You need to test your code directly on a real device and not just an emulated device
  2. You are ready to publish an app to the app store

So what is the cost of MonoDroid? Depends on if you buy Professional, Enterprise, or Enterprise Priority. On the Xamarin store, the following table can be found. To see it you have to add MonoDroid to your cart and then click the “Show product comparison” link. [1]

Professional Enterprise Enterprise Priority
Deploy to your devices Has this feature Has this feature Has this feature
Publish to app stores Has this feature Has this feature Has this feature
Enterprise distribution Has this feature Has this feature
Priority support queue Has this feature
Guaranteed response time Has this feature
License expiration Never Never Never
Update subscription 1 Year 1 Year 1 Year
License usage Original User Seat Seat
Price (USD) $399 $999 $2,499

These costs are very low for business or enterprise customers who have C# developers and want to write Android apps.  The cost of training a C# developer to develop apps for Android in Java may be far greater than training them to develop apps for Android using C# and buying a MonoDroid license.

Is MonoDroid easy to set up?

Update
MonoDroid is not down to a one-click installer.

Here is the old method of Installing without the One-click Installer

MonoDroid is simple to set up.  Xamarin has some simple steps that can be found on their web site. They have MonoDroid installation instructions for installing MonoDroid for use with any of three environments.

  1. Visual Studio  (Important! Visual Studio Express is not supported)
  2. MonoDevelop on Windows
  3. MonoDevelop on Mac OSX

If you don’t have a Visual Studio license and you can’t afford one, then go with MonoDevelop because Visual Studio Express is noted to be enough [3].

However, the Visual Studio install is four simple steps.

  1. Install the Java SDK
  2. Install the Android SDK
  3. Configure your simulator
  4. Install the Mono for Android Visual Studio 2010 Plugin

These are very easy steps to complete, and I won’t repeat the steps here, but once you complete them, you are ready to start writing Android apps in C#.

Once you feel you have everything installed, click the following link to continue reading.

Writing your first MonoDroid project

http://android.xamarin.com/Installation/Windows

How to have the TextBlock in a left column of a Grid in a ListView Template expand or shrink with text wrapping?

Ok, lets say you want to have a Grid where each item is a row of data in a Grid. The left most column should expand or shrink, and yes the text should wrap when it shrinks.

Not so easy…but it can be done if you use the right tools.

  • Use a DockPanel not a Grid
  • Make the left most column the last one added
<Window x:Class="ListBoxWithWrap.MainWindow"
        xmlns="http://schemas.microsoft.com/winfx/2006/xaml/presentation"
        xmlns:x="http://schemas.microsoft.com/winfx/2006/xaml"
        Title="MainWindow"
        mc:Ignorable="d" xmlns:d="http://schemas.microsoft.com/expression/blend/2008"
        xmlns:mc="http://schemas.openxmlformats.org/markup-compatibility/2006"
        d:DesignHeight="242"
        d:DesignWidth="388"
        >
    <Grid>
        <DockPanel Name="MainGrid" HorizontalAlignment="Stretch">
            <!-- These four blocks will have other content eventually, but only need to be 45 wide -->
            <TextBlock Text="X" Grid.Column="1" HorizontalAlignment="Center" Width="45" DockPanel.Dock="Right"/>
            <TextBlock Text="X" Grid.Column="2" HorizontalAlignment="Center" Width="45" DockPanel.Dock="Right"/>
            <TextBlock Text="X" Grid.Column="3" HorizontalAlignment="Center" Width="45" DockPanel.Dock="Right"/>
            <TextBlock Text="X" Grid.Column="4" HorizontalAlignment="Center" Width="45" DockPanel.Dock="Right"/>
            <!-- This is the TextBlock that needs to wrap its content (and
                             change the height of the row (so the full content is still
                             visible) to whatever the available space is, but should not
                             make overall ListView wider than the parent's width. -->
            <TextBlock Text="A very long string that should wrap when the window is small." Padding="20,6,6,6" TextWrapping="Wrap" DockPanel.Dock="Right"/>
        </DockPanel>
    </Grid>
</Window>

You will see that this works as you desire.

Now put this in a ListView’s Template and set it to use Binding.

<Window x:Class="ListBoxWithWrap.MainWindow"
        xmlns="http://schemas.microsoft.com/winfx/2006/xaml/presentation"
        xmlns:x="http://schemas.microsoft.com/winfx/2006/xaml"
        Title="MainWindow"
        mc:Ignorable="d"
        xmlns:d="http://schemas.microsoft.com/expression/blend/2008"
        xmlns:mc="http://schemas.openxmlformats.org/markup-compatibility/2006"
        d:DesignHeight="242"
        d:DesignWidth="388"
        SizeToContent="WidthAndHeight">
    <Grid>
        <ListView Name="lvWrap" ItemsSource="{Binding}">
            <ListView.ItemTemplate>
                <DataTemplate>
                    <DockPanel Name="MainGrid" HorizontalAlignment="Stretch">
                        <!-- These four blocks will have other content eventually, but only need to be 45 wide -->
                        <TextBlock Text="X" Grid.Column="1" HorizontalAlignment="Center" Width="45" DockPanel.Dock="Right"/>
                        <TextBlock Text="X" Grid.Column="2" HorizontalAlignment="Center" Width="45" DockPanel.Dock="Right"/>
                        <TextBlock Text="X" Grid.Column="3" HorizontalAlignment="Center" Width="45" DockPanel.Dock="Right"/>
                        <TextBlock Text="X" Grid.Column="4" HorizontalAlignment="Center" Width="45" DockPanel.Dock="Right"/>
                        <!-- This is the TextBlock that needs to wrap its content (and
                             change the height of the row (so the full content is still
                             visible) to whatever the available space is, but should not
                             make overall ListView wider than the parent's width. -->
                        <TextBlock Text="{Binding Content}" Padding="20,6,6,6" TextWrapping="Wrap" DockPanel.Dock="Right"/>
                    </DockPanel>
                </DataTemplate>
            </ListView.ItemTemplate>
        </ListView>
    </Grid>
</Window>

Now give it some data to bind to.

using System.Collections.Generic;
using System.Windows;
using System.Windows.Documents;

namespace ListBoxWithWrap
{
    /// <summary>
    /// Interaction logic for MainWindow.xaml
    /// </summary>
    public partial class MainWindow : Window
    {
        public MainWindow()
        {
            InitializeComponent();

            List<SomeItem> list = new List<SomeItem>();
            list.Add(new SomeItem() { Content = "Some very long string with so many words there should be some wrapping going on to prevent a line of text that is too long" });
            list.Add(new SomeItem() { Content = "Some very long string with so many words there should be some wrapping going on to prevent a line of text that is too long" });
            list.Add(new SomeItem() { Content = "Some very long string with so many words there should be some wrapping going on to prevent a line of text that is too long" });
            list.Add(new SomeItem() { Content = "Some very long string with so many words there should be some wrapping going on to prevent a line of text that is too long" });
            list.Add(new SomeItem() { Content = "Some very long string with so many words there should be some wrapping going on to prevent a line of text that is too long" });

            lvWrap.DataContext = list;
        }

        public class SomeItem
        {
            public string Content { get; set; }
        }
    }
}

The shrink with text wrapping no longer works once inside of the ListView. So that tells you that something to do with the ListView is breaking the feature you want.

Here is how you fix this:

1. Open your project in Expression Blend. (If you don’t have Expression Blend, maybe just look at my code below and copy it)

2. Right-Click on the ListView in the Object and Timeline tab and choose Edit Template | Edit a Copy.

3. Click OK on the next Window.

This will create the following resource code.

<Window.Resources>
		<SolidColorBrush x:Key="ListBorder" Color="#828790"/>
		<Style x:Key="ListViewStyle1" TargetType="{x:Type ListView}">
			<Setter Property="Background" Value="{DynamicResource {x:Static SystemColors.WindowBrushKey}}"/>
			<Setter Property="BorderBrush" Value="{StaticResource ListBorder}"/>
			<Setter Property="BorderThickness" Value="1"/>
			<Setter Property="Foreground" Value="{DynamicResource {x:Static SystemColors.ControlTextBrushKey}}"/>
			<Setter Property="ScrollViewer.HorizontalScrollBarVisibility" Value="Auto"/>
			<Setter Property="ScrollViewer.VerticalScrollBarVisibility" Value="Auto"/>
			<Setter Property="ScrollViewer.CanContentScroll" Value="true"/>
			<Setter Property="ScrollViewer.PanningMode" Value="Both"/>
			<Setter Property="Stylus.IsFlicksEnabled" Value="False"/>
			<Setter Property="VerticalContentAlignment" Value="Center"/>
			<Setter Property="Template">
				<Setter.Value>
					<ControlTemplate TargetType="{x:Type ListView}">
						<Border x:Name="Bd" BorderBrush="{TemplateBinding BorderBrush}" BorderThickness="{TemplateBinding BorderThickness}" Background="{TemplateBinding Background}" Padding="1" SnapsToDevicePixels="true">
							<ScrollViewer Focusable="false" Padding="{TemplateBinding Padding}">
								<ItemsPresenter SnapsToDevicePixels="{TemplateBinding SnapsToDevicePixels}"/>
							</ScrollViewer>
						</Border>
						<ControlTemplate.Triggers>
							<Trigger Property="IsEnabled" Value="false">
								<Setter Property="Background" TargetName="Bd" Value="{DynamicResource {x:Static SystemColors.ControlBrushKey}}"/>
							</Trigger>
							<Trigger Property="IsGrouping" Value="true">
								<Setter Property="ScrollViewer.CanContentScroll" Value="false"/>
							</Trigger>
						</ControlTemplate.Triggers>
					</ControlTemplate>
				</Setter.Value>
			</Setter>
		</Style>
	</Window.Resources>

4. Now look at what is surrounding the ItemPresenter. Yes, you see the ScrollViewer, which is your problem. Delete it.

5. Build you project.

Success! Now your feature to both expand or shrink with text wrapping is back.

Here is the final XAML.

<Window x:Class="ListBoxWithWrap.MainWindow"
        xmlns="http://schemas.microsoft.com/winfx/2006/xaml/presentation"
        xmlns:x="http://schemas.microsoft.com/winfx/2006/xaml"
        Title="MainWindow"
        mc:Ignorable="d"
        xmlns:d="http://schemas.microsoft.com/expression/blend/2008"
        xmlns:mc="http://schemas.openxmlformats.org/markup-compatibility/2006"
        d:DesignHeight="242"
        d:DesignWidth="388"
        SizeToContent="WidthAndHeight">
    <Window.Resources>
        <SolidColorBrush x:Key="ListBorder" Color="#828790"/>
        <Style x:Key="ListViewStyle1" TargetType="{x:Type ListView}">
            <Setter Property="Background" Value="{DynamicResource {x:Static SystemColors.WindowBrushKey}}"/>
            <Setter Property="BorderBrush" Value="{StaticResource ListBorder}"/>
            <Setter Property="BorderThickness" Value="1"/>
            <Setter Property="Foreground" Value="{DynamicResource {x:Static SystemColors.ControlTextBrushKey}}"/>
            <Setter Property="ScrollViewer.HorizontalScrollBarVisibility" Value="Auto"/>
            <Setter Property="ScrollViewer.VerticalScrollBarVisibility" Value="Auto"/>
            <Setter Property="ScrollViewer.CanContentScroll" Value="true"/>
            <Setter Property="ScrollViewer.PanningMode" Value="Both"/>
            <Setter Property="Stylus.IsFlicksEnabled" Value="False"/>
            <Setter Property="VerticalContentAlignment" Value="Center"/>
            <Setter Property="Template">
                <Setter.Value>
                    <ControlTemplate TargetType="{x:Type ListView}">
                        <Border x:Name="Bd" BorderBrush="{TemplateBinding BorderBrush}" BorderThickness="{TemplateBinding BorderThickness}" Background="{TemplateBinding Background}" Padding="1" SnapsToDevicePixels="true">
                            <ItemsPresenter SnapsToDevicePixels="{TemplateBinding SnapsToDevicePixels}"/>
                        </Border>
                        <ControlTemplate.Triggers>
                            <Trigger Property="IsEnabled" Value="false">
                                <Setter Property="Background" TargetName="Bd" Value="{DynamicResource {x:Static SystemColors.ControlBrushKey}}"/>
                            </Trigger>
                            <Trigger Property="IsGrouping" Value="true">
                                <Setter Property="ScrollViewer.CanContentScroll" Value="false"/>
                            </Trigger>
                        </ControlTemplate.Triggers>
                    </ControlTemplate>
                </Setter.Value>
            </Setter>
        </Style>
    </Window.Resources>
    <Grid>
        <ListView Name="lvWrap" ItemsSource="{Binding}" Style="{DynamicResource ListViewStyle1}">
            <ListView.ItemTemplate>
                <DataTemplate>
                    <DockPanel Name="MainGrid" HorizontalAlignment="Stretch">
                        <!-- These four blocks will have other content eventually, but only need to be 45 wide -->
                        <TextBlock Text="X" Grid.Column="1" HorizontalAlignment="Center" Width="45" DockPanel.Dock="Right"/>
                        <TextBlock Text="X" Grid.Column="2" HorizontalAlignment="Center" Width="45" DockPanel.Dock="Right"/>
                        <TextBlock Text="X" Grid.Column="3" HorizontalAlignment="Center" Width="45" DockPanel.Dock="Right"/>
                        <TextBlock Text="X" Grid.Column="4" HorizontalAlignment="Center" Width="45" DockPanel.Dock="Right"/>
                        <!-- This is the TextBlock that needs to wrap its content (and
                             change the height of the row (so the full content is still
                             visible) to whatever the available space is, but should not
                             make overall ListView wider than the parent's width. -->
                        <TextBlock Text="{Binding Content}" Padding="20,6,6,6" TextWrapping="Wrap" DockPanel.Dock="Right"/>
                    </DockPanel>
                </DataTemplate>
            </ListView.ItemTemplate>
        </ListView>
    </Grid>
</Window>

You should now have a little bit more understanding of the ListView template and how to manipulate it, which should translate to other objects in WPF as well.