Archive for November 2011

Decoupling in all 7 areas of development

There are 7 main development areas and decoupling, especially decoupling using interface-based design, will be most successful when it occurs in all possible areas.

  1. Code – writing code, sharing code, linking to libraries
  2. Test Code – Unit Tests, Mocked tests, coded functional tests
  3. User Experience – UI design.  The UI should be decoupled from code.
  4. Source Control – Code repositories, branching
  5. Build – compiling, versioning, signing, publishing
  6. Install – Any install method such as MSI, EXE, RPM. Any updates or patches.
  7. Localization – Make this independent of build/compiling

If you decouple everywhere, it is easy to remain decoupled. This leads to good architecture – the overall design of your software.

Code

Code should be easy to write and maintain always.

Let’s face it. Coupled code is often the easiest to start with. However, while it is easy to start out using coupled code, it becomes very difficult to use coupled code as a project grows.

Interface-based design is one method of decoupling code. You are still coupled, just instead of coupled to code, you are coupled to an interface that rarely changes and the code that implements that interface is free to be refactored as long as the tests against the interface pass.

If your code is decoupled, you are free to write your code as you will.

Test Code

I often hear someone say they don’t need to use interface-based design because their code is never going to be an API.  This is not true. If you are Unit Testing properly, your code is always going to be an API even if only your Unit Tests and Functional Tests interface with your code/API.

In decoupled code using interface-based design, your interfaces should have 400% coverage.

100% for each of the following:

  • Expected values
  • Null values
  • Empty values
  • Exception causing values

Write Unit Tests that are exhaustive for your interfaces.  The object that implements the interface will be easier to refactor this way because the new refactoring can implement the interface either directly or through an adapter and you will know nothing can be broken in your refactored code because all the tests pass.

All code that touches the system or requires resources not on a clean build system should be mockable. If you use interface-based design your are mockable by default. For your development language, do a search for mocking libraries such as RhinoMocks for C#.  Also, be aware of how to use an adapter or wrapper to allow for mocking, such as SystemWrapper for C#.

User Experience

User Interfaces (UIs) should be developed independent of the back-end code. They should be developed first or at least simultaneously to the back-end code.  This allows for user experience tests to occur early in the process and changes based on the feedback to be easy and quick. Tools to design UIs that allow for customer feedback already exist, such as SketchFlow for rich Windows WPF UIs.

The UI should be decoupled from the code. You should probably have two separate UIs just so you can switch between them to show how the UI is not coupled to the code and can be switched at any time.

Source Control

Decouple your source control. I don’t mean that one team uses Subversion, another GIT, and another TFS. I mean that your project is in its own repository, and has few as possible prerequisites projects as possible. This is made possible by interface-based design. If you have a 10 features, all on top of core functionality, you should have one core functionality repository and 10 feature repositories.

Also, if you source is not decoupled you are tempted to couple your code with other code.  This lead us to build.

Build

Build does not just mean on a build system. Lets start with the developer building on their local machine. A developer should be able to check out a project and build it without any effort beyond the checkout.  Ok, maybe if you are C# developer you need to at least install Visual Studio. But then you should be able to check out a solution, open it, and press F5 to build it and the build should work. If not, your process is broken and developers’ time is wasted.

Now to the build system or CI builds.

Coupled code is hard to build. Dependency loops can occur. Builds have to occur in specific order, and this takes longer.

With interface-based design, you build your interface libraries first and they build almost instantly as they have no real code. Then you simultaneously build everything else.  Your build is extremely fast because you can build everything with different threads simultaneously (or even on different build machines), even for extremely large applications because they only link to the interfaces.

Different parts of your project can and should have different versions. Just because you release YourProduct 3.0 doesn’t mean that the a library hasn’t already matured beyond to 5.1.  And because of your decoupled interface-based design, you can upgrade YourProduct 3.0 to use version 5.2 of the library and it won’t know the difference. This leads right into install.

Install

Installing should be decoupled. If your project is big enough, it is ok to have 100 different installs. Sure, for Windows don’t show 100 items in Add / Remove Programs, just one or a few.  But that doesn’t mean that you don’t have each piece of your product separately installable, patchable, and upgradeable.

Think of a product with four different parts. You should be able to install, upgrade, and patch each of the four parts separately.  The product as a whole can be version 3.0 but different parts can be different versions. You may have a piece that is very mature, at version 5.1 and a piece that was just refactored for your 3.0 release and it is version 1.0.  Your four products could be: 3.0, 5.1, 1.0, 3.0.

If you are properly decoupled and using interface-based design, you can upgrade any of the four parts to a new version without the other three parts having any adverse affects at all.

Localization

It is frustrating to have to wait for a build to see and test your localization.  Sure some people only have to wait for the first build and then can generate their satellite assemblies from there. However, I disagree with any localization strategy that involves build. I cringe when I hear “localization lock down” because the release is soon.  Really? Does it have to be this way?

How can you do this? Decouple text from the software.

Text should stay where text belongs, in text files. Whether it be a property-value-list or an XML, localization should be dynamic. Let the software pull in text dynamically from a text file. Then switching language in a UI is just a matter of changing from one text file set to another (probably as simple as changing a two, three, or five-letter path).

And the text is patchable without build risk.  If you are 1 day from shipping and you realize you have a completely erroneous string, you can edit a text file to fix it without little to no risk.

Edit the text file(s) without a build and run time just picks up the corrected text.

Since the UI was done before or simultaneous to the back-end code, the localization will be done early and changing may be made often.

Conclusion

Decoupling is a massive undertaking and doesn’t just mean to decouple code. Decoupling is methodology that should be used everywhere in all aspects of the software development life cycle.

Feature branching fits the Kanban model – Branching by MMF

I have to say I am a fan of branching for feature or for team.  I think branching for feature, or branching for a Minimal Marketable Feature (MMF), really fits into the Kanban model.

However, decouple first. This article was really good about talking about a decoupling branching strategy.

http://continuousdelivery.com/2011/05/make-large-scale-changes-incrementally-with-branch-by-abstraction/

Once decouple, branch by feature or in the Kanban world, Branch by MMF.

Here are the positive and negatives.

Branch by feature or team (team and feature are similar)

Positive

Indifferent

Negative

Having read all of these. The negatives are important to read.

It seems that a lot of the negatives are eliminated by the following.

  1. Decoupled code
  2. Using Interface-based design (which is a method for decoupling code)
  3. Keeping MMFs as small as possible (which they should be anyway: “Minimal” marketable feature
  4. Merging main to the feature branch daily/weekly
  5. Running tests on CI on feature branches as well as on main
  6. Checkin’s are gated so a failed build/test prevents check in.

Also read the comments as there are real experiences shared there (assuming the author of the comments are sincere).

A successful branch by MMF strategy can be done with any source control tool.

Side Note 1:

I’ve been using GIT lately for a project in my Masters of Computer Science’s Security course. I finally understand why GIT has become the de facto source control for Open Source, because branching on your local machine can be helpful and efficient. The local check out on your dev box IS A BRANCH and can be branched and you can branch by feature or by task locally.

I recently wrote something I couldn’t check in and couldn’t branch it locally with our source control, but I could have with GIT.

Side Note 2:

Another side note: TortoiseGit and TortoiseSVN are both on my dev box now and explorer.exe is constantly at 45% CPU slowing my system.

Visual Studio Black Theme

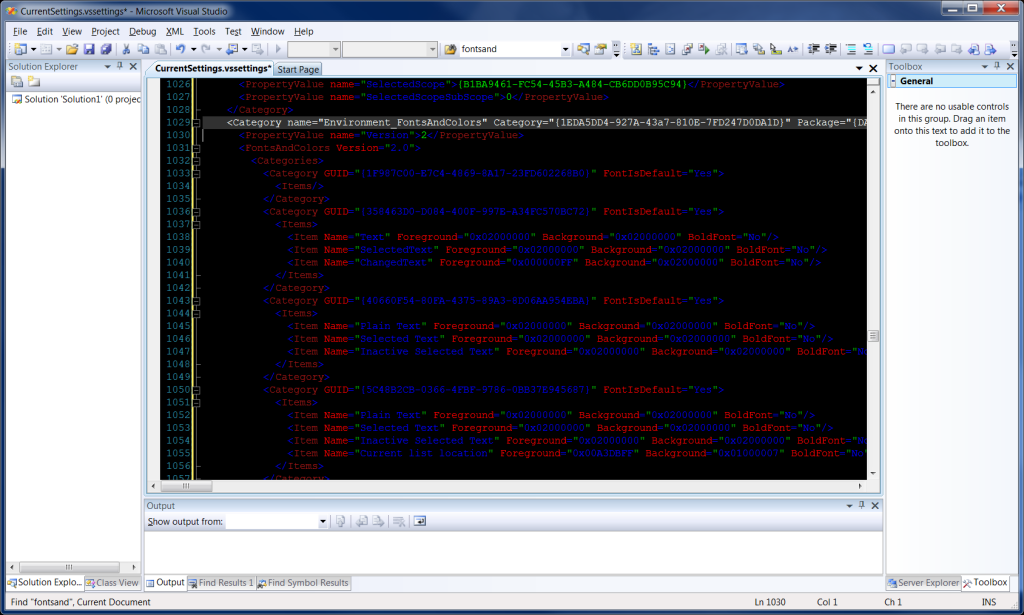
For those of you who want a black background in Visual Studio with colored text as shown in the image below, go ahead and download the settings here.

DOWNLOAD: Visual Studio Black.zip

Here is a screen shot of what this looks like.

Visual Studio 2008 Text Editor with black background

Visual Studio 2008 Text Editor with black background

How to import the theme

  1. Extract the zip file.
  2. In Visual Studio, go to Tools | Import and Export Settings.
  3. Choose Import selected environment settings and click Next.
  4. Choose yes to save your settings and click Next (you never know if you don’t like the theme and you want to go back).
  5. Browse to the extracted Black.vssettings file, make sure it is highlighted, and click Finish.
Happy colors on black.


Unwrapping a packet with Pcap and tcpdump (Part 1 – Ethernet Header)

If you are familiar with the OSI model, you are aware that network packets are wrapped in layers called headers.
Note: Don’t confuse these with C++ headers, these are network packet headers and I will try to always clarify by saying “packet headers” or “C++ headers”.
The goal of this article to demonstrate how to unwrap these packet headers using C++ and the Pcap and tcpdump libraries.

Prerequisites

  • You have read the previous Pcap posts.
  • Basic understanding of the OSI model
  • Basic knowledge of networking

Packet Headers

The first layer of a valid packet will contain an ethernet layer and it will be the first 14 octets. Each octet is a pair of hex numbers.  If you look at a standard TCP Syn packet in Wireshark, it will be displayed in Hex view as follows:

00 18 e7 dc e7 29 00 1f 3b 69 4f 29 08 00 45 00
00 34 0c 93 40 00 80 06 aa 86 c0 a8 00 0f 41 30
41 c3 39 22 00 50 c9 bc 46 2b 00 00 00 00 80 02
20 00 c2 11 00 00 02 04 05 b4 01 03 03 02 01 01
04 02

But you could display the octets in bits using the Bits View to see the binary representation of the packet:

00000000 00011000 11100111 11011100 11100111 00101001 00000000 00011111
00111011 01101001 01001111 00101001 00001000 00000000 01000101 00000000
00000000 00110100 00001100 10010011 01000000 00000000 10000000 00000110
10101010 10000110 11000000 10101000 00000000 00001111 01000001 00110000
01000001 11000011 00111001 00100010 00000000 01010000 11001001 10111100
01000110 00101011 00000000 00000000 00000000 00000000 10000000 00000010
00100000 00000000 11000010 00010001 00000000 00000000 00000010 00000100
00000101 10110100 00000001 00000011 00000011 00000010 00000001 00000001
00000100 00000010

I will use Hex unless demonstrating something that is easier to explain in binary.

Because this is a TCP Syn packet, there actually is no data or payload, just packet headers really, because it is just the first packet of a TCP handshake, but we can still demonstrate the idea of packet headers (and it is easier since the packet is smaller).

The first 14 octets comprises the first packet header and it has three items of data:

00 18 e7 dc e7 29 - (6 octets) Destination Mac Address
00 1f 3b 69 4f 29 - (6 octets) Source Mac Address<
08 00             - (2 octets) Ethertype

So our first job in C++ is to get this packet header data into a struct. Structs are already created in the tcpdump library if you want to use them, but if you want, you can create your own.

We will continue the project we started here: How to read a PCap file from Wireshark with C++

Step 1 – Download tcpdump

  1. Go to the tcpdump developer page:
    http://www.tcpdump.org/#latest-release
  2. Download the latest stable version of WinPcap.
  3. Extract to your solution directory.

Step 2 – Add tcpdump to Additional Include Directories

  1. In Visual Studio, right-click on your project and go to Properties.
  2. Go to Configuration Properties | C/C++ | General.
  3. Note: If you don’t see the C/C++ option, did you forget to do Step 2 above?
  4. For Additional Include Directories add the relative path to the tcpdump-4.2.0 directory you just extracted:
    ..\tcpdump-4.2.0

Step 3 – Add #include statements for packet headers and enums

The ether.h file that comes with tcpdump code has a small amount of code that include three #define and one struct (BSD license and comments omitted for brevity).

#define	ETHERMTU	1500
#define	ETHER_ADDR_LEN		6
struct	ether_header {
	u_int8_t	ether_dhost[ETHER_ADDR_LEN];
	u_int8_t	ether_shost[ETHER_ADDR_LEN];
	u_int16_t	ether_type;
};
#define ETHER_HDRLEN		14

However, there are other C++ headers that provide struct for packet headers as well as useful #define statements and enumerations. Here is a list of some of the tcpdump c++ headers you should become familiar with.

// These provide Packet Headers and Enums
#include <ether.h>
#include <ip.h>
#include <ipproto.h>
#include <tcp.h>
#include <udp.h>
#include <ethertype.h>

Add these to the main.cpp.

We are now ready to start unwrapping the packet headers with c++ code.

Step 4 – Create some helper functions

Let’s move the printing of the packet into its own function, this will get it out of our way.

Lets also create a function to only print parts of the packet.

Also, add a function to convert ethertype values to strings.

First declare them…

// Declare helper functions
void PrintPacket(pcap_pkthdr * header, const u_char *data);
void PrintData(u_int startOctet, u_int endOctet, const u_char *data);
char * get_ethertype(const u_int16_t ethertype);

Then define them….

void PrintPacket(pcap_pkthdr * header, const u_char *data)
{
	// Print using printf. See printf reference:
	// http://www.cplusplus.com/reference/clibrary/cstdio/printf/

	// Show the packet number
	printf("Packet # %i\n", ++packetCount);

	// Show the size in bytes of the packet
	printf("Packet size: %ld bytes\n", header->len);

	// Show a warning if the length captured is different
	if (header->len != header->caplen)
		printf("Warning! Capture size different than packet size: %ld bytes\n", header->len);

	// Show Epoch Time
	printf("Epoch Time: %ld:%ld seconds\n", header->ts.tv_sec, header->ts.tv_usec);

	// loop through the packet and print it as hexidecimal representations of octets
	// We also have a function that does this similarly below: PrintData()
	for (u_int i=0; (i < header->caplen ) ; i++)
	{
		// Start printing on the next after every 16 octets
		if ( (i % 16) == 0) printf("\n");

		// Print each octet as hex (x), make sure there is always two characters (.2).
		printf("%.2x ", data[i]);
	}
	printf("\n\n");
}

void PrintData(u_int startOctet, u_int endOctet, const u_char *data)
{
	for (u_int i = startOctet; i <= endOctet; i++)
	{
		// Print each octet as hex (x), make sure there is always two characters (.2).
		printf("%.2x ", data[i]);
	}
	printf("\n");
}

// Returns a string representation of the common Ethertype
char * get_ethertype(const u_int16_t ethertype)
{
	switch(ethertype)
	{
	case ETHERTYPE_IP:
		return "IPv4";
	case ETHERTYPE_IPV6:
		return "IPv6";
	case ETHERTYPE_ARP:
		return "ARP";
	default:
		return "Unknown";
	}
}

Step 5 – Unwrapping the first packet header with the ether_header struct

Once we have printed the packet out, we are now going to print details of the packet.

  1. Create a pointer to an ether_header struct.
  2. Assign it the same memory address as the data pointer.
const struct ether_header *ethernet;
ethernet = (struct ether_header*)(data);

Now print out the three items in the struct: Destination Mac, Source Mac, and Ethertype.

// Print Destination Mac Address
printf("Dst MAC: ");
PrintData(0,5,ethernet->ether_dhost);

// Print Source Mac Address
printf("Src MAC: ", ethernet->ether_shost);
PrintData(0,5,ethernet->ether_shost);

// Print EtherType
printf("Ethertype: %s (%#.4x)\n", get_ethertype(ethernet->ether_type), ethernet->ether_type);

Everything should print fine except the ethertype. It is 0x0080 instead of 0x8000. In the next step we will fix this.

Step 6 – Fix the bit order of the ether_type

We are going to use the ntohs() function to fix the bits. This is defined on windows in the Ws2_32.lib library, which is not included, so we must include it.

  1. In Visual Studio, right-click on your project and go to Properties.
  2. Go to Configuration Properties | Linker | Input.
  3. For Additional Dependencies, add the following:
    Ws2_32.lib;

Now we can go ahead and use the ntohs() function in our code.

// Print EtherType
u_short ethertype = ntohs(ethernet->ether_type);
printf("Ethertype: %s (%#.4x)\n", get_ethertype(ethertype), ethertype);

Lets end here for now. We have successfully unwrapped the first packet header.

Here is the full main.cpp file.

/*
	Copyright 2011 Rhyous. All rights reserved.

	Redistribution and use in source and binary forms, with or without modification, are
	permitted provided that the following conditions are met:

	   1. Redistributions of source code must retain the above copyright notice, this list of
		  conditions and the following disclaimer.

	   2. Redistributions in binary form must reproduce the above copyright notice, this list
		  of conditions and the following disclaimer in the documentation and/or other materials
		  provided with the distribution.

	THIS SOFTWARE IS PROVIDED BY Rhyous ''AS IS'' AND ANY EXPRESS OR IMPLIED
	WARRANTIES, INCLUDING, BUT NOT LIMITED TO, THE IMPLIED WARRANTIES OF MERCHANTABILITY AND
	FITNESS FOR A PARTICULAR PURPOSE ARE DISCLAIMED. IN NO EVENT SHALL Rhyous OR
	CONTRIBUTORS BE LIABLE FOR ANY DIRECT, INDIRECT, INCIDENTAL, SPECIAL, EXEMPLARY, OR
	CONSEQUENTIAL DAMAGES (INCLUDING, BUT NOT LIMITED TO, PROCUREMENT OF SUBSTITUTE GOODS OR
	SERVICES; LOSS OF USE, DATA, OR PROFITS; OR BUSINESS INTERRUPTION) HOWEVER CAUSED AND ON
	ANY THEORY OF LIABILITY, WHETHER IN CONTRACT, STRICT LIABILITY, OR TORT (INCLUDING
	NEGLIGENCE OR OTHERWISE) ARISING IN ANY WAY OUT OF THE USE OF THIS SOFTWARE, EVEN IF
	ADVISED OF THE POSSIBILITY OF SUCH DAMAGE.

	The views and conclusions contained in the software and documentation are those of the
	authors and should not be interpreted as representing official policies, either expressed
	or implied, of Rhyous.
/*

/*
* How to read a packet capture file.
*/

/*
* Step 1 - Add includes and namespace
*/
#include <string>
#include <iostream>
#include <pcap.h>

// These provide headers and enums
#include <ether.h>
#include <ip.h>
#include <ipproto.h>
#include <tcp.h>
#include <udp.h>
#include <ethertype.h>

using namespace std;

// Declare helper functions
void PrintPacket(pcap_pkthdr * header, const u_char *data);
void PrintData(u_int startOctet, u_int endOctet, const u_char *data);
u_short get_ethertype_value(const u_char *data);
char * get_ethertype(const u_int16_t ethertype);

// static values
static u_int packetCount = 0;

// Defines
#define SIZE_ETHERNET 14

int main(int argc, char *argv[])
{
	/*
	* Step 2 - Get a file name
	*/

	string file = "C:\\users\\jared\\testfiles\\smallcapture.pcap";

	/*
	* Step 3 - Create an char array to hold the error.
	*/

	// Note: errbuf in pcap_open functions is assumed to be able to hold at least PCAP_ERRBUF_SIZE chars
	//       PCAP_ERRBUF_SIZE is defined as 256.
	// http://www.winpcap.org/docs/docs_40_2/html/group__wpcap__def.html
	char errbuff[PCAP_ERRBUF_SIZE];

	/*
	* Step 4 - Open the file and store result in pointer to pcap_t
	*/

	// Use pcap_open_offline
	// http://www.winpcap.org/docs/docs_41b5/html/group__wpcapfunc.html#g91078168a13de8848df2b7b83d1f5b69
	pcap_t * pcap = pcap_open_offline(file.c_str(), errbuff);

	/*
	* Step 5 - Create a header and a data object
	*/

	// Create a header object:
	// http://www.winpcap.org/docs/docs_40_2/html/structpcap__pkthdr.html
	struct pcap_pkthdr *header;

	// Create a character array using a u_char
	// u_char is defined here:
	// C:\Program Files (x86)\Microsoft SDKs\Windows\v7.0A\Include\WinSock2.h
	// typedef unsigned char   u_char;
	const u_char *data;

	/*
	* Step 6 - Loop through packets and print them to screen
	*/
	while (int returnValue = pcap_next_ex(pcap, &header, &data) >= 0)
	{
		// I moved the code for printing the packet as hex values
		// to a function
		PrintPacket(header, data);

		// Print the packet in details
		printf("Packet Details\n");

		// Unwrap ether_header (first 14 bytes)
		const struct ether_header *ethernet;
		ethernet = (struct ether_header*)(data);

		// Print Destination Mac Address
		printf("Dst MAC: ");
		PrintData(0,5,ethernet->ether_dhost);

		// Print Source Mac Address
		printf("Src MAC: ", ethernet->ether_shost);
		PrintData(0,5,ethernet->ether_shost);

		// Print EtherType
		u_short ethertype = ntohs(ethernet->ether_type);
		printf("Ethertype: %s (%#.4x)\n", get_ethertype(ethertype), ethertype);

		// Add two lines between packets
		printf("\n\n");
	}
}

void PrintPacket(pcap_pkthdr * header, const u_char *data)
{
	// Print using printf. See printf reference:
	// http://www.cplusplus.com/reference/clibrary/cstdio/printf/

	// Show the packet number
	printf("Packet # %i\n", ++packetCount);

	// Show the size in bytes of the packet
	printf("Packet size: %ld bytes\n", header->len);

	// Show a warning if the length captured is different
	if (header->len != header->caplen)
		printf("Warning! Capture size different than packet size: %ld bytes\n", header->len);

	// Show Epoch Time
	printf("Epoch Time: %ld:%ld seconds\n", header->ts.tv_sec, header->ts.tv_usec);

	// loop through the packet and print it as hexidecimal representations of octets
	// We also have a function that does this similarly below: PrintData()
	for (u_int i=0; (i < header->caplen ) ; i++)
	{
		// Start printing on the next after every 16 octets
		if ( (i % 16) == 0) printf("\n");

		// Print each octet as hex (x), make sure there is always two characters (.2).
		printf("%.2x ", data[i]);
	}
	printf("\n\n");
}

void PrintData(u_int startOctet, u_int endOctet, const u_char *data)
{
	for (u_int i = startOctet; i <= endOctet; i++)
 	{
		// Print each octet as hex (x), make sure there is always two characters (.2).
		printf("%.2x ", data[i]);
	}
	printf("\n");
}

u_short get_ethertype_value(const u_char *data)
{
	u_short ethertype = data[12] << 8;
	ethertype += data[13];
	return ethertype;
}

// Returns a string representation of the common Ethertype
char * get_ethertype(const u_int16_t ethertype)
{
	switch(ethertype)
	{
	case ETHERTYPE_IP:
		return "IPv4";
	case ETHERTYPE_IPV6:
		return "IPv6";
	case ETHERTYPE_ARP:
		return "ARP";
	default:
		return "Unknown";
	}
}

Stay tuned for Unwrapping a packet with Pcap and tcpdump (Part 2 – IP Header)

How to read a PCap file from Wireshark with C++

In my Computer Security class I am taking as part of my Masters of Computer Science course, we need to parse a Pcap dump file.

Prerequisites

It is expected you have Visual Studio 2010 already. It may work the same with Visual C++ 2010.

Step 1 – Install Wireshark

We are going to use Wireshark to get a packet capture. Wireshark is a nice easy tool to get a packet capture.

http://www.wireshark.org

Make sure to install Wireshark and let Wireshark install WinPcap when it prompts you.

Step 2 – Create a new project in Visual Studio

I already have post on creating a WinPcap project in Visual Studio and getting it to compile, so follow it.

How to compile WinPcap with Visual Studio 2010?

Step 3 – Get a packet capture.

  1. Open Wireshark and start capturing file.
  2. Open your browser or go to a few sites.
  3. Stop the packet capture.
  4. Save the packet capture to a file.
    I named my file smallcapture.pcap.

Step 4 – Add C++ code to read the packet capture

I am going to paste the code for you and put the comments and steps in the code.

/*
* How to read a packet capture file.
*/

/*
* Step 1 - Add includes
*/
#include <string>
#include <iostream>
#include <pcap.h>

using namespace std;

int main(int argc, char *argv[])
{
	/*
	* Step 2 - Get a file name
	*/

	string file = "C:\\users\\jared\\testfiles\\smallcapture.pcap";

	/*
	* Step 3 - Create an char array to hold the error.
	*/

	// Note: errbuf in pcap_open functions is assumed to be able to hold at least PCAP_ERRBUF_SIZE chars
	//       PCAP_ERRBUF_SIZE is defined as 256.
	// http://www.winpcap.org/docs/docs_40_2/html/group__wpcap__def.html
	char errbuff[PCAP_ERRBUF_SIZE];

	/*
	* Step 4 - Open the file and store result in pointer to pcap_t
	*/

	// Use pcap_open_offline
	// http://www.winpcap.org/docs/docs_41b5/html/group__wpcapfunc.html#g91078168a13de8848df2b7b83d1f5b69
	pcap_t * pcap = pcap_open_offline(file.c_str(), errbuff);

	/*
	* Step 5 - Create a header and a data object
	*/

	// Create a header object:
	// http://www.winpcap.org/docs/docs_40_2/html/structpcap__pkthdr.html
	struct pcap_pkthdr *header;

	// Create a character array using a u_char
	// u_char is defined here:
	// C:\Program Files (x86)\Microsoft SDKs\Windows\v7.0A\Include\WinSock2.h
	// typedef unsigned char   u_char;
	const u_char *data;

	/*
	* Step 6 - Loop through packets and print them to screen
	*/
	u_int packetCount = 0;
	while (int returnValue = pcap_next_ex(pcap, &header, &data) >= 0)
	{
		// Print using printf. See printf reference:
		// http://www.cplusplus.com/reference/clibrary/cstdio/printf/

		// Show the packet number
		printf("Packet # %i\n", ++packetCount);

		// Show the size in bytes of the packet
		printf("Packet size: %d bytes\n", header->len);

		// Show a warning if the length captured is different
		if (header->len != header->caplen)
			printf("Warning! Capture size different than packet size: %ld bytes\n", header->len);

		// Show Epoch Time
		printf("Epoch Time: %d:%d seconds\n", header->ts.tv_sec, header->ts.tv_usec);

		// loop through the packet and print it as hexidecimal representations of octets
		// We also have a function that does this similarly below: PrintData()
		for (u_int i=0; (i < header->caplen ) ; i++)
		{
			// Start printing on the next after every 16 octets
			if ( (i % 16) == 0) printf("\n");

			// Print each octet as hex (x), make sure there is always two characters (.2).
			printf("%.2x ", data[i]);
		}

		// Add two lines between packets
		printf("\n\n");
	}
}

You are now reading packets in C++. Now you can start working on differentiating the packet types.

Resources

  • http://www.tcpdump.org/pcap.html
  • http://www.tcpdump.org/pcap3_man.html

How to compile WinPcap with Visual Studio 2010?

The documentation for WinPcap was pretty poor. The last update for Visual Studio was for 2005, so this hasn’t been updated for Visual Studio 2008 or Visual Studio 2010.

Also, the steps don’t say what type of C++ project was created. This is probably why it missing information, such as the fact that WIN32 must be defined.

So I thought I would get it working and provide a post someone could actually find. I had to read the pcap.h file myself to figure out what was missing in the documentation.

Prerequisites

It is expected you have Visual Studio 2010 already. It may work the same with Visual C++ 2010.

Step 1 – Create a new empty project

  1. In Visual Studio go to File | New | Project.
  2. Select Other Languages | Visual C++ | General | Empty Project
  3. Enter a Project name, Location, and Solution Name.
  4. Take note of the solution directory.
  5. Click OK.

This creates the following directory structure:

.\WinPcapExample\WinPcapExample.sdf
.\WinPcapExample\WinPcapExample.sln
.\WinPcapExample\WinPcapExample\
.\WinPcapExample\WinPcapExample\WinPcapExample.vcxproj
.\WinPcapExample\WinPcapExample\WinPcapExample.vcxproj.filters
.\WinPcapExample\WinPcapExample\WinPcapExample.vcxproj.user

Step 2 – Create a main.cpp file

  1. Right-click on the project and choose Add | New Item.
  2. Select C++ File (.cpp)
  3. Enter the name as Main.cpp.
  4. Click Ok.
  5. Add the standard main function to the file:
    int main(int argc, char *argv[])
    {
    }
    
  6. Save the file.

Step 3 – Download and extract WinPCap

  1. Go to the WinPcap developer page:
    http://www.winpcap.org/devel.htm
  2. Download the latest stable version of WinPcap.
  3. Extract to your solution directory.

Step 4 – Configure the Project properties

Now that the needed resources are in your solution directory, you can configure your project to access them.

  1. In Visual Studio, right-click on your project and choose Properties.
  2. Make the following configuration changes to your project:

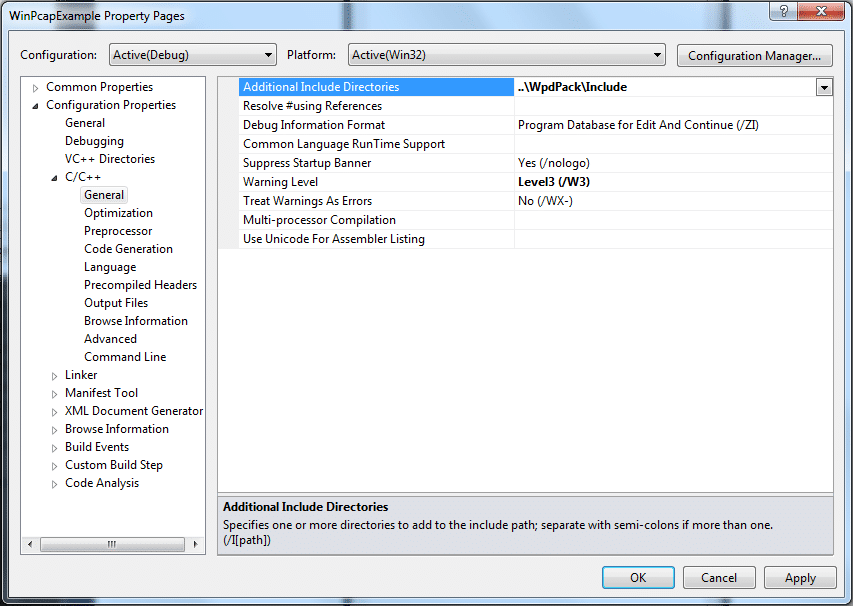
Configuration 1 – Add Additional Include Directories

  1. Go to Configuration Properties | C/C++ | General.
    Note: If you don’t see the C/C++ option, did you forget to do Step 2 above?
  2. For Additional Include Directories add the relative path:
    ..\WpdPack\Include

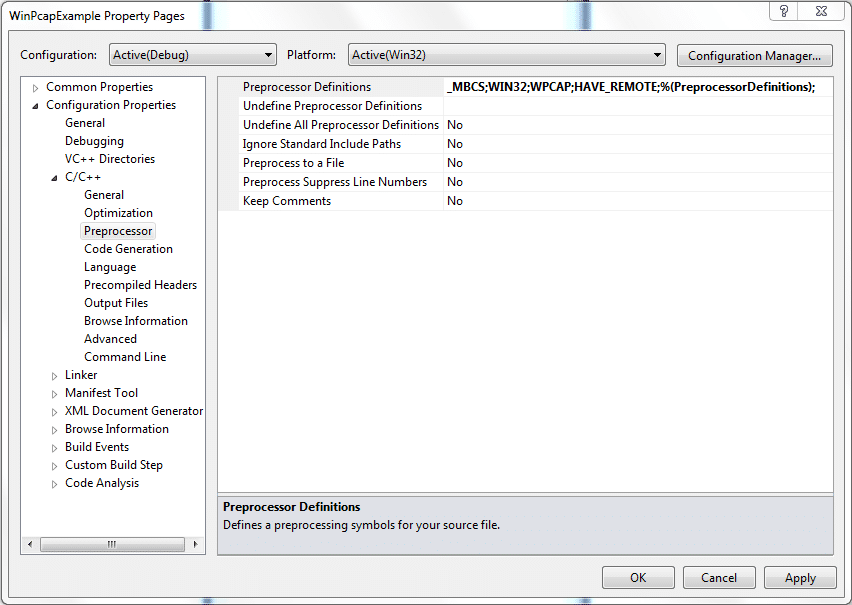
Configuration 2 – Add Preprocessor Definitions

  1. Go to Configuration Properties | C/C++ | Preprocessor.
  2. For Preprocessor Definitions, add these three:
    WIN32;WPCAP;HAVE_REMOTE.

Preprocessor Definintions

Important: If you fail to add WIN32, your compile will fail as follows:

Error	1	error C1083: Cannot open include file: 'sys/time.h': No such file or directory	c:\users\jared\documents\visual studio 2010\projects\c++\readpcapexample\libs\winpcap-4.1.2\include\pcap\pcap.h	47	1	ReadPCapExample

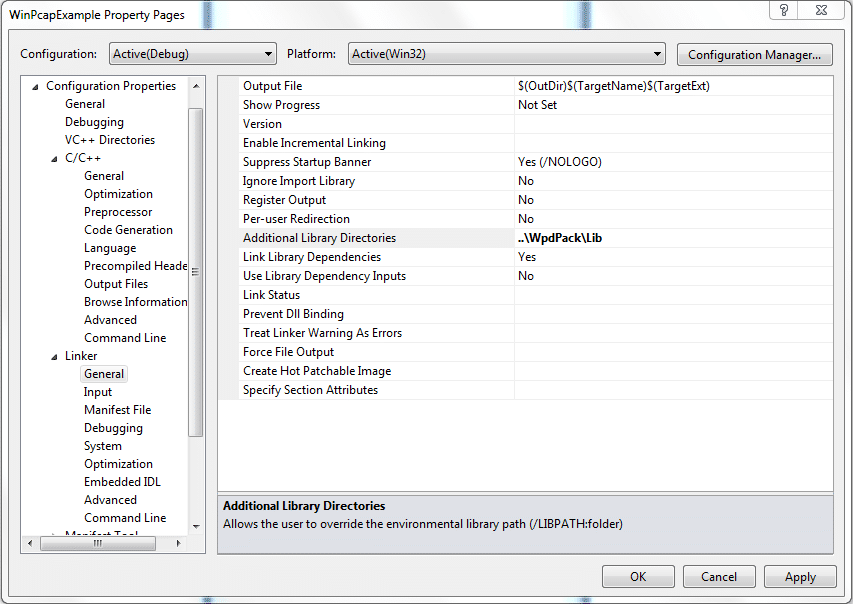
Configuration 3 – Add Additional Library Directories

  1. Go to Configuration Properties | Linker | General.
  2. For Additional Library Directories enter the following:
    ..\WpdPack\Lib
AdditionalLibraryDirectories

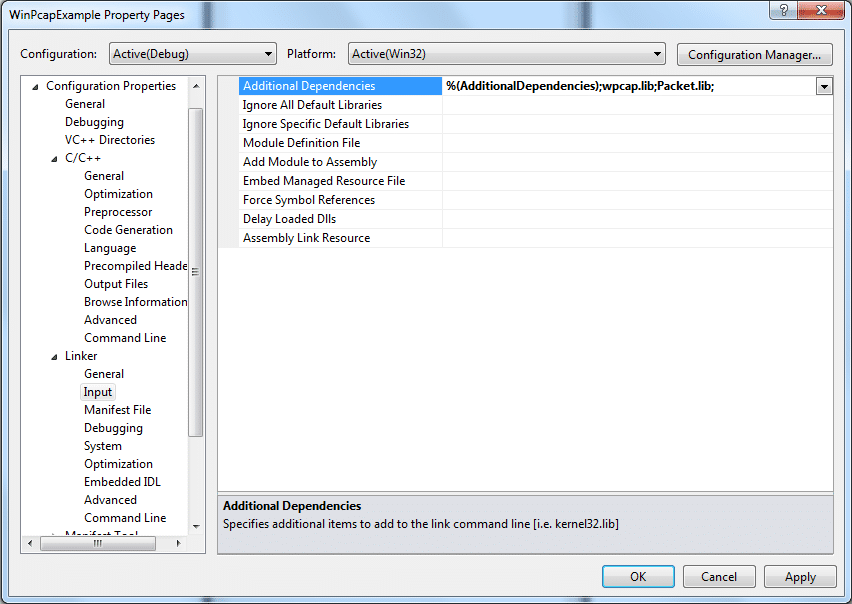
Configuration 4 – Add Additional Dependencies

  1. Go to Configuration Properties | Linker | Input.
  2. For Additional Dependencies, add the following:
    winpcap.lib;Packet.lib;

Additional Dependencies

Note: I removed the default libraries. You may need some of them:
kernel32.lib;user32.lib;gdi32.lib;winspool.lib;comdlg32.lib;advapi32.lib;shell32.lib;ole32.lib;oleaut32.lib;uuid.lib;odbc32.lib;odbccp32.lib;

Step 5 – Include pcap.h

  1. Open the Main.cpp file.
  2. Include pcap.h.
    #include
    
    int main(int argc, char *argv[])
    {
    }
    
  3. Try to compile and it should work.
You are now ready to develop using WinPcap.

How to write a FreeBSD Kernel Module

You may be think that writing your first kernel module is going to be a long, painful, grueling task, but really it is only slightly harder than writing your first program, Hello World!, in C or C++.

Lets break this into nice easy steps.

Prerequisites

It is assumed you have installed FreeBSD already. If not, follow the instructions below with one change: Install the FreeBSD source during the “Choose Distribution” section.

How do I install FreeBSD?

Step 1 – Create a basic module file

A FreeBSD kernel module is written in C. This is going to be only a slightly harder than writing hello world in C. We are going to create a single text file with a .c extension and put some C code in it.

  1. Create a folder to hold you project. I used this directory:
    /usr/home/jared/code/kernel/hwm
  2. Create the file to hold your code. I named my file this:
    hello_world_kmod.c
  3. Edit the file with you favorite editor, vi, vim, emac, ee. I used easy editor (ee):
    ee hello_world_kmod.c
  4. Add the following code to the file.I have broken the code of the simplest kernel module into four parts or steps:
    1. Add four required #include statements.
    2. Create the kernel load/unload event handler.
    3. Create a struct to name the module and point to the event handler function.
    4. Call the DECLARE_MODULE macro.
    /*
     * Step 1 - Add the four needed libraries to include
     */
    #include <sys/param.h>
    #include <sys/module.h>
    #include <sys/kernel.h>
    #include <sys/systm.h>
    
    /*
     * Step 2 - Handle the load/unload event
     */
    static int EventHandler(struct module *inModule, int inEvent, void *inArg)
    {
            // Set return code to 0
            int returnCode = 0;
    
            switch (inEvent)
            {
              case MOD_LOAD:
                    uprintf("Hello, World! \n");
                    break;
              case MOD_UNLOAD:
                    uprintf("Bye, World! \n");
                    break;
              default:
                    returnCode = EOPNOTSUPP;
                    break;
            }
    
            return(returnCode);
    }
    
    /*
     * Step 3 - Name the module and the event hander function
     *          This is done using a struct of type moduledata_T
     */
    static moduledata_t  moduleData = {
            "hello_world_kmod",     // Module Name
            EventHandler,           // Event handler function name
            NULL                    // Extra data
    };
    
    /*
     * Step 4 - Declare the module
     *          This is done with the DECLARE_MODULE macro
     */
    DECLARE_MODULE(hello_world_kmod, moduleData, SI_SUB_DRIVERS, SI_ORDER_MIDDLE);
    
  5. Save and close the file.

Step 2 – Create a Makefile

Creating a Makefile to build a kernel module is quite easy because almost all the work is done for you. FreeBSD has a file that you include, /usr/src/share/mk/bsd.kmod.mk, that does most of the work for you and all you have to do is include it.

  1. In the same directory where you put your .c file, create a new text file called Makefile.
  2. There are three basic parts to the kernel module Makefile:
    1. Module name
    2. Source files
    3. Include of bsd.kmod.mk
    # Module Name
    KMOD = hello_world_kmod
    
    # Source files
    
    SRCS = hello_world_kmod.c
    
    # Include <bsd.kmod.mk>
    .include <bsd.kmod.mk>
    
  3. Save and close the file.

Step 3 – Run make to build the module

  1. In the command prompt, in the directory where you have created your code and make file, run make.
    > cd /usr/home/jared/code/kernel/hwm
    > make
    Warning: Object directory not changed from original /usr/home/jared/code/kernel/hwm
    @ -> /usr/src/sys
    machine -> /usr/src/sys/amd64/include
    x86 -> /usr/src/sys/x86/include
    cc -O2 -pipe -fno-strict-aliasing -Werror -D_KERNEL -DKLD_MODULE -nostdinc   -I. -I@ -I@/contrib/altq -finline-limit=8000 --param inline-unit-growth=100 --param large-function-growth=1000 -fno-common  -fno-omit-frame-pointer  -mno-sse -mcmodel=kernel -mno-red-zone -mno-mmx -msoft-float  -fno-asynchronous-unwind-tables -ffreestanding -fstack-protector -std=iso9899:1999 -fstack-protector -Wall -Wredundant-decls -Wnested-externs -Wstrict-prototypes  -Wmissing-prototypes -Wpointer-arith -Winline -Wcast-qual  -Wundef -Wno-pointer-sign -fformat-extensions  -Wmissing-include-dirs -fdiagnostics-show-option -c hello_world_kmod.c
    ld  -d -warn-common -r -d -o hello_world_kmod.ko hello_world_kmod.o
    :> export_syms
    awk -f /sys/conf/kmod_syms.awk hello_world_kmod.ko  export_syms | xargs -J% objcopy % hello_world_kmod.ko
    objcopy --strip-debug hello_world_kmod.ko
    >
    

Step 4 – Test loading an unloading the module

Loading and unloading kernel modules must be done as root. If you have sudo installed, use it, otherwise install it (Configuring sudo on FreeBSD) or su to root.

  1. Use kldload to load the module and kldunload to unload the module.
    > sudo kldload ./hello_world_kmod.ko
    Hello, World!
    > sudo kldunload ./hello_world_kmod.ko
    Bye, World!
    >
    

You have now performed the Hello World version of a FreeBSD kernel module.

Resources

WPF jobs trend up according to Indeed.com

According to Indeed.com the amount of WPF job trends up rapidly.

Since XAML is going to be used in Windows 8 as well, it is not going away any time in the next decade. Also, declarative UI will improve in the future, not disappear. So there is job security in this.

Unit Testing Registry access with RhinoMocks and SystemWrapper

As mentioned in the previous Unit Test post (Unit Testing Registry access with RhinoMocks and SystemWrapper) it important to be able to Unit Test code that access the registry without really accessing the registry.

Prerequisites

Step 1 – Download SystemWrapper

You may have already done this when reading the previous post, if not do so now.

  1. Go to https://github.com/jozefizso/SystemWrapper and download the latest dll or the latest source or add the SystemWrapper.Interfaces and SystemWrapper.Wrappers By jozef.izso
  2. Copy the SystemInterface.dll and SystemWrapper.dll into your project (perhaps you already have a libs directory).
  3. Add references to these two dlls in your release code.
  4. Add a reference only to SystemInterface.dll in your Unit Test project.

Step 2 – Change your code to use Interfaces and Wrappers

Ok, so here we are going to start with an example. Here is an object that I wrote myself that uses the registry to check on which versions of .NET Framework are installed. It is currently using Registry and RegistryKey directly.

using System;
using Microsoft.Win32;

namespace SystemInfo
{
    public class DotNetFramework
    {
        #region Constant members
        public const string REGPATH_DOTNET11_VERSION        = @"SOFTWARE\Microsoft\NET Framework Setup\NDP\v1.1.4322";
        public const string REGPATH_DOTNET20_VERSION        = @"SOFTWARE\Microsoft\NET Framework Setup\NDP\v2.0.50727";
        public const string REGPATH_DOTNET30_VERSION        = @"SOFTWARE\Microsoft\NET Framework Setup\NDP\v3.0";
        public const string REGPATH_DOTNET35_VERSION        = @"SOFTWARE\Microsoft\NET Framework Setup\NDP\v3.5";
        public const string REGPATH_DOTNET40_VERSION_CLIENT = @"SOFTWARE\Microsoft\NET Framework Setup\NDP\v4\Client";
        public const string REGPATH_DOTNET40_VERSION        = @"SOFTWARE\Microsoft\NET Framework Setup\NDP\v4\Full";
        #endregion

        #region Properties
        /// <summary>
        /// This returns true if .NET 4 Full is installed.
        /// </summary>
        public bool FoundDotNet4
        {
            get { return HasDotNetFramework(REGPATH_DOTNET40_VERSION, 0); }
        }

        /// <summary>
        /// This returns true if .NET 4 Client is installed.
        /// </summary>
        public bool FoundDotNet4Client
        {
            get { return HasDotNetFramework(REGPATH_DOTNET40_VERSION_CLIENT, 0); }
        }

        /// <summary>
        /// This returns true if .NET 3.5 with SP1 is installed.
        /// </summary>
        public bool FoundDotNet35SP1
        {
            get { return HasDotNetFramework(REGPATH_DOTNET35_VERSION, 1); }
        }

        /// <summary>
        /// This returns true if .NET 3.5 is installed.
        /// </summary>
        public bool FoundDotNet35
        {
            get { return HasDotNetFramework(REGPATH_DOTNET35_VERSION, 0); }
        }

        /// <summary>
        /// This returns true if .NET 3.0 with SP2 is installed.
        /// </summary>
        public bool FoundDotNet30SP2
        {
            get { return HasDotNetFramework(REGPATH_DOTNET30_VERSION, 2); }
        }

        /// <summary>
        /// This returns true if .NET 3.0 with SP1 is installed.
        /// </summary>
        public bool FoundDotNet30SP1
        {
            get { return HasDotNetFramework(REGPATH_DOTNET30_VERSION, 1); }
        }

        /// <summary>
        /// This returns true if .NET 3.0 is installed.
        /// </summary>
        public bool FoundDotNet30
        {
            get { return HasDotNetFramework(REGPATH_DOTNET30_VERSION, 0); }
        }

        /// <summary>
        /// This returns true if .NET 2.0 with SP2 is installed.
        /// </summary>
        public bool FoundDotNet20SP2
        {
            get { return HasDotNetFramework(REGPATH_DOTNET20_VERSION, 2); }
        }

        /// <summary>
        /// This returns true if .NET 2.0 with SP1 is installed.
        /// </summary>
        public bool FoundDotNet20SP1
        {
            get { return HasDotNetFramework(REGPATH_DOTNET20_VERSION, 1); }
        }

        /// <summary>
        /// This returns true if .NET 2.0 is installed.
        /// </summary>
        public bool FoundDotNet20
        {
            get { return HasDotNetFramework(REGPATH_DOTNET20_VERSION, 0); }
        }

        /// <summary>
        /// This returns true if .NET 1.1 is installed.
        /// </summary>
        public bool FoundDotNet11
        {
            get { return HasDotNetFramework(REGPATH_DOTNET11_VERSION, 0); }
        }
        #endregion

        public bool HasDotNetFramework(string dotNetRegPath, int expectedServicePack)
        {
            bool retVal = false;

            try
            {
                RegistryKey localKey = Registry.LocalMachine.OpenSubKey(dotNetRegPath);
                if (localKey != null)
                {
                    int? isInstalled = localKey.GetValue("Install") as int?;
                    if (isInstalled != null)
                    {
                        if (isInstalled == 1)
                        {
                            if (expectedServicePack > 0)
                            {
                                if ((int)localKey.GetValue("SP") >= expectedServicePack)
                                    retVal = true;
                            }
                            else
                            {
                                retVal = true;
                            }
                        }
                    }
                }
                return retVal;
            }
            catch
            {
                return retVal;
            }
        }
    }
}
  1. Find any place in your code where you use touch the system. For example, if you touch the registry, find any place you call Registry or RegistryKey objects or reference Microsoft.Win32.
    Hint: Use the search feature in your IDE.
  2. Replace the reference with a reference to SystemWrapper and SystemInterfaces. For example, if replacingrRegistry code,
    SystemInterface.Microsoft.Win32
    SystemWrapper.Microsoft.Win32In the DotNetFramework.cs file above, there is a using statement to Microsoft.Win32. Our new using statements will be:

    using System;
    using SystemInterface.Microsoft.Win32;
    using SystemWrapper.Microsoft.Win32;
    
  3. For any object that touches the system, change that object to be instantiated using the interface. For example, replace RegistryKey objects with IRegistryKey objects.In the DotNetFramework.cs file, there is only one single line that needs to change to do this, line 113.
    This line…

        RegistryKey localKey = Registry.LocalMachine.OpenSubKey(dotNetRegPath);
    

    …changes to this line.

        IRegistryKey localKey = new RegistryWrap().LocalMachine.OpenSubKey(dotNetRegPath);
    

Step 3 – Allow for replacing the IRegistryKey objects

Create a property or function that allows you to replace the object you are mocking so you can pass in an object that is mocked.

This is done for you to some extent for registry access by using the IAccessTheRegistry interface.

  1. Implementing the IAccessTheRegistry interface from the SystemInterface.Microsoft.Win32 namespace. You can add the following code to the DotNetFramework object.
            #region IAccessTheRegistry Members
    
            public IRegistryKey BaseKey
            {
                get
                {
                    if (null == _BaseKey)
                        _BaseKey = new RegistryWrap().LocalMachine;
                    return _BaseKey;
                }
            } private IRegistryKey _BaseKey;
    
            public void ChangeBaseKey(IRegistryKey inBaseKey)
            {
                _BaseKey = inBaseKey;
            }
    
            #endregion
    

    Note: Notice that the Property is read only. Instead of enabling the set ability, a function is created to allow you to change the IRegistryKey instance. This is by design and keeps you from making a mistake such as BaseKey = BaseKey.OpenSubkey(“…”) and replacing the BaseKey.

    Note: You may want to look into the “Factory” design pattern.

  2. Change line 113 to use the BaseKey.
        IRegistryKey localKey = BaseKey.OpenSubKey(dotNetRegPath);
    

Step 4 – Download and Reference RhinoMocks in your Unit Test

You may have already done this when reading the previous post, if not do so now.

In this step you need to download RhinoMocks and reference it with your Unit Test project. If you don’t have a test project, create one.  Your release project won’t need it.

  1. Go to http://hibernatingrhinos.com/open-source/rhino-mocks and download RhinoMocks.
  2. Add RhinoMocks.dll

Step 5 – Mock IRegistryKey in your Unit Test

For this, you have to understand and know how to use RhinoMocks and this takes some learning. For this we need an example.

  1. Add a new class to your test project.
  2. Add a using statement:
    using&nbsp;Rhino.Mocks;
  3. Add code to create the Mock objects.I put these in separate functions because every test needed the exact same code.
    1. Mock the HKLM key and any calls made using it.
    2. Mock the registry sub key and any calls made using it.
    #region Test Helper Functions
            /// <summary>
            /// Mock to pretend to be this registry subkey:
            /// Hive:   HKLM
            ///
            /// No stubbing is preconfigured
            /// </summary>
            /// <returns>IRegistryKey</returns>
            private IRegistryKey CreateMockOfHKLM()
            {
                // Mock to pretend to be this registry key:
                // Hive:   HKLM
                IRegistryKey hklmMock = MockRepository.GenerateMock<IRegistryKey>();
                hklmMock.Stub(x => x.Name).Return("HKEY_LOCAL_MACHINE");
    
                return hklmMock;
            }
    
            /// <summary>
            /// Mock to pretend to be this registry subkey:
            /// Hive:   HKLM
            ///
            /// It has stubs preconfigured
            /// </summary>
            /// <returns>IRegistry that is a mock of HKLM with IIS Version stubs.</returns>
            private IRegistryKey CreateDotNetRegistryOpenSubKeyMock(string inSubkey, bool inIsInstalled = true, int? inSP = null)
            {
                // Mock to pretend to be this registry subkey:
                // Hive:   HKLM
                IRegistryKey hklmMock = CreateMockOfHKLM();
    
                // Allow to test a key that doesn't exist (null) or one that does.
                IRegistryKey dotNetMock = null;
                if (inIsInstalled)
                {
                    dotNetMock = CreateDotNetRegistryGetValueMock(inSubkey, inSP);
                }
    
                // Stubs using hklmMock to open and return this registry key
                // and return dotNetMock:
                hklmMock.Stub(x => x.OpenSubKey(inSubkey)).Return(dotNetMock);
    
                return hklmMock;
            }
    
            private IRegistryKey CreateDotNetRegistryGetValueMock(string inSubkey, int? inSP)
            {
                // Mock to pretend to be this subkey passed in:
                // Hive:   HKLM
                // SubKey: HKEY_LOCAL_MACHINE\" + inSubkey
                IRegistryKey dotNetMock = MockRepository.GenerateMock<IRegistryKey>();
                dotNetMock.Stub(x => x.Name).Return(@"HKEY_LOCAL_MACHINE\" + inSubkey);
    
                // Stubs checking the available registry properties:
                // Hive:   HKLM
                // SubKey: HKEY_LOCAL_MACHINE\" + inSubkey
                // Properties: "Install", "SP"
                dotNetMock.Stub(x => x.GetValueNames()).Return(new String[] { "Install", "SP" });
    
                // Stubs checking this registry:
                // Hive:   HKLM
                // SubKey: HKEY_LOCAL_MACHINE\" + inSubkey
                // Property: Install
                // Value:  1 - If not installed the whole key shouldn't even exist so it should always be 1
                dotNetMock.Stub(x => x.GetValue("Install")).Return(1);
    
                if (null != inSP)
                {
                    // Stubs checking this registry:
                    // Hive:   HKLM
                    // SubKey: HKEY_LOCAL_MACHINE\" + inSubkey
                    // Property: SP
                    // Value:    null or 1, 2, 3, ...
                    dotNetMock.Stub(x => x.GetValue("SP")).Return(inSP);
                }
                return dotNetMock;
            }
            #endregion
    
  4. Now go forth and mock all your code that uses the Registry.

Here is the final test file.

using System;
using Microsoft.VisualStudio.TestTools.UnitTesting;
using Rhino.Mocks;
using SystemInfo;
using SystemInterface.Microsoft.Win32;

namespace DotNetFrameworkTest
{
    /// <summary>
    ///This is a test class for DotNetFrameworkTest and is intended
    ///to contain all DotNetFrameworkTest Unit Tests
    ///</summary>
    [TestClass()]
    public class DotNetFrameworkTest
    {
        #region Constructor tests
        /// <summary>
        ///A test for DotNetFramework Constructor
        ///</summary>
        [TestMethod()]
        public void DotNetFrameworkConstructorTest()
        {
            DotNetFramework target = new DotNetFramework();
            Assert.IsNotNull(target);
        }
        #endregion

        #region IAccessTheRegistry interface items test
        /// <summary>
        ///A test for ChangeBaseKey
        ///</summary>
        [TestMethod()]
        public void BaseKeyAndChangeBaseKeyTest()
        {
            DotNetFramework target = new DotNetFramework(); // TODO: Initialize to an appropriate value
            IRegistryKey defaultBaseKey = target.BaseKey;
            IRegistryKey inBaseKey = MockRepository.GenerateMock<IRegistryKey>();
            target.ChangeBaseKey(inBaseKey);

            // Make sure the newly assigned is not the same as the original
            Assert.AreNotEqual(target.BaseKey, defaultBaseKey);

            // Make sure that the assignment worked
            Assert.AreEqual(target.BaseKey, inBaseKey);
        }
        #endregion

        #region FoundDotNet11 tests
        /// <summary>
        ///A test for FoundDotNet11 mocking the key so it should return true
        ///</summary>
        [TestMethod()]
        public void FoundDotNet11_Test_KeyExists()
        {
            bool isInstalled = true;
            DotNetFramework target = new DotNetFramework();
            IRegistryKey key = CreateDotNetRegistryOpenSubKeyMock(DotNetFramework.REGPATH_DOTNET11_VERSION, isInstalled);
            target.ChangeBaseKey(key);
            bool expected = true;
            bool actual = target.FoundDotNet11;
            Assert.AreEqual(actual, expected);

            key.AssertWasCalled(x => x.OpenSubKey(DotNetFramework.REGPATH_DOTNET11_VERSION));
            IRegistryKey innerkey = key.OpenSubKey(DotNetFramework.REGPATH_DOTNET11_VERSION);
            innerkey.AssertWasCalled(x => x.GetValue("Install"));
            innerkey.AssertWasNotCalled(x => x.GetValue("SP"));
        }

        /// <summary>
        ///A test for FoundDotNet11 mocking the lack of a key so it should return false
        ///</summary>
        [TestMethod()]
        public void FoundDotNet11_Test_KeyDoesNotExist()
        {
            bool isInstalled = false;
            DotNetFramework target = new DotNetFramework();
            IRegistryKey key = CreateDotNetRegistryOpenSubKeyMock(DotNetFramework.REGPATH_DOTNET11_VERSION, isInstalled);
            target.ChangeBaseKey(key);
            bool expected = false;
            bool actual = target.FoundDotNet11;

            Assert.AreEqual(actual, expected);
            key.AssertWasCalled(x => x.OpenSubKey(DotNetFramework.REGPATH_DOTNET11_VERSION));
            Assert.IsNull(key.OpenSubKey(DotNetFramework.REGPATH_DOTNET11_VERSION));
        }
        #endregion

        #region FoundDotNet20 tests
        /// <summary>
        ///A test for FoundDotNet20 mocking the key so it should return true
        ///</summary>
        [TestMethod()]
        public void FoundDotNet20_Test_KeyExists()
        {
            bool isInstalled = true;
            DotNetFramework target = new DotNetFramework();
            IRegistryKey key = CreateDotNetRegistryOpenSubKeyMock(DotNetFramework.REGPATH_DOTNET20_VERSION, isInstalled);
            target.ChangeBaseKey(key);
            bool expected = true;
            bool actual = target.FoundDotNet20;
            Assert.AreEqual(actual, expected);

            key.AssertWasCalled(x => x.OpenSubKey(DotNetFramework.REGPATH_DOTNET20_VERSION));
            IRegistryKey innerkey = key.OpenSubKey(DotNetFramework.REGPATH_DOTNET20_VERSION);
            innerkey.AssertWasCalled(x => x.GetValue("Install"));
            innerkey.AssertWasNotCalled(x => x.GetValue("SP"));
        }

        /// <summary>
        ///A test for FoundDotNet20 mocking the lack of a key so it should return false
        ///</summary>
        [TestMethod()]
        public void FoundDotNet20_Test_KeyDoesNotExist()
        {
            bool isInstalled = false;
            DotNetFramework target = new DotNetFramework();
            IRegistryKey key = CreateDotNetRegistryOpenSubKeyMock(DotNetFramework.REGPATH_DOTNET20_VERSION, isInstalled);
            target.ChangeBaseKey(key);
            bool expected = false;
            bool actual = target.FoundDotNet20;

            Assert.AreEqual(actual, expected);
            key.AssertWasCalled(x => x.OpenSubKey(DotNetFramework.REGPATH_DOTNET20_VERSION));
            Assert.IsNull(key.OpenSubKey(DotNetFramework.REGPATH_DOTNET20_VERSION));
        }
        #endregion

        #region FoundDOtNet20SP1 tests
        /// <summary>
        ///A test for FoundDotNet20SP1 mocking the key so it should return true
        ///</summary>
        [TestMethod()]
        public void FoundDotNet20SP1_Test_KeyExistsWithSP1()
        {
            bool isInstalled = true;
            int? sp = 1;
            DotNetFramework target = new DotNetFramework();
            IRegistryKey key = CreateDotNetRegistryOpenSubKeyMock(DotNetFramework.REGPATH_DOTNET20_VERSION, isInstalled, sp);
            target.ChangeBaseKey(key);
            bool expected = true;
            bool actual = target.FoundDotNet20SP1;
            
            Assert.AreEqual(actual, expected);
            key.AssertWasCalled(x => x.OpenSubKey(DotNetFramework.REGPATH_DOTNET20_VERSION));
            IRegistryKey innerkey = key.OpenSubKey(DotNetFramework.REGPATH_DOTNET20_VERSION);
            innerkey.AssertWasCalled(x => x.GetValue("Install"));
            innerkey.AssertWasCalled(x => x.GetValue("SP"));
        }

        /// <summary>
        ///A test for FoundDotNet20SP1 mocking the key so it should return false due to no service pack
        ///</summary>
        [TestMethod()]
        public void FoundDotNet20SP1_Test_KeyExistsWithoutSP1()
        {
            bool isInstalled = true;
            int? sp = null;
            DotNetFramework target = new DotNetFramework();
            IRegistryKey key = CreateDotNetRegistryOpenSubKeyMock(DotNetFramework.REGPATH_DOTNET20_VERSION, isInstalled, sp);
            target.ChangeBaseKey(key);
            bool expected = false;
            bool actual = target.FoundDotNet20SP1;
            
            Assert.AreEqual(actual, expected);
            key.AssertWasCalled(x => x.OpenSubKey(DotNetFramework.REGPATH_DOTNET20_VERSION));
            IRegistryKey innerkey = key.OpenSubKey(DotNetFramework.REGPATH_DOTNET20_VERSION);
            innerkey.AssertWasCalled(x => x.GetValue("Install"));
            innerkey.AssertWasCalled(x => x.GetValue("SP"));
        }

        /// <summary>
        ///A test for FoundDotNet20SP1 mocking the lack of a key so it should return false
        ///</summary>
        [TestMethod()]
        public void FoundDotNet20SP1_Test_KeyDoesNotExist()
        {
            bool isInstalled = false;
            DotNetFramework target = new DotNetFramework();
            IRegistryKey key = CreateDotNetRegistryOpenSubKeyMock(DotNetFramework.REGPATH_DOTNET20_VERSION, isInstalled);
            target.ChangeBaseKey(key);
            bool expected = false;
            bool actual = target.FoundDotNet20SP1;

            Assert.AreEqual(actual, expected);
            key.AssertWasCalled(x => x.OpenSubKey(DotNetFramework.REGPATH_DOTNET20_VERSION));
            Assert.IsNull(key.OpenSubKey(DotNetFramework.REGPATH_DOTNET20_VERSION));
        }
        #endregion

        #region FoundDOtNet20SP2 tests
        /// <summary>
        ///A test for FoundDotNet20SP2 mocking the key so it should return true
        ///</summary>
        [TestMethod()]
        public void FoundDotNet20SP2_Test_KeyExistsWithSP2()
        {
            bool isInstalled = true;
            int? sp = 2;
            DotNetFramework target = new DotNetFramework();
            IRegistryKey key = CreateDotNetRegistryOpenSubKeyMock(DotNetFramework.REGPATH_DOTNET20_VERSION, isInstalled, sp);
            target.ChangeBaseKey(key);
            bool expected = true;
            bool actual = target.FoundDotNet20SP2;

            Assert.AreEqual(actual, expected);
            key.AssertWasCalled(x => x.OpenSubKey(DotNetFramework.REGPATH_DOTNET20_VERSION));
            IRegistryKey innerkey = key.OpenSubKey(DotNetFramework.REGPATH_DOTNET20_VERSION);
            innerkey.AssertWasCalled(x => x.GetValue("Install"));
            innerkey.AssertWasCalled(x => x.GetValue("SP"));
        }

        /// <summary>
        ///A test for FoundDotNet20SP2 mocking the key so it should return false because it only has SP1
        ///</summary>
        [TestMethod()]
        public void FoundDotNet20SP2_Test_KeyExistsWithSP1()
        {
            bool isInstalled = true;
            int? sp = 1;
            DotNetFramework target = new DotNetFramework();
            IRegistryKey key = CreateDotNetRegistryOpenSubKeyMock(DotNetFramework.REGPATH_DOTNET20_VERSION, isInstalled, sp);
            target.ChangeBaseKey(key);
            bool expected = false;
            bool actual = target.FoundDotNet20SP2;

            Assert.AreEqual(actual, expected);
            key.AssertWasCalled(x => x.OpenSubKey(DotNetFramework.REGPATH_DOTNET20_VERSION));
            IRegistryKey innerkey = key.OpenSubKey(DotNetFramework.REGPATH_DOTNET20_VERSION);
            innerkey.AssertWasCalled(x => x.GetValue("Install"));
            innerkey.AssertWasCalled(x => x.GetValue("SP"));
        }

        /// <summary>
        ///A test for FoundDotNet20SP2 mocking the key so it should return false due to no service pack
        ///</summary>
        [TestMethod()]
        public void FoundDotNet20SP2_Test_KeyExistsWithoutSP()
        {
            bool isInstalled = true;
            int? sp = null;
            DotNetFramework target = new DotNetFramework();
            IRegistryKey key = CreateDotNetRegistryOpenSubKeyMock(DotNetFramework.REGPATH_DOTNET20_VERSION, isInstalled, sp);
            target.ChangeBaseKey(key);
            bool expected = false;
            bool actual = target.FoundDotNet20SP2;

            Assert.AreEqual(actual, expected);
            key.AssertWasCalled(x => x.OpenSubKey(DotNetFramework.REGPATH_DOTNET20_VERSION));
            IRegistryKey innerkey = key.OpenSubKey(DotNetFramework.REGPATH_DOTNET20_VERSION);
            innerkey.AssertWasCalled(x => x.GetValue("Install"));
            innerkey.AssertWasCalled(x => x.GetValue("SP"));
        }

        /// <summary>
        ///A test for FoundDotNet20SP2 mocking the lack of a key so it should return false
        ///</summary>
        [TestMethod()]
        public void FoundDotNet20SP2_Test_KeyDoesNotExist()
        {
            bool isInstalled = false;
            DotNetFramework target = new DotNetFramework();
            IRegistryKey key = CreateDotNetRegistryOpenSubKeyMock(DotNetFramework.REGPATH_DOTNET20_VERSION, isInstalled);
            target.ChangeBaseKey(key);
            bool expected = false;
            bool actual = target.FoundDotNet20SP2;

            Assert.AreEqual(actual, expected);
            key.AssertWasCalled(x => x.OpenSubKey(DotNetFramework.REGPATH_DOTNET20_VERSION));
            Assert.IsNull(key.OpenSubKey(DotNetFramework.REGPATH_DOTNET20_VERSION));
        }
        #endregion

        #region FoundDotNet30 tests
        /// <summary>
        ///A test for FoundDotNet30 mocking the key so it should return true
        ///</summary>
        [TestMethod()]
        public void FoundDotNet30_Test_KeyExists()
        {
            bool isInstalled = true;
            DotNetFramework target = new DotNetFramework();
            IRegistryKey key = CreateDotNetRegistryOpenSubKeyMock(DotNetFramework.REGPATH_DOTNET30_VERSION, isInstalled);
            target.ChangeBaseKey(key);
            bool expected = true;
            bool actual = target.FoundDotNet30;

            Assert.AreEqual(actual, expected);
            key.AssertWasCalled(x => x.OpenSubKey(DotNetFramework.REGPATH_DOTNET30_VERSION));
            IRegistryKey innerkey = key.OpenSubKey(DotNetFramework.REGPATH_DOTNET30_VERSION);
            innerkey.AssertWasCalled(x => x.GetValue("Install"));
            innerkey.AssertWasNotCalled(x => x.GetValue("SP"));
        }

        /// <summary>
        ///A test for FoundDotNet30 mocking the lack of a key so it should return false
        ///</summary>
        [TestMethod()]
        public void FoundDotNet30_Test_KeyDoesNotExist()
        {
            bool isInstalled = false;
            DotNetFramework target = new DotNetFramework();
            IRegistryKey key = CreateDotNetRegistryOpenSubKeyMock(DotNetFramework.REGPATH_DOTNET30_VERSION, isInstalled);
            target.ChangeBaseKey(key);
            bool expected = false;
            bool actual = target.FoundDotNet30;

            Assert.AreEqual(actual, expected);
            key.AssertWasCalled(x => x.OpenSubKey(DotNetFramework.REGPATH_DOTNET30_VERSION));
            Assert.IsNull(key.OpenSubKey(DotNetFramework.REGPATH_DOTNET30_VERSION));
        }
        #endregion

        #region FoundDOtNet30SP1 tests
        /// <summary>
        ///A test for FoundDotNet30SP1 mocking the key so it should return true
        ///</summary>
        [TestMethod()]
        public void FoundDotNet30SP1_Test_KeyExistsWithSP1()
        {
            bool isInstalled = true;
            int? sp = 1;
            DotNetFramework target = new DotNetFramework();
            IRegistryKey key = CreateDotNetRegistryOpenSubKeyMock(DotNetFramework.REGPATH_DOTNET30_VERSION, isInstalled, sp);
            target.ChangeBaseKey(key);
            bool expected = true;
            bool actual = target.FoundDotNet30SP1;

            Assert.AreEqual(actual, expected);
            key.AssertWasCalled(x => x.OpenSubKey(DotNetFramework.REGPATH_DOTNET30_VERSION));
            IRegistryKey innerkey = key.OpenSubKey(DotNetFramework.REGPATH_DOTNET30_VERSION);
            innerkey.AssertWasCalled(x => x.GetValue("Install"));
            innerkey.AssertWasCalled(x => x.GetValue("SP"));
        }

        /// <summary>
        ///A test for FoundDotNet30SP1 mocking the key so it should return false due to no service pack
        ///</summary>
        [TestMethod()]
        public void FoundDotNet30SP1_Test_KeyExistsWithoutSP()
        {
            bool isInstalled = true;
            int? sp = null;
            DotNetFramework target = new DotNetFramework();
            IRegistryKey key = CreateDotNetRegistryOpenSubKeyMock(DotNetFramework.REGPATH_DOTNET30_VERSION, isInstalled, sp);
            target.ChangeBaseKey(key);
            bool expected = false;
            bool actual = target.FoundDotNet30SP1;

            Assert.AreEqual(actual, expected);
            key.AssertWasCalled(x => x.OpenSubKey(DotNetFramework.REGPATH_DOTNET30_VERSION));
            IRegistryKey innerkey = key.OpenSubKey(DotNetFramework.REGPATH_DOTNET30_VERSION);
            innerkey.AssertWasCalled(x => x.GetValue("Install"));
            innerkey.AssertWasCalled(x => x.GetValue("SP"));
        }

        /// <summary>
        ///A test for FoundDotNet30SP1 mocking the lack of a key so it should return false
        ///</summary>
        [TestMethod()]
        public void FoundDotNet30SP1_Test_KeyDoesNotExist()
        {
            bool isInstalled = false;
            DotNetFramework target = new DotNetFramework();
            IRegistryKey key = CreateDotNetRegistryOpenSubKeyMock(DotNetFramework.REGPATH_DOTNET30_VERSION, isInstalled);
            target.ChangeBaseKey(key);
            bool expected = false;
            bool actual = target.FoundDotNet30SP1;

            Assert.AreEqual(actual, expected);
            key.AssertWasCalled(x => x.OpenSubKey(DotNetFramework.REGPATH_DOTNET30_VERSION));
            Assert.IsNull(key.OpenSubKey(DotNetFramework.REGPATH_DOTNET30_VERSION));
        }
        #endregion

        #region FoundDOtNet30SP2 tests
        /// <summary>
        ///A test for FoundDotNet30SP2 mocking the key so it should return true
        ///</summary>
        [TestMethod()]
        public void FoundDotNet30SP2_Test_KeyExistsWithSP2()
        {
            bool isInstalled = true;
            int? sp = 2;
            DotNetFramework target = new DotNetFramework();
            IRegistryKey key = CreateDotNetRegistryOpenSubKeyMock(DotNetFramework.REGPATH_DOTNET30_VERSION, isInstalled, sp);
            target.ChangeBaseKey(key);
            bool expected = true;
            bool actual = target.FoundDotNet30SP2;

            Assert.AreEqual(actual, expected);
            key.AssertWasCalled(x => x.OpenSubKey(DotNetFramework.REGPATH_DOTNET30_VERSION));
            IRegistryKey innerkey = key.OpenSubKey(DotNetFramework.REGPATH_DOTNET30_VERSION);
            innerkey.AssertWasCalled(x => x.GetValue("Install"));
            innerkey.AssertWasCalled(x => x.GetValue("SP"));
        }

        /// <summary>
        ///A test for FoundDotNet30SP2 mocking the key so it should return false because it only has SP1
        ///</summary>
        [TestMethod()]
        public void FoundDotNet30SP2_Test_KeyExistsWithSP1()
        {
            bool isInstalled = true;
            int? sp = 1;
            DotNetFramework target = new DotNetFramework();
            IRegistryKey key = CreateDotNetRegistryOpenSubKeyMock(DotNetFramework.REGPATH_DOTNET30_VERSION, isInstalled, sp);
            target.ChangeBaseKey(key);
            bool expected = false;
            bool actual = target.FoundDotNet30SP2;

            Assert.AreEqual(actual, expected);
            key.AssertWasCalled(x => x.OpenSubKey(DotNetFramework.REGPATH_DOTNET30_VERSION));
            IRegistryKey innerkey = key.OpenSubKey(DotNetFramework.REGPATH_DOTNET30_VERSION);
            innerkey.AssertWasCalled(x => x.GetValue("Install"));
            innerkey.AssertWasCalled(x => x.GetValue("SP"));
        }

        /// <summary>
        ///A test for FoundDotNet30SP2 mocking the key so it should return false due to no service pack
        ///</summary>
        [TestMethod()]
        public void FoundDotNet30SP2_Test_KeyExistsWithoutSP()
        {
            bool isInstalled = true;
            int? sp = null;
            DotNetFramework target = new DotNetFramework();
            IRegistryKey key = CreateDotNetRegistryOpenSubKeyMock(DotNetFramework.REGPATH_DOTNET30_VERSION, isInstalled, sp);
            target.ChangeBaseKey(key);
            bool expected = false;
            bool actual = target.FoundDotNet30SP2;

            Assert.AreEqual(actual, expected);
            key.AssertWasCalled(x => x.OpenSubKey(DotNetFramework.REGPATH_DOTNET30_VERSION));
            IRegistryKey innerkey = key.OpenSubKey(DotNetFramework.REGPATH_DOTNET30_VERSION);
            innerkey.AssertWasCalled(x => x.GetValue("Install"));
            innerkey.AssertWasCalled(x => x.GetValue("SP"));
        }

        /// <summary>
        ///A test for FoundDotNet30SP2 mocking the lack of a key so it should return false
        ///</summary>
        [TestMethod()]
        public void FoundDotNet30SP2_Test_KeyDoesNotExist()
        {
            bool isInstalled = false;
            DotNetFramework target = new DotNetFramework();
            IRegistryKey key = CreateDotNetRegistryOpenSubKeyMock(DotNetFramework.REGPATH_DOTNET30_VERSION, isInstalled);
            target.ChangeBaseKey(key);
            bool expected = false;
            bool actual = target.FoundDotNet30SP2;

            Assert.AreEqual(actual, expected);
            key.AssertWasCalled(x => x.OpenSubKey(DotNetFramework.REGPATH_DOTNET30_VERSION));
            Assert.IsNull(key.OpenSubKey(DotNetFramework.REGPATH_DOTNET30_VERSION));
        }
        #endregion
        
        #region FoundDotNet35 tests
        /// <summary>
        ///A test for FoundDotNet35 mocking the key so it should return true
        ///</summary>
        [TestMethod()]
        public void FoundDotNet35_Test_KeyExists()
        {
            bool isInstalled = true;
            DotNetFramework target = new DotNetFramework();
            IRegistryKey key = CreateDotNetRegistryOpenSubKeyMock(DotNetFramework.REGPATH_DOTNET35_VERSION, isInstalled);
            target.ChangeBaseKey(key);
            bool expected = true;
            bool actual = target.FoundDotNet35;

            Assert.AreEqual(actual, expected);
            key.AssertWasCalled(x => x.OpenSubKey(DotNetFramework.REGPATH_DOTNET35_VERSION));
            IRegistryKey innerkey = key.OpenSubKey(DotNetFramework.REGPATH_DOTNET35_VERSION);
            innerkey.AssertWasCalled(x => x.GetValue("Install"));
            innerkey.AssertWasNotCalled(x => x.GetValue("SP"));
        }

        /// <summary>
        ///A test for FoundDotNet35 mocking the lack of a key so it should return false
        ///</summary>
        [TestMethod()]
        public void FoundDotNet35_Test_KeyDoesNotExist()
        {
            bool isInstalled = false;
            DotNetFramework target = new DotNetFramework();
            IRegistryKey key = CreateDotNetRegistryOpenSubKeyMock(DotNetFramework.REGPATH_DOTNET35_VERSION, isInstalled);
            target.ChangeBaseKey(key);
            bool expected = false;
            bool actual = target.FoundDotNet35;

            Assert.AreEqual(actual, expected);
            key.AssertWasCalled(x => x.OpenSubKey(DotNetFramework.REGPATH_DOTNET35_VERSION));
            Assert.IsNull(key.OpenSubKey(DotNetFramework.REGPATH_DOTNET35_VERSION));
        }
        #endregion

        #region FoundDOtNet35SP1 tests
        /// <summary>
        ///A test for FoundDotNet35SP1 mocking the key so it should return true
        ///</summary>
        [TestMethod()]
        public void FoundDotNet35SP1_Test_KeyExistsWithSP1()
        {
            bool isInstalled = true;
            int? sp = 1;
            DotNetFramework target = new DotNetFramework();
            IRegistryKey key = CreateDotNetRegistryOpenSubKeyMock(DotNetFramework.REGPATH_DOTNET35_VERSION, isInstalled, sp);
            target.ChangeBaseKey(key);
            bool expected = true;
            bool actual = target.FoundDotNet35SP1;

            Assert.AreEqual(actual, expected);
            key.AssertWasCalled(x => x.OpenSubKey(DotNetFramework.REGPATH_DOTNET35_VERSION));
            IRegistryKey innerkey = key.OpenSubKey(DotNetFramework.REGPATH_DOTNET35_VERSION);
            innerkey.AssertWasCalled(x => x.GetValue("Install"));
            innerkey.AssertWasCalled(x => x.GetValue("SP"));
        }

        /// <summary>
        ///A test for FoundDotNet35SP1 mocking the key so it should return false due to no service pack
        ///</summary>
        [TestMethod()]
        public void FoundDotNet35SP1_Test_KeyExistsWithoutSP()
        {
            bool isInstalled = true;
            int? sp = null;
            DotNetFramework target = new DotNetFramework();
            IRegistryKey key = CreateDotNetRegistryOpenSubKeyMock(DotNetFramework.REGPATH_DOTNET35_VERSION, isInstalled, sp);
            target.ChangeBaseKey(key);
            bool expected = false;
            bool actual = target.FoundDotNet35SP1;

            Assert.AreEqual(actual, expected);
            key.AssertWasCalled(x => x.OpenSubKey(DotNetFramework.REGPATH_DOTNET35_VERSION));
            IRegistryKey innerkey = key.OpenSubKey(DotNetFramework.REGPATH_DOTNET35_VERSION);
            innerkey.AssertWasCalled(x => x.GetValue("Install"));
            innerkey.AssertWasCalled(x => x.GetValue("SP"));
        }

        /// <summary>
        ///A test for FoundDotNet35SP1 mocking the lack of a key so it should return false
        ///</summary>
        [TestMethod()]
        public void FoundDotNet35SP1_Test_KeyDoesNotExist()
        {
            bool isInstalled = false;
            DotNetFramework target = new DotNetFramework();
            IRegistryKey key = CreateDotNetRegistryOpenSubKeyMock(DotNetFramework.REGPATH_DOTNET35_VERSION, isInstalled);
            target.ChangeBaseKey(key);
            bool expected = false;
            bool actual = target.FoundDotNet35SP1;

            Assert.AreEqual(actual, expected);
            key.AssertWasCalled(x => x.OpenSubKey(DotNetFramework.REGPATH_DOTNET35_VERSION));
            Assert.IsNull(key.OpenSubKey(DotNetFramework.REGPATH_DOTNET35_VERSION));
        }
        #endregion

        #region FoundDotNet 4 Full tests
        /// <summary>
        ///A test for FoundDotNet4 (full) mocking the key so it should return true
        ///</summary>
        [TestMethod()]
        public void FoundDotNet4_Full_Test_KeyExists()
        {
            bool isInstalled = true;
            DotNetFramework target = new DotNetFramework();
            IRegistryKey key = CreateDotNetRegistryOpenSubKeyMock(DotNetFramework.REGPATH_DOTNET40_VERSION, isInstalled);
            target.ChangeBaseKey(key);
            bool expected = true;
            bool actual = target.FoundDotNet4;

            Assert.AreEqual(actual, expected);
            key.AssertWasCalled(x => x.OpenSubKey(DotNetFramework.REGPATH_DOTNET40_VERSION));
            IRegistryKey innerkey = key.OpenSubKey(DotNetFramework.REGPATH_DOTNET40_VERSION);
            innerkey.AssertWasCalled(x => x.GetValue("Install"));
            innerkey.AssertWasNotCalled(x => x.GetValue("SP"));
        }

        /// <summary>
        ///A test for FoundDotNet4 (full) mocking the lack of a key so it should return false
        ///</summary>
        [TestMethod()]
        public void FoundDotNet4_Test_KeyDoesNotExist()
        {
            bool isInstalled = false;
            DotNetFramework target = new DotNetFramework();
            IRegistryKey key = CreateDotNetRegistryOpenSubKeyMock(DotNetFramework.REGPATH_DOTNET40_VERSION, isInstalled);
            target.ChangeBaseKey(key);
            bool expected = false;
            bool actual = target.FoundDotNet4;

            Assert.AreEqual(actual, expected);
            key.AssertWasCalled(x => x.OpenSubKey(DotNetFramework.REGPATH_DOTNET40_VERSION));
            Assert.IsNull(key.OpenSubKey(DotNetFramework.REGPATH_DOTNET40_VERSION));
        }
        #endregion

        #region FoundDotNet4 Client tests
        /// <summary>
        ///A test for FoundDotNet4Client mocking the key so it should return true
        ///</summary>
        [TestMethod()]
        public void FoundDotNet4Client_Test_KeyExists()
        {
            bool isInstalled = true;
            DotNetFramework target = new DotNetFramework();
            IRegistryKey key = CreateDotNetRegistryOpenSubKeyMock(DotNetFramework.REGPATH_DOTNET40_VERSION_CLIENT, isInstalled);
            target.ChangeBaseKey(key);
            bool expected = true;
            bool actual = target.FoundDotNet4Client;

            Assert.AreEqual(actual, expected);
            key.AssertWasCalled(x => x.OpenSubKey(DotNetFramework.REGPATH_DOTNET40_VERSION_CLIENT));
            IRegistryKey innerkey = key.OpenSubKey(DotNetFramework.REGPATH_DOTNET40_VERSION_CLIENT);
            innerkey.AssertWasCalled(x => x.GetValue("Install"));
            innerkey.AssertWasNotCalled(x => x.GetValue("SP"));
        }

        /// <summary>
        ///A test for FoundDotNet4 (client) mocking the lack of a key so it should return false
        ///</summary>
        [TestMethod()]
        public void FoundDotNet4Client_Test_KeyDoesNotExist()
        {
            bool isInstalled = false;
            DotNetFramework target = new DotNetFramework();
            IRegistryKey key = CreateDotNetRegistryOpenSubKeyMock(DotNetFramework.REGPATH_DOTNET40_VERSION_CLIENT, isInstalled);
            target.ChangeBaseKey(key);
            bool expected = false;
            bool actual = target.FoundDotNet4Client;

            Assert.AreEqual(actual, expected);
            key.AssertWasCalled(x => x.OpenSubKey(DotNetFramework.REGPATH_DOTNET40_VERSION_CLIENT));
            Assert.IsNull(key.OpenSubKey(DotNetFramework.REGPATH_DOTNET40_VERSION_CLIENT));
        }
        #endregion

        #region HasDotNetFrameworkTest
        /// <summary>
        ///A test for HasDotNetFramework
        ///</summary>
        [TestMethod()]
        public void HasDotNetFrameworkTest()
        {
            // No need to test this as all properties test this
        }

        #endregion

        #region Test Helper Functions
        /// <summary>
        /// Mock to pretend to be this registry subkey:
        /// Hive:   HKLM
        /// 
        /// No stubbing is preconfigured
        /// </summary>
        /// <returns>IRegistryKey</returns>
        private IRegistryKey CreateMockOfHKLM()
        {
            // Mock to pretend to be this registry key:
            // Hive:   HKLM
            IRegistryKey hklmMock = MockRepository.GenerateMock<IRegistryKey>();
            hklmMock.Stub(x => x.Name).Return("HKEY_LOCAL_MACHINE");

            return hklmMock;
        }

        /// <summary>
        /// Mock to pretend to be this registry subkey:
        /// Hive:   HKLM
        /// 
        /// It has stubs preconfigured
        /// </summary>
        /// <returns>IRegistry that is a mock of HKLM with IIS Version stubs.</returns>
        private IRegistryKey CreateDotNetRegistryOpenSubKeyMock(string inSubkey, bool inIsInstalled = true, int? inSP = null)
        {
            // Mock to pretend to be this registry subkey:
            // Hive:   HKLM
            IRegistryKey hklmMock = CreateMockOfHKLM();

            // Allow to test a key that doesn't exist (null) or one that does.
            IRegistryKey dotNetMock = null;
            if (inIsInstalled)
            {
                dotNetMock = CreateDotNetRegistryGetValueMock(inSubkey, inSP);
            }

            // Stubs using hklmMock to open and return this registry key
            // and return dotNetMock:
            hklmMock.Stub(x => x.OpenSubKey(inSubkey)).Return(dotNetMock);
            
            return hklmMock;
        }

        private IRegistryKey CreateDotNetRegistryGetValueMock(string inSubkey, int? inSP)
        {
            // Mock to pretend to be this subkey passed in:
            // Hive:   HKLM
            // SubKey: HKEY_LOCAL_MACHINE\" + inSubkey
            IRegistryKey dotNetMock = MockRepository.GenerateMock<IRegistryKey>();
            dotNetMock.Stub(x => x.Name).Return(@"HKEY_LOCAL_MACHINE\" + inSubkey);

            // Stubs checking the available registry properties:
            // Hive:   HKLM
            // SubKey: HKEY_LOCAL_MACHINE\" + inSubkey
            // Properties: "Install", "SP"
            dotNetMock.Stub(x => x.GetValueNames()).Return(new String[] { "Install", "SP" });

            // Stubs checking this registry:
            // Hive:   HKLM
            // SubKey: HKEY_LOCAL_MACHINE\" + inSubkey
            // Property: Install
            // Value:  1 - If not installed the whole key shouldn't even exist so it should always be 1
            dotNetMock.Stub(x => x.GetValue("Install")).Return(1);

            if (null != inSP)
            {
                // Stubs checking this registry:
                // Hive:   HKLM
                // SubKey: HKEY_LOCAL_MACHINE\" + inSubkey
                // Property: SP
                // Value:    null or 1, 2, 3, ...
                dotNetMock.Stub(x => x.GetValue("SP")).Return(inSP);
            }
            return dotNetMock;
        }
        #endregion

    }
}

Return to C# Unit Test Tutorial

Unit Testing code that touches the system

Unit Tests should be fast and simple and they should not touch the system. What we mean by touching the system is any code that actually changes the file system or registry of the build system that runs the Unit Tests. Also any code that touches a remote system such as a database or a web server as these remote system should not have to exist during a Unit Test.

Unit Test Presentation (using Open Office Impress)

Question: So if your code accesses the system, how do you test this code?

Answer: You use Interface-based design and a library that can mock that interface.

Well, it is not exactly simple.

Question: What if you are using some one elses code, such as standard C# libraries in the System or Microsoft namespaces?

Answer: Imagine you need to unit test code that touches the registry. You must do the following steps:

  1. Create an interface for accessing the registry that matches Microsoft.Win32.Registry and Microsoft.Win32.RegistryKey (and you may have to create an interfaces for each object they need as well).
  2. Create a wrapper that wraps the Microsoft.Win32.Registry and Microsoft.Win32.RegistryKey (again, you have to create a wrapper for each objects they need as well).
  3. Change your production code to use the interfaces and the wrappers instead of using the system code.  For example, if dealing with the Registry this involves Microsoft.Win32.Registry and Microsoft.Win32.RegistryKey directly.Don’t use these objects directly, instead you use these objects:
    SystemInterface.Microsoft.Win32.IRegistry
    SystemInterface.Microsoft.Win32.IRegistryKey
    SystemWrapper.Microsoft.Win32.RegistryWrap
    SystemWrapper.Microsoft.Win32.RegistryKeyWrap
  4. Provide a method in your production code for replacing anywhere you use IRegistry or IRegistryKey with any object that implements the interface.
  5. In your Unit Test, mock any neededIRegistry and IRegistryKey objects.

The best solution, long-term, is that Microsoft adds interfaces to the standard .NET libraries and exposes these interfaces so a wrapper isn’t needed. If you agree, vote for this enhancement here: Implement interfaces for your objects so we don’t have use SystemWrapper.codeplex.com

However, since Microsoft hasn’t done this, you have to do it yourself. But all of this probably takes more time than your project will allow you to take, so I am going to try to get you there faster.
Step 1 and Step 2 are done for you, all you have to do is download the dll or source from here:
http://SystemWrapper.codeplex.com
Step 3 and 4 are not done for you but there are examples in the SystemWrapper project.
Step 5 can be done extremely quickly with a free (BSD Licensed) tool called RhinoMocks.
So the new steps become these:

Step 1 – Download SystemWrapper

  1. Go to http://SystemWrapper.codeplex.com and download the latest dll or the latest source.
  2. Copy the SystemInterface.dll and SystemWrapper.dll into your project (perhaps you already have a libs directory).
  3. Add references to these two dlls in your release code.
  4. Add a reference only to SystemInterface.dll in your Unit Test project.

Step 2 – Change your code to use Interfaces and Wrappers

  1. Find any place in your code where it touches the system. For example, if you touch the registry, find any place you call Registry or RegistryKey objects or reference Microsoft.Win32.
    Hint: Use the search feature in your IDE.
  2. Replace the reference with a reference to SystemWrapper and SystemInterfaces. For example, if replacingrRegistry code,
    SystemInterface.Microsoft.Win32
    SystemWrapper.Microsoft.Win32
  3. For any object that touches the system, change that object to be instantiated using the interface. For example, replace RegistryKey objects with IRegistryKey objects.

Step 3 – Allow for replacing the Interface-based objects

Create a property or function that allows you to replace the object you are mocking so you can pass in an object that is mocked.

Here is an example of how to do this when mocking a RegistryKey object using IRegistryKey.

  1. Implement the IAccessTheRegistry interface from the SystemInterface.Microsoft.Win32 namespace. Here is a sample implementation that uses lazy property injection:
            #region IAccessTheRegistry Members
    
            public IRegistryKey BaseKey
            {
                get { return _BaseKey ?? (_BaseKey = new RegistryWrap().LocalMachine); }
                internal set { _BaseKey value; }
            } private IRegistryKey _BaseKey;
    
            #endregion
    

    Notice that the setter is internal. This is because unit tests can usually access an internal method with InternalsVisibleTo. The internal set is hidden for code not in the same assembly and not included in InternalsVisibleTo.

Note: You may want to look into the “Factory” design pattern.

Step 4 – Download and Reference RhinoMocks in your Unit Test

In this step you need to download RhinoMocks and reference it with your Unit Test project. Your release project won’t need it.

  1. Go to http://hibernatingrhinos.com/open-source/rhino-mocks and download RhinoMocks.
  2. Add RhinoMocks.dll

Step 5 – Mock IRegistryKey in your Unit Test

For this, you have to understand and know how to use RhinoMocks and this takes some learning.

Instead of trying to explain this here, let’s go straight into the examples.

Examples

Forthcoming…

  1. Unit Testing Registry access with RhinoMocks and SystemWrapper
  2. Unit Testing File IO with RhinoMocks and SystemWrapper

Return to C# Unit Test Tutorial

Avoiding the MSVCR110.dll or MSVCR110D.dll is missing error

MSVCR110.dll

This MSVCR110.dll is the Microsoft Visual C++ Redistributable dll that is needed for projects built with Visual Studio 2011. The dll letters spell this out.

MS = Microsoft
V = Visual
C = C++
R = Redistributable

If you create a C++ project in Visual Studio 2011, this file is probably needed.

MSVCR110D.dll

The MSVCR110D.dll is almost the same file only the D at the end stands for Debug. This file has debugging enabled.

Why the error?

Ok, so recently I switched to Visual Studio 2011.  I had a C++ application that worked perfectly in Visual Studio 2008.  Once I compiled it with Visual Studio 2011 and ran it on a clean 2008 server (fully patched but otherwise clean), it failed to run with the following error.

TestWin32.exe – System Error

The program can’t start because MSVCR110.dll is missing from your computer. Try reinstalling the program to fix this problem.

Here is the screen shot:

MSVCR110.dll

The same things happens with the debug version of the file, only it is a the debug version of the same DLL as noted by the fact that the DLL name ends with D.

Autorun – System Error

The program can’t start because MSVCR110.dll is missing from your computer. Try reinstalling the program to fix this problem.

The screen shot is identical except for the D in the dll name.

MSVCR110d.dll

I create a new project in Visual Studio 2011 using the project type of C++ Win32 Project and without making a single change to the default project, I built the file and tested it on my clean machine and the same issue occurred.

So obviously that is not acceptable.  It seems like this should just not happen by default, but unfortunately it does.

Solution

It was actually really easy to resolve for my one project.

Here is what I did.

You can solve this any of the following ways:

  1. Statically link to the dll files so they are compiled into my executable instead of referenced as separate dll files.
  2. Included the dll in the same directory as the exe (I actually didn’t try this but I assume it would work).
  3. Forced everyone to install the VC++ Runtime Redistributable before running the app.

The first option seems the most stable and robust and easiest for a single executable. So that is the one I am going to use.

The second option doesn’t really make sense to me and I would probably never do it.  Maybe if I had dozens of executable files that all required the same DLL and I didn’t have an installer, and I wanted to conserve size, which probably wouldn’t happen for me since I am pretty good at creating a quick installer. Though you might be in this a situation.

The third option would make sense if I was planning on running my executable after an install.  During the install I could include the VC++ Runtime Redistributable and all would be fine.

Statically Linking the DLLs

Make sure you resolve it for both Release and Debug.  The steps are slightly different.

Release

  1. In Visual Studio, I went to the project Properties.
  2. I changed my Configuration to Release.
  3. I went under Configuration Properties | C/C++ | Code Generation
  4. Look at the Runtime Library setting.  It is set to this: Multi-threaded DLL (/MD)
    Change it to this: Multi-threaded (/MT)
  5. Rebuild.

Debug

Almost exactly the same as release.

  1. In Visual Studio, I went to the project Properties.
  2. I changed my Configuration to Debug.
  3. I went under Configuration Properties | C/C++ | Code Generation
  4. Look at the Runtime Library setting.  It is set to this: Multi-threaded Debug DLL (/MDd)
    Change it to this: Multi-threaded Debug (/MTd)
  5. Rebuild the debug

It might be a good idea for me to figure out how to change the project so when I create a new project of this type, those settings are the default.