How to compile WinPcap with Visual Studio 2010?
The documentation for WinPcap was pretty poor. The last update for Visual Studio was for 2005, so this hasn’t been updated for Visual Studio 2008 or Visual Studio 2010.
Also, the steps don’t say what type of C++ project was created. This is probably why it missing information, such as the fact that WIN32 must be defined.
So I thought I would get it working and provide a post someone could actually find. I had to read the pcap.h file myself to figure out what was missing in the documentation.
Prerequisites
It is expected you have Visual Studio 2010 already. It may work the same with Visual C++ 2010.
Step 1 – Create a new empty project
- In Visual Studio go to File | New | Project.
- Select Other Languages | Visual C++ | General | Empty Project
- Enter a Project name, Location, and Solution Name.
- Take note of the solution directory.
- Click OK.
This creates the following directory structure:
.\WinPcapExample\WinPcapExample.sdf
.\WinPcapExample\WinPcapExample.sln
.\WinPcapExample\WinPcapExample\
.\WinPcapExample\WinPcapExample\WinPcapExample.vcxproj
.\WinPcapExample\WinPcapExample\WinPcapExample.vcxproj.filters
.\WinPcapExample\WinPcapExample\WinPcapExample.vcxproj.user
Step 2 – Create a main.cpp file
- Right-click on the project and choose Add | New Item.
- Select C++ File (.cpp)
- Enter the name as Main.cpp.
- Click Ok.
- Add the standard main function to the file:
int main(int argc, char *argv[]) { } - Save the file.
Step 3 – Download and extract WinPCap
- Go to the WinPcap developer page:
http://www.winpcap.org/devel.htm - Download the latest stable version of WinPcap.
- Extract to your solution directory.
Step 4 – Configure the Project properties
Now that the needed resources are in your solution directory, you can configure your project to access them.
- In Visual Studio, right-click on your project and choose Properties.
- Make the following configuration changes to your project:
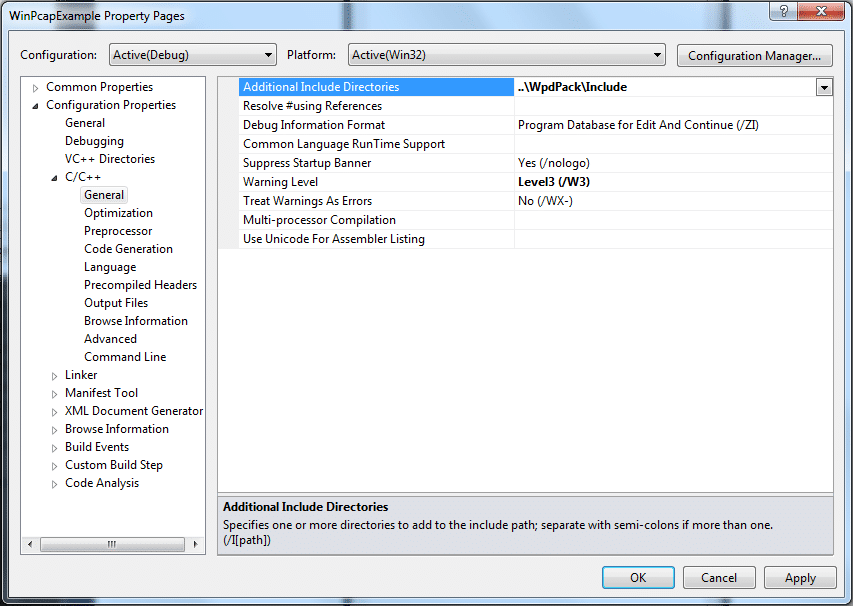
Configuration 1 – Add Additional Include Directories
- Go to Configuration Properties | C/C++ | General.
Note: If you don’t see the C/C++ option, did you forget to do Step 2 above? - For Additional Include Directories add the relative path:
..\WpdPack\Include
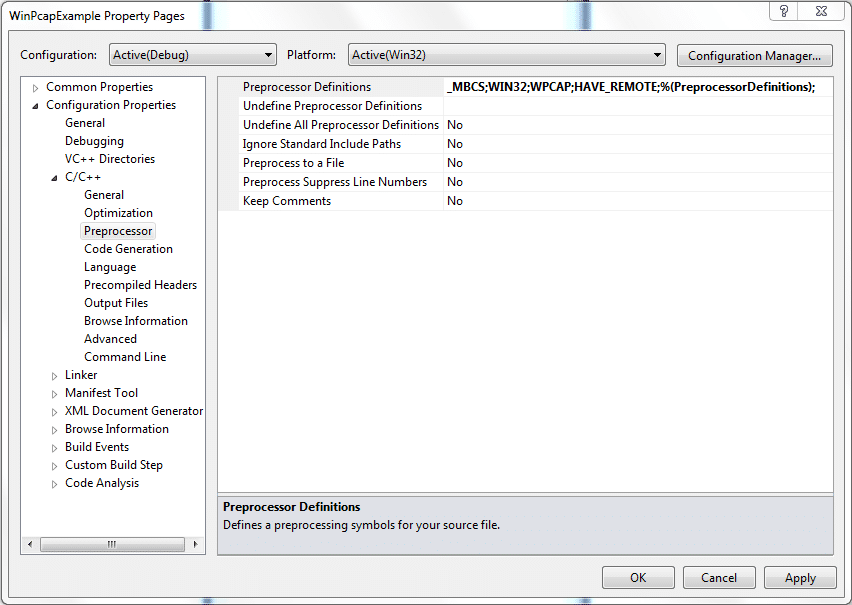
Configuration 2 – Add Preprocessor Definitions
- Go to Configuration Properties | C/C++ | Preprocessor.
- For Preprocessor Definitions, add these three:
WIN32;WPCAP;HAVE_REMOTE.
Important: If you fail to add WIN32, your compile will fail as follows:
Error 1 error C1083: Cannot open include file: 'sys/time.h': No such file or directory c:\users\jared\documents\visual studio 2010\projects\c++\readpcapexample\libs\winpcap-4.1.2\include\pcap\pcap.h 47 1 ReadPCapExample
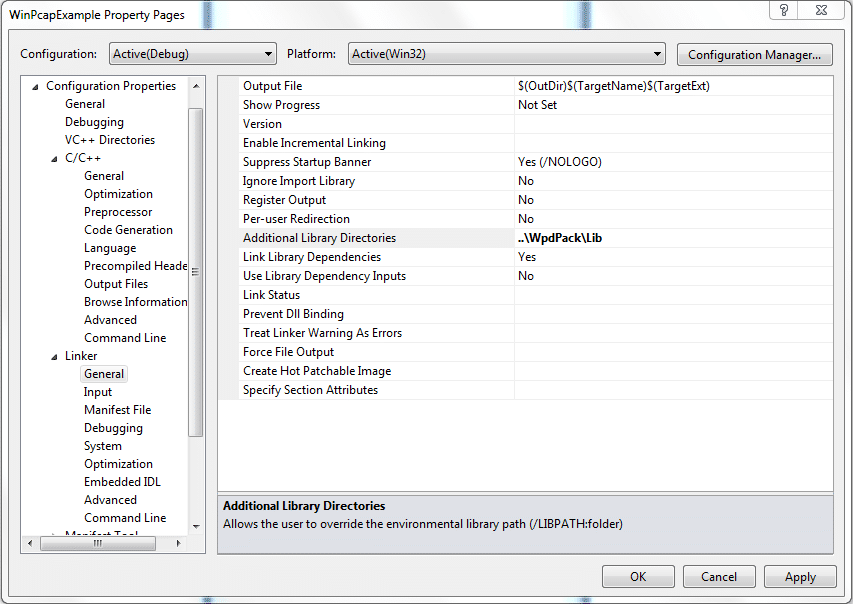
Configuration 3 – Add Additional Library Directories
- Go to Configuration Properties | Linker | General.
- For Additional Library Directories enter the following:
..\WpdPack\Lib
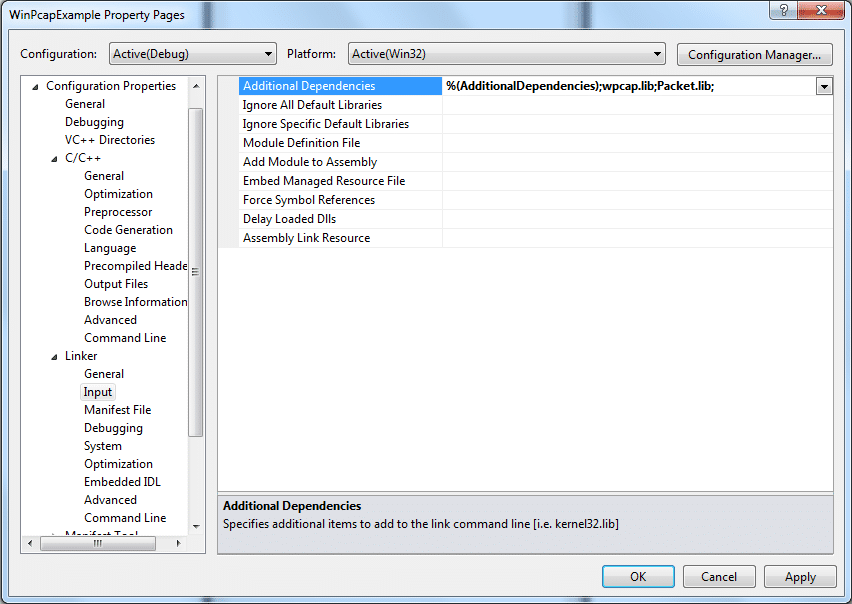
Configuration 4 – Add Additional Dependencies
- Go to Configuration Properties | Linker | Input.
- For Additional Dependencies, add the following:
winpcap.lib;Packet.lib;
Note: I removed the default libraries. You may need some of them:
kernel32.lib;user32.lib;gdi32.lib;winspool.lib;comdlg32.lib;advapi32.lib;shell32.lib;ole32.lib;oleaut32.lib;uuid.lib;odbc32.lib;odbccp32.lib;
Step 5 – Include pcap.h
- Open the Main.cpp file.
- Include pcap.h.
#include int main(int argc, char *argv[]) { } - Try to compile and it should work.


resources
Rhyous » Blog Archive » How to compile WinPcap with Visual Studio 2010?
スーパーコピー,スーパーコピー時計,ブランド偽物コピーN級品,日本最大級のブランド時計・バッグ・財布N級品専門店
Rhyous
カルティエ時計 バロンブルー 人気
Rhyous
オメガ時計 京都 xバンドレーダー
ERROR: The requested URL could not be retrieved
ブレゲ wikipedia
Rhyous
professional teeth whitening in West Los Angeles
How to compile WinPcap with Visual Studio 2010? | Rhyous
I get the weirdest error.
"The C++ Standard Library forbids macroizing keywords. Enable warning C4005 to find the forbidden macro."
thanks for This.
do i have to do these steps for every time i want to open new project ?
I build it successfully but when I try to run it it says that wpcap.dll is missing. Using visual studio C++ 2012 and Winpcap 4.1.2 developers pack
I'm using VS 2010 and Winpcap 4.1.2 D pack. I saw that wpcap.dll not found. After i install 4.1beta2-WinPcap.exe, i solved. link is http://www.winpcap.org/archive/
Thanks for this!
However I would like to know how can I use later my project on another computer ?
it doesn't create any dll that I can transfer ?!
Mreza
i have the same error
cannot open file 'winpcap.lib'
Replace it with wpcap.lib
Created a small project in VC ++ 6.0 . Included pcap.h in source file.
in Build menu observed the error msg " Cannot compile pcap-stdinc.h : no
compile tool is associated with this file extension. please let me where i
missed any step.
Very helpful. Thank you!
Thanks for this! Quick and easy to follow. Worked out great.
I've got the following error:
cannot open file 'winpcap.lib' c:\Users\Taesiri\documents\visual studio 2010\Projects\WinPcapExample\WinPcapExample\LINK WinPcapExample
(LINK folder doesn't exist!) 🙁
thanks for the article BTW!
In the "Linker Input" instruction it says to enter winpcap.lib...
but look at the screenshot and you'll see wpcap.lib actually entered.
wpcap.lib exists in WpdPack\Lib
thanks, it's been a while since I've found the solution 😀
can you help about
cannot open file 'winpcap.lib'
use "wpcap.lib"
[...] How to compile WinPcap with Visual Studio 2010? [...]