Archive for the ‘Development’ Category.

Why you should avoid multiline string literals in C# with Git

Recently I started using Continuous Integration (CI) for my open source C# projects on GitHub. I found a http://www.AppVeyor.com would provide me this for free for my open source projects. I setup a few of my projects on the AppVeyor’s CI.

Unfortunately, one of my projects, Rhyous.EasyXml, failed four out of ten unit tests on the CI server. This made no sense. I had the code checked out on a work desktop and a laptop and all ten tests passed in both places.

I had a string that my EasyXml code generates. I had the expected Xml in the following multiline string literal.

        public string PrettyUtf8Xml =
@"<?xml version=""1.0"" encoding=""UTF-8""?>
<Person>
  <FirstName>John</FirstName>
  <MiddleName>Al Leon</MiddleName>
  <LastName>Doe</LastName>
</Person>";

The test results were not helpful because the string results in the test output were identical.

Starting test execution, please wait... 
Passed   TestMethodLinearize 
Failed   TestMethodPretty 
Error Message: 
   Assert.AreEqual failed. Expected:<<?xml version="1.0" encoding="UTF-8"?>
<Person>
  <FirstName>John</FirstName>
  <MiddleName>Al Leon</MiddleName>
  <LastName>Doe</LastName>
</Person>>. Actual:<<?xml version="1.0" encoding="UTF-8"?>
<Person>
  <FirstName>John</FirstName>
  <MiddleName>Al Leon</MiddleName>
  <LastName>Doe</LastName>
</Person>>.  
Stack Trace: 
   at Rhyous.EasyXml.Tests.XmlTests.TestMethodPretty() in C:\projects\easyxml\src\Unit Tests\Rhyous.EasyXml.Tests\XmlTests.cs:line 102

My first guess was that somehow my UTF-8 vs UTF-16 code wasn’t working and I set up to figure out how to compare the strings in a way that shows me the difference. I quickly found a wonderful string extension method ShouldEqualWithDiff for Unit Tests by Phil Haack. Phil Haack’s extension method is extremely helpful because it provides a verticle character by character output of the string if the comparison fails.

This provided the following output and pointed the finger of the problem directly at Git. See the highlighted lines 59 and 60 below that show that characters 38 and 39 fail to match up.

Failed   TestMethodPretty 
Error Message: 
   Assert.AreEqual failed. Expected:<<?xml version="1.0" encoding="UTF-8"?>
<Person>
  <FirstName>John</FirstName>
  <MiddleName>Al Leon</MiddleName>
  <LastName>Doe</LastName>
</Person>>. Actual:<<?xml version="1.0" encoding="UTF-8"?>
<Person>
  <FirstName>John</FirstName>
  <MiddleName>Al Leon</MiddleName>
  <LastName>Doe</LastName>
</Person>>.  
Stack Trace: 
   at Rhyous.EasyXml.Tests.StringExtensions.ShouldEqualWithDiff(String actualValue, String expectedValue, DiffStyle diffStyle, TextWriter output) in C:\projects\easyxml\src\Unit Tests\Rhyous.EasyXml.Tests\StringExtensions.cs:line 50
   at Rhyous.EasyXml.Tests.StringExtensions.ShouldEqualWithDiff(String actualValue, String expectedValue) in C:\projects\easyxml\src\Unit Tests\Rhyous.EasyXml.Tests\StringExtensions.cs:line 12
   at Rhyous.EasyXml.Tests.XmlTests.TestMethodPretty() in C:\projects\easyxml\src\Unit Tests\Rhyous.EasyXml.Tests\XmlTests.cs:line 102
Standard Output Messages: 
     Idx Actual    Expected
   -------------------------
     0   60   <    60   <  
     1   63   ?    63   ?  
     2   120  x    120  x  
     3   109  m    109  m  
     4   108  l    108  l  
     5   32   \u20;  32   \u20;
     6   118  v    118  v  
     7   101  e    101  e  
     8   114  r    114  r  
     9   115  s    115  s  
     10  105  i    105  i  
     11  111  o    111  o  
     12  110  n    110  n  
     13  61   =    61   =  
     14  34   "    34   "  
     15  49   1    49   1  
     16  46   .    46   .  
     17  48   0    48   0  
     18  34   "    34   "  
     19  32   \u20;  32   \u20;
     20  101  e    101  e  
     21  110  n    110  n  
     22  99   c    99   c  
     23  111  o    111  o  
     24  100  d    100  d  
     25  105  i    105  i  
     26  110  n    110  n  
     27  103  g    103  g  
     28  61   =    61   =  
     29  34   "    34   "  
     30  85   U    85   U  
     31  84   T    84   T  
     32  70   F    70   F  
     33  45   -    45   -  
     34  56   8    56   8  
     35  34   "    34   "  
     36  63   ?    63   ?  
     37  62   >    62   >  
   * 38  13   \r   10   \n 
   * 39  10   \n   60   <  
   * 40  60   <    80   P  
   * 41  80   P    101  e  
   * 42  101  e    114  r  
   * 43  114  r    115  s  
   * 44  115  s    111  o  
   * 45  111  o    110  n  
   * 46  110  n    62   >  
   * 47  62   >    10   \n 
   * 48  13   \r   32   \u20;
   * 49  10   \n   32   \u20;
   * 50  32   \u20;  60   <  
   * 51  32   \u20;  70   F  
   * 52  60   <    105  i  
   * 53  70   F    114  r  
   * 54  105  i    115  s  
   * 55  114  r    116  t  
   * 56  115  s    78   N  
   * 57  116  t    97   a  
   * 58  78   N    109  m  
   * 59  97   a    101  e  
   * 60  109  m    62   >  
   * 61  101  e    74   J  
   * 62  62   >    111  o  
   
   . . .

The cause is carriage returns. Why would AppVeyor’s tests have only \n while running the tests on any of my machines has \r\n? Yes, Git is the reason. Git normalizes carriage returns when you check in and check out your code. On a Windows box, \r\n is converted to \n on check-in. On checkout \n is converted to \r\n. When AppVeyor checks out my code, the conversion from \n to \r\n doesn’t occur.

So my options to fix this are these:

  1. Change Git to:
    1. use \r\n and not change line endings at all
    2. Change my code to be a single line string

    I chose the second option. I did not want to mess with the Git settings. Different people could have difference Git settings and if anyone else forked my code, and ran the tests, I wanted them to work. So I changed my code. Now the string literal is on one line and the new lines are indicated with \r\n.

            public string PrettyUtf8Xml = "<?xml version=\"1.0\" encoding=\"UTF-8\"?>\r\n<Person>\r\n  <FirstName>John</FirstName>\r\n  <MiddleName>Al Leon</MiddleName>\r\n  <LastName>Doe</LastName>\r\n</Person>";
    

    And now my Continuous Integration on AppVeyor is building and passing tests.

A simple C# factory class

I have a project that is pretty small. Despite the small size, it is well-designed, using multiple layers, and interfaces, dependency injection, and unit tests. I need to create a production object at runtime and a mocked object at test time. I could easily use an IOC container. The problem with that is that most IOC containers (Autoface, Castle Windsor, Unity, etc.) are larger than my entire project. While I am a proponent of using IOC containers in large projects, I’m not a big proponent of using them in very small projects.

To make my code more unit testable, I am using a project called SystemWrapper that wraps standard system calls in an Interface and a Wrapper. Again, because my project is small, I didn’t bring in the SystemInterfaces and SystemWrapper dlls. This wrapper includes an ISmtpClient and an SmtpClientWrap object and I only brought in those two class files. The business logic uses the interface, ISmtpWrapper. This allows for me to unit test it by injecting a mock ISmtpClient.

I needed a simple factory that creates a new SmptClient in production runtime but allows for my unit test to create and use a mock ISmptClient during unit test time.

Here is what my factory should do:

Production

  1. Create a new SmptClientWrap object (which wraps an System.Net.SmptClient oject).
  2. Use setting from the app.config or web.config for the mail server, domain, user, and password.

Unit Test

  1. Create an mock of ISmptClient (using Moq).

Here is the simple factory class that I wrote:

using System.Configuration;
using System.Net;
using SystemInterface.Net.Mail;
using SystemWrapper.Net.Mail;

namespace Rhyous.System.Factory
{
    public class SmtpClientFactory
    {
        public ISmtpClient GetNewSmtpClient()
        {
            return CreateCredentialsMethod();
        }

        public delegate ISmtpClient CreateCredentialsDelegate();

        public CreateCredentialsDelegate CreateCredentialsMethod = () => new SmtpClientWrap(ConfigurationManager.AppSettings["SmtpServer"])
        {
            Credentials = new NetworkCredential
            {
                Domain = ConfigurationManager.AppSettings["SmtpDomain"],
                UserName = ConfigurationManager.AppSettings["SmtpUser"],
                Password = ConfigurationManager.AppSettings["SmtpPassword"]
            }
        };
    }
}

In the above class, the GetNewSmptClient returns an ISmtpClient. I use a delegate to create a concrete ISmtpClient called SmtpClienWrap. The default delegate implementation gets the data from the app.config or web.config.

Now I can inject a concrete ISmtpClient into my code:

    using (var smtpClient = SmtpClientFactory.GetNewSmtpClient())
    {
        var mailer = new Mailer(smtpClient);
    }

Note: I could make SmptClientFactory static or make it a singleton. I’m thinking about both.

Now in a test, I am able to create a mock ISmtpClient. Here is an example.

        [TestMethod]
        public void ReplacingTheCreateCredentialsDelegateWorks()
        {
            var factory = new SmtpClientFactory();
            bool _wasCalled = false;
            factory.CreateCredentialsMethod = () =>
            {
                _wasCalled = true;
                return new Mock<ISmtpClient>().Object;
            };
            var client = factory.GetNewSmtpClient();
            Assert.IsTrue(_wasCalled);
        }

The one problem with my factory is that it is pretty specific to one class. It might be interesting to make it more generic.

using System;

namespace Rhyous.Factory
{
    public class ObjectFactory<TInterface, TObject>
        where TInterface : class
        where TObject : TInterface, new()
    {
        public TInterface GetNewObject()
        {
            if (!typeof(TInterface).IsInterface)
            {
                throw new Exception("The first generic, TInterface, must be an interface.");
            }
            return CreateObjectMethod();
        }

        public delegate TInterface CreateObjectDelegate();

        public virtual CreateObjectDelegate CreateObjectMethod
        {
            get
            {
                return _CreateObjectMethod ?? (_CreateObjectMethod = () => Activator.CreateInstance<TObject>());
            }
            set { _CreateObjectMethod = value; }
        }
        public CreateObjectDelegate _CreateObjectMethod;
    }
}

Now I move my delegate (which is creation method of the factory) upstream to where I instantiate the factory.

    var smtpClientFactory = smtpClientFactory = new ObjectFactory<ISmtpClient, SmtpClientWrap>
                    {
                        CreateObjectMethod = () => new SmtpClientWrap(ConfigurationManager.AppSettings["SmtpServer"])
                        {
                            Credentials = new NetworkCredential
                            {
                                Domain = ConfigurationManager.AppSettings["SmtpDomain"],
                                UserName = ConfigurationManager.AppSettings["SmtpUser"],
                                Password = ConfigurationManager.AppSettings["SmtpPassword"]
                            }
                        }
                    };

    // Then later use the factory...

    using (var smtpClient = smtpClientFactory.GetNewSmtpClient())
    {
        var mailer = new Mailer(smtpClient);
    }

Anyway, have fun with this mini-factory. It might be useful on small projects where you don’t want an entire IOC container.

The Oft Forgotten Middle Trim

Two Most Popular Ways to Trim

It has become ubiquitous to trim whitespace from data. Data should almost never have whitespace at the front or at the end. This fact is nearly ubiquitous throughout the industry.

  • Front Trim (also called left trim) = Remove leading whitespace, whitespace (space, tab, new line, carriage return) at the front of text.
  • Back Trim (also called left trim) = Remove trailing whitespace, whitespace (space, tab, new line, carriage return) from the back of data. Trailing whitespace.

What does this mean? Look at the following data example:

"  White space at front"      <-- space
"	White space at front" <-- tab
"
White space at front"         <-- new line or carriage return
"White space at back   "      <-- space
"White space at back	"     <-- tab
"White space at back
"                             <-- new line or carriage return

When extra white space is added to the front or back of data, it should almost always be trimmed.

The Third Way to Trim – Middle Trim

There is a third type of trimming that should be done for many fields. It is not as popular and many developers forget about it. (Marked in green below.)

  • Front Trim (also called left trim) = Remove whitespace (space, tab, new line, carriage return) from the front of data.
  • Back Trim (also called right trim) = Remove whitespace (space, tab, new line, carriage return) from the back of data.
  • Middle Trim (also called center trim) = Remove extra whitespace (space, tab, new line, carriage return) from between words of data.

Note: Extra whitespace could mean different things depending on the field. In this post, it means more than one space. However, if we were dealing with names of objects in code that should not have any middle spaces at all, then even one middle space could be considered an extra space.

Perhaps “Middle Trim” is not something you have heard of before. Front and back trim involves only removing characters if they exist. Middle Trim involves either removing or replacing characters if they exist. Because of this, some might argue that Middle Trim is an incorrect phrase. From a certain point of view, I would agree. However, to properly link the task to front trim and back trim, the phrase Middle Trim makes a lot of sense.

"Extra     white space in middle"      <-- space
"Extra 	white space in middle"          <-- tab
"Extra
white space in middle"         <-- new line or carriage return

This one actually takes some thought. Because it doesn’t apply to every field as often as front trim and back trim do. However, for many fields, middle trim is just as valid.

  • Address Lines (When there is one field per line)
  • City
  • Country
  • Name (Pretty much any type of name)
    • Account
    • Business
    • Contact
    • Company
    • Course
    • Customer
    • First
    • Last
    • Middle
    • Part
    • Partner
    • Product
    • School
    • Spouse
    • Street
    • User
  • Order Identifiers
  • State
  • etc…

Names should not have extra whitespace at the front, end, or middle. State or Country names should never have extra whitespace at the front, middle, or end. Many types of input should be cleaned of extra whitespace in the front, middle, or end.

"Awesome     Company LLC"  <-- space
"Washtington	D.C."      <-- tab
"United States of
America"                   <-- new line or carriage return

All of the above are wrong. I could quote First Normal Form to you, but really common sense should be enough. These spaces make the data wrong.

Now, each field may be different. You may not want middle trim if your field is a blob of text, that has paragraphs. In that case, you certainly want to leave carriage returns.

Implementing Middle Trim in C#

Middle trim isn’t exactly easy to implement. Some languages have features, such as Regex, which make it easy. Others do not.

Why isn’t Middle Trim extremely common and more easily implemented? Perhaps middle trim is forgotten because there isn’t a clear method for it like there is with String.Trim() and so it is often left out?

Many languages, like C#, make front and back trimming easy. In C#, you can simply call String.Trim() and it will trim whitespace from the front and back. However, it doesn’t clean up extra whitespace in the middle.

Doing all three trims in C# is most easily done with Regex and an extension method.

Note: Get the Rhyous.StringLibrary from NuGet or check out the Rhyous.StringLibrary project on GitHub.

public static class StringExtensions
{
    public static string TrimAll(this string value)
    {
        var newstring = value;
        newstring = myString.Trim(); // This removes extra whitespace from the front and the back.
        newstring = Regex.Replace(LastName, @"\s+", " "); // Replaces all whitespace with a single space
    }
}

If you want to avoid regex, you could roll your own like this:

public static class StringExtensions
{
    public static string TrimAll(this string value)
    {
        var trimmedValue = new StringBuilder();
        char previousChar = (char)0;
        foreach (char c in value)
        {
            if (char.IsWhiteSpace(c))
            {
                previousChar = c;
                continue;
            }
            if (char.IsWhiteSpace(previousChar) && trimmedValue.Length > 0)
            {
                trimmedValue.Append(' ');
            }
            trimmedValue.Append(c);
            previousChar = c;
        }
        return trimmedValue.ToString();
    }
}

You would use either method the same way.

  var newstring = " This string     has extra whitespace in the      front, middle and the end.   "
  newstring = nestring.TrimAll();

Implementing Middle Trim in MSSQL

MSSQL also has LTRIM (left trim) and RTRIM (right trim), but middle trim doesn’t exist. Middle Trim is even harder to write in MSSQL because there is no Regex. So you have to replace whitespaces characters with spaces, then remove multiple spaces.

Here is what it looks like to add a name to a person and to do all three trims: front, back, middle. Wow! It is ugly.

INSERT INTO PERSON  (NAME) VALUES (
	REPLACE(
		REPLACE (
			REPLACE(
				REPLACE(
					REPLACE(
						REPLACE(
							LTRIM(RTRIM(@str))
							, char(9), ' '
						),  char(10), ' '
					),  char(13), ' '
				),'  ',' '+CHAR(7)
			), CHAR(7)+' ',''
		), CHAR(7),''
	)
)

This does right trim, left trim. Then it replaces tabs, new line, and carriage returns with spaces. Then it uses the bell character (because bell is basically never used) to replace any double spaces, char(32)+Char(32), with space bell, char(32)+char(7). Then it replaces any instance of char(7)+char(32) with ”, an empty string. Then that might leave a few space bell sequences, so we only need one more replace of bell, char(7), with ”, an empty string.

How to know which type of trimming you need?

This is very simple. Just ask questions:

  • Front trim – Will extra whitespace at the front ever be valid?
  • Back trim – Will extra whitespace at the back ever be valid?
  • Middle trim – Will extra whitespace in the middle ever be valid? Are middle spaces allowed? If so, should they always be a single space?

If the answer to any of those questions is “no,” then you need to do that type of trim. However, it is clear that Middle Trim has more questions as it is more complex.

NuGet for Source Using Add As Link (Part 1)

Update: Projects using NuGet for Source with Add as Link. If you have a project using this please comment and let me know.

  1. https://github.com/rhyous/SimpleArgs
  2. https://github.com/rhyous/EasyXml
  3. https://github.com/rhyous/EasyCsv
  4. https://github.com/rhyous/SimplePluginLoader
  5. https://github.com/rhyous/StringLibrary

So I have a project on GitHub called SimpleArgs. This project makes command line arguments easy in a C# project. However, one of the requirements is to have an option to use the SimpleArgs dll or to have a single file executable. Yes, everything in one single exe, so referencing a dll is not an option.

So I created two separate NuGet packages from this project:

  1. SimpleArgs – This NuGet package uses a dll
  2. SimpleArgs.Sources – This NuGet package adds source

I use SimpleArgs.Sources the most. I quickly realized that NuGet for source does not scale. I have a Solution with four different projects where each project is a single file executable. The result was many copies of the SimpleArgs code.

MySolution
    /Packages    &amp;lt;-- Copy of SimpleArgs source
    /SingleExe1  &amp;lt;-- Copy of SimpleArgs source
    /SingleExe2  &amp;lt;-- Copy of SimpleArgs source
    /SingleExe3  &amp;lt;-- Copy of SimpleArgs source
    /SingleExe4  &amp;lt;-- Copy of SimpleArgs source

That is 5 copies of the SimpleArgs source. Now at first, this doesn’t seem to be a big problem, in fact, it seems little more than an annoyance. One of the first changes I made, was to exclude the duplicate copies of source from Git. This helped but not enough. There are still problems that occur with multiple copies of source. For example, I ran into a bug with SimpleArgs. I fixed it, and then some time later I ran into the same bug with another project in the same solution. Oh, yeah. I only fixed the bug in one copy of the SimpleArgs source.

I decided the best solution was to reference the source using Add as link. Add as link is the ability to include a file into your Visual Studio project but without making a copy of the file in your project.

See: How to Add As Link in Visual Studio

I quickly changed the projects so the source was included not as copies but using the Add As Link capability. I manually did this. Then I finally pushed my changes to SimpleArgs Git repository and released a new version of the SimpleArgs.Sources NuGet package. That basically wiped out my manual work to Add As Link.

I needed the NuGet packages include the source using Add As Link for me.

How to create NuGet package using Add As Source

Well, to my dismay, NuGet didn’t have this feature built in. At first I was exciting about the possibility that this feature would be added as part of NuGet 3.3 and the contentFiles feature, but unfortunately, this feature is for Universal Windows projects, and not for Console Application, Windows Forms, or WPF projects.

However, NuGet does run a PowerShell script on install and another on uninstall, called install.psi and uninstall.ps1. It took some work, I even gave up once, but eventually I found the right library and the documentation for it to help me solve this.

Step 1 – Create a NuGet Packager Project in Visual Studio

  1. Open Visual Studio and go to File | New Project.
    Note: Steps 2 thru 7 installs the NuGet Packager project from online. If you have already done this, then you probably can create your project without these steps. 🙂
  2. At the bottom of the list on the right, click Online to expand it.
    Note: For some reason, Visual Studio hung for about ten to twenty seconds when I clicked this.
  3. In the search bar on the top right, enter NuGet.
  4. Select NuGet Packager.
  5. Give your project a Name.
    Note: Mine is named SimpleArgs.Sources.
  6. Give your solution a Name.
  7. Click Ok.
    See steps 2 – 7 in this image:
    NuGet Package Visual Studio Project Template
    When you click OK, the template will install. It will prompt you a few times but once installed, your project will be created.Note: From now on, you can find the NuGet Packager project in Installed | Templates | Visual C# | NuGet.

Step 2 – Fill out the Package.nuspec file metadata

The package.nusepc is an Xml file. It is created as follows:

 
&amp;lt;?xml version=&amp;quot;1.0&amp;quot;?&amp;gt;
&amp;lt;package &amp;gt;
  &amp;lt;metadata&amp;gt;
    &amp;lt;id&amp;gt;SimpleArgs.Sources&amp;lt;/id&amp;gt;
    &amp;lt;version&amp;gt;1.0.0&amp;lt;/version&amp;gt;
    &amp;lt;title&amp;gt;SimpleArgs.Sources&amp;lt;/title&amp;gt;
    &amp;lt;authors&amp;gt;Jjbarneck&amp;lt;/authors&amp;gt;
    &amp;lt;owners&amp;gt;&amp;lt;/owners&amp;gt;
    &amp;lt;description&amp;gt;A long description of the package. This shows up in the right pane of the Add Package Dialog as well as in the Package Manager Console when listing packages using the Get-Package command.&amp;lt;/description&amp;gt;
    &amp;lt;releaseNotes&amp;gt;&amp;lt;/releaseNotes&amp;gt;
    &amp;lt;summary&amp;gt;A short description of the package. If specified, this shows up in the middle pane of the Add Package Dialog. If not specified, a truncated version of the description is used instead.&amp;lt;/summary&amp;gt;
    &amp;lt;language&amp;gt;en-US&amp;lt;/language&amp;gt;
    &amp;lt;projectUrl&amp;gt;https://nuget.org/packages/SimpleArgs.Sources&amp;lt;/projectUrl&amp;gt;
    &amp;lt;iconUrl&amp;gt;https://nuget.org/Content/Images/packageDefaultIcon-50x50.png&amp;lt;/iconUrl&amp;gt;
    &amp;lt;requireLicenseAcceptance&amp;gt;false&amp;lt;/requireLicenseAcceptance&amp;gt;
    &amp;lt;licenseUrl&amp;gt;http://opensource.org/licenses/Apache-2.0&amp;lt;/licenseUrl&amp;gt;
    &amp;lt;copyright&amp;gt;Copyright  2016&amp;lt;/copyright&amp;gt;
    &amp;lt;dependencies&amp;gt;
        &amp;lt;group targetFramework=&amp;quot;net40&amp;quot;&amp;gt;
          &amp;lt;dependency id=&amp;quot;log4net&amp;quot; version=&amp;quot;1.2.10&amp;quot; /&amp;gt;
        &amp;lt;/group&amp;gt;
    &amp;lt;/dependencies&amp;gt;
    &amp;lt;references&amp;gt;&amp;lt;/references&amp;gt;
    &amp;lt;tags&amp;gt;&amp;lt;/tags&amp;gt;
  &amp;lt;/metadata&amp;gt;
  &amp;lt;files&amp;gt;
    &amp;lt;file src=&amp;quot;lib\&amp;quot; target=&amp;quot;lib&amp;quot; /&amp;gt;
    &amp;lt;file src=&amp;quot;tools\&amp;quot; target=&amp;quot;tools&amp;quot; /&amp;gt;
    &amp;lt;file src=&amp;quot;content\&amp;quot; target=&amp;quot;content&amp;quot; /&amp;gt;
  &amp;lt;/files&amp;gt;
&amp;lt;/package&amp;gt;
Package.nuspec Changes

I can’t go over every possible nuspec setting. That is in the Nuspec Reference. However, I’ll give you the basics of what I changed.

  1. id – Set this to your package name. If you named your project correctly, this is already named correctly. I’ll leave the above unchanged.
  2. version – This is your version. If this is your first release, 1.0.0 is perfect. I am changing mine to 1.1.0 as my last version was 1.0.9.
  3. title – Often the same as the id, but not always. I’ll leave mine as is.
  4. authors – This is me. I want something other than the Visual Studio username. I changed this to Jared Barneck (Rhyous)
  5. owners – This is me or my business. I’ll change this to Rhyous Publishing LLC
  6. description – Long description. This is defined in the Xml. Change it to describe your NuGet package.
  7. releaseNotes – I just put a link to the release notes in my GitHub repo: https://github.com/rhyous/SimpleArgs/blob/master/ReleaseNotes.txt
  8. summary – Short description. This is also defined in the xml. This is usually shorter than the description.
  9. language – This is the 5 digit language IETF language tag. I left mine at en-US.
  10. projectUrl – I changed this to my GitHub location: https://github.com/rhyous/SimpleArgs
  11. iconUrl – I changed this to the icon file in my GitHub source. Unlike the release notes and the license file, I used the raw GitHub link for the image: https://raw.githubusercontent.com/rhyous/SimpleArgs/master/Docs/Images/SimpleArgs.Logo.png
  12. requireLicenseAcceptance – I left this as false. Only set this to true if your license requires an agreement.
  13. licenseUrl – I set this to the license file in my GitHub repository:
    https://github.com/rhyous/SimpleArgs/blob/master/Fork%20and%20Contribute%20License.txt
  14. copyright – I set this to Copyright Rhyous Publishing LLC
  15. dependencies – This project has no dependencies, so I deleted this entire section.
  16. references – I deleted this tag. Source NuGet packages probably won’t have any references.
  17. tags – Since my project is for command line arguments, I set my tags to: args, arguments
  18. files – This was preconfigured, however, I replaced the libs\ with src\ because I didn’t have any libs but I have source.

You can see my final nuspec file in the GitHub repo: SimpleArgs.Sources Package.nuspec

Step 3 – Add Shared Source Files

Default Items in Solution Explorer for a NuGet Packager ProjectIn Visual Studio, in Solution Explorer, you should see that there are already four folders provided for you. See the image to your right. ———–>

  • content – This is what is going to be copied to your project. Since we don’t want all our source copied, we aren’t going to put our source here.
    Note: I would delete this folder, but it turns out, I have one source file that isn’t shared. ArgsHandler.cs will be customized in each project, which makes sense because each project will have different args and handle args differently. ArgsHandler.cs will go here.
  • libs – I have no libs. I can delete this folder and the associated xml for it in the nuspec.
  • src – Stuff I put here isn’t copied to my projects. I am going to put all my shared source in this folder.
  • tools – this has the PowerShell scripts: init.ps1, install.ps1, and uninstall.ps1

Now that we understand our folder structure, let’s get to work.

  1. In Visual Studio’s Solution Explorer, create a folder called App_Packages under the src directory.
    Note: I was going to use App_Sources but NuGet recommends that we follow what other community members follow and others have already started putting source files under App_Packages, so I am following that community convention. Also, this is important for the PowerShell scripts, as this convention plays a part in them. If you don’t follow this convention, you will have to edit the and uninstall.psi PowerShell scripts, which I’ll be providing later.
  2. In Visual Studio’s Solution Explorer, create a Folder with the project name and version. In my case, the folder name is this: SimpleArgs.Sources.1.1.0.
    Note: Again, this was by community convention. Others were doing this. You don’t have to follow this exactly, again, If you don’t follow this convention, you will have to edit the install.ps1 and uninstall.psi PowerShell scripts, which I’ll be providing later.
  3. In Windows Explorer, not in Visual Studio, put your source under the project name and version directory.
    Note: In Visual Studio’s Solution Explorer, I only have these two directories: App_Packages/SimpleArgs.Sources.1.1.0.
    Note: In Windows Explorer, My directory structure ended up as follows:

    \App_Packages
    \App_Packages\SimpleArgs.Sources.1.1.0\
    \App_Packages\SimpleArgs.Sources.1.1.0\Business
    \App_Packages\SimpleArgs.Sources.1.1.0\Business\Args.cs
    \App_Packages\SimpleArgs.Sources.1.1.0\Business\ArgsHandlerCollection.cs
    \App_Packages\SimpleArgs.Sources.1.1.0\Business\ArgsManager.cs
    \App_Packages\SimpleArgs.Sources.1.1.0\Business\ArgsReader.cs
    \App_Packages\SimpleArgs.Sources.1.1.0\Business\ArgumentMessageBuilder.cs
    \App_Packages\SimpleArgs.Sources.1.1.0\Business\CommonAllowedValues.cs
    \App_Packages\SimpleArgs.Sources.1.1.0\Extensions
    \App_Packages\SimpleArgs.Sources.1.1.0\Extensions\ArgumentExtensions.cs
    \App_Packages\SimpleArgs.Sources.1.1.0\Extensions\StringExtensions.cs
    \App_Packages\SimpleArgs.Sources.1.1.0\Interfaces
    \App_Packages\SimpleArgs.Sources.1.1.0\Interfaces\IArgumentMessageBuilder.cs
    \App_Packages\SimpleArgs.Sources.1.1.0\Interfaces\IArgumentsHandler.cs
    \App_Packages\SimpleArgs.Sources.1.1.0\Interfaces\IReadArgs.cs
    \App_Packages\SimpleArgs.Sources.1.1.0\Model
    \App_Packages\SimpleArgs.Sources.1.1.0\Model\Argument.cs
    \App_Packages\SimpleArgs.Sources.1.1.0\Model\ArgumentAddedEventArgs.cs
    \App_Packages\SimpleArgs.Sources.1.1.0\Model\ArgumentDictionary.cs
    \App_Packages\SimpleArgs.Sources.1.1.0\Model\ArgumentList.cs
    \App_Packages\SimpleArgs.Sources.1.1.0\Model\ArgumentsHandlerBase.cs
    

    Note: There is a good reason that I don’t include these in the NuGet Packager Visual Studio project, which I will explain later.

Step 4 – Add Source Files

As mentioned earlier, the ArgsHandler.cs file isn’t shared. Each project does need its own copy of this file. So we need to add it so that it supports Source Code Transformations.

  1. In Visual Studio’s Solution Explorer, copy any source files into the Content directory. You may put them in sub directories if you wish. I created an Arguments folder.
  2. Add .pp to the end of any source files.
  3. Change the namespace to $rootnamespace$ in any source files. You may also add a sub namespace to the end of $rootnamespace$ as I did.
using SimpleArgs;
using System;
using System.Collections.Generic;

namespace $rootnamespace$.Arguments
{
    // Add this line of code to Main() in Program.cs
    //
    //   ArgsManager.Instance.Start(new ArgsHandler(), args);
    //

    /// &amp;lt;summary&amp;gt;
    /// A class that implements IArgumentsHandler where command line
    /// arguments are defined.
    /// &amp;lt;/summary&amp;gt;
    public sealed class ArgsHandler : ArgsHandlerBase
    {
         // content snipped see full file here: https://github.com/rhyous/SimpleArgs/blob/master/NuGet/SimpleArgs.NuGet/content/Arguments/ArgsHandler.cs.pp
    }
}

Step 5 – Add As Link in NuGet using PowerShell scripts

There are three PowerShell scripts.

  • init.ps1
  • install.ps1
  • uninstall.ps1

We are only going to modify install.ps1 and uninstall.ps1.

Note: The following are written to be very generic and have been tested in various Visual Studio projects, which means some common bugs are already fixed, such as not failing on creation of App_Packages just because it is already there.

  1. Update install.ps1.

    Note: For the latest versions of install1.ps1 and uninstall.ps1, go to the tools directory on my GitHub repo.

    # Runs every time a package is uninstalled
    
    param($installPath, $toolsPath, $package, $project)
    
    # $installPath is the path to the folder where the package is installed.
    # $toolsPath is the path to the tools directory in the folder where the package is installed.
    # $package is a reference to the package object.
    # $project is a reference to the project the package was installed to.
    
    # Variables
    $src = &amp;quot;src&amp;quot;
    $packageName = [System.IO.Path]::GetFileName($installPath)
    
    #logging
    write-host &amp;quot;project: &amp;quot; $project.FullName
    write-host &amp;quot;installPath: &amp;quot; $installPath
    write-host &amp;quot;toolsPath: &amp;quot; $toolsPath
    write-host &amp;quot;package: &amp;quot; $package
    write-host &amp;quot;project: &amp;quot; $project
    
    $srcPath = [System.IO.Path]::Combine($installPath, $src)
    write-host &amp;quot;srcPath: &amp;quot; $srcPath
    
    $solutionDir = [System.IO.Path]::GetDirectoryName($dte.Solution.FullName)
    $projectDir = [System.IO.Path]::GetDirectoryName($project.FullName)
    write-host &amp;quot;solutionDir: &amp;quot; $solutionDir
    write-host &amp;quot;projectDir: &amp;quot; $projectDir
    
    $areSameDir = $solutionDir -eq $projectDir
    write-host &amp;quot;areSameDir: &amp;quot; $areSameDir
    
    function AddLinkedFiles($path, $addLocation, $canLink) 
    { 
        write-host &amp;quot;path: &amp;quot; $path
        write-host &amp;quot;addLocation: &amp;quot; $addLocation.FullName
        write-host &amp;quot;canLink: &amp;quot; $canLink
        foreach ($item in Get-ChildItem $path)
        {
            write-host &amp;quot;item: &amp;quot; $item $item.FullName
            if (Test-Path $item.FullName -PathType Container) 
            {
                if ( $canLink) {
                    $addFolder = $project.ProjectItems|Where-Object {$_.FullName -eq $item.FullName}
                    if (!$addFolder) {
                        $addFolder = $addLocation.ProjectItems.AddFolder($item)
                    }
                    write-host &amp;quot;addFolder: &amp;quot; $addFolder.FullName
                    AddLinkedFiles $item.FullName $addFolder $canLink
                } else
                {
                    AddLinkedFiles $item.FullName $addLocation $canLink
                }            
            } 
            else 
            {             
                write-host &amp;quot;Adding &amp;quot; $item.FullName &amp;quot; to &amp;quot; $addLocation.FullName
                $addLocation.ProjectItems.AddFromFile($item.FullName)
            }
        } 
    }
    
    write-host &amp;quot;Calling AddLinkedFiles&amp;quot;
    AddLinkedFiles $srcPath $project (!$areSameDir)
    
  2. Update uninstall.ps1.
    # Runs every time a package is uninstalled
    
    param($installPath, $toolsPath, $package, $project)
    
    # $installPath is the path to the folder where the package is installed.
    # $toolsPath is the path to the tools directory in the folder where the package is installed.
    # $package is a reference to the package object.
    # $project is a reference to the project the package was installed to.
    
    # Variables
    $packages = &amp;quot;Packages&amp;quot;
    $app_packages = &amp;quot;App_Packages&amp;quot;
    $src = &amp;quot;src&amp;quot;
    $packageName = [System.IO.Path]::GetFileName($installPath)
    
    #logging
    write-host &amp;quot;project: &amp;quot; $project.FullName
    write-host &amp;quot;installPath: &amp;quot; $installPath
    write-host &amp;quot;toolsPath: &amp;quot; $toolsPath
    write-host &amp;quot;package: &amp;quot; $package
    write-host &amp;quot;project: &amp;quot; $project
    
    
    $srcPath = [System.IO.Path]::Combine($installPath, $src)
    write-host &amp;quot;srcPath: &amp;quot; $srcPath
    
    $solutionDir = [System.IO.Path]::GetDirectoryName($dte.Solution.FullName)
    $projectDir = [System.IO.Path]::GetDirectoryName($project.FullName)
    write-host &amp;quot;solutionDir: &amp;quot; $solutionDir
    write-host &amp;quot;projectDir: &amp;quot; $projectDir
    
    $areSameDir = $solutionDir -eq $projectDir
    write-host &amp;quot;areSameDir: &amp;quot; $areSameDir
    
    
    if ($areSameDir) {
        $packagesItem = $project.ProjectItems|Where-Object {$_.Name -eq $packages}    
        write-host &amp;quot;packageFolder: &amp;quot; $packagesItem.Name
        $item = $packagesItem.ProjectItems|Where-Object {$_.Name -eq [System.IO.Path]::GetFileName($installPath)}
        write-host &amp;quot;item: &amp;quot; $item.Name
        $item.Remove()
        if ($packagesItem.ProjectItems.Count -eq 0) {
            $packagesItem.Remove()
        }            
    } else {
        $app_packagesItem = $project.ProjectItems|Where-Object {$_.Name -eq $app_packages}
        write-host &amp;quot;app_packagesItem: &amp;quot; $app_packagesItem.Name
        $app_packagesFolder = [System.IO.Path]::Combine($srcPath,$app_packages)
        foreach ($subDir in (Get-ChildItem $app_packagesFolder)) {
            $item = $app_packagesItem.ProjectItems|Where-Object {$_.Name -eq $subDir.Name}
            write-host &amp;quot;item: &amp;quot; $item.Name
            if ($item) {
                $item.Delete()
            }
        }
        if ($app_packagesItem.ProjectItems.Count -eq 0 -and (Get-ChildItem ([System.IO.Path]::Combine($projectDir, $app_packages))).Count -eq 0) {
            $app_packagesItem.Delete()
        }
    }
    

    Step 6 – Build the solution and NuGet package

    The NuGet Packager project template is pretty awesome. When you use it, it builds the NuGet package for you on build. Also, if you build in release mode, it will try to upload the NuGet package to the public NuGet Package Gallary.

    1. In Visual Studio, make sure the Solution Configuration is set to Debug.
    2. Choose to Build | Build Solution.
    3. In your project directory, you should have a NuGet package built. Mine is called SimpleArgs.Sources.1.1.1.nupkg.

    Stay Tuned

    Stay tuned for NuGet for Source Using Add As Link (Part 2 – Testing & Deploying)

    If you subscribe, you will never miss a post.

How to Add As Link in Visual Studio

There may be times when you need to share source between projects but you can’t reference a dll. This would happen if you are writing multiple single file executables and you wanted to share source between them. By definition, a single file executable doesn’t reference a dll or it would not be a single file.

You can still share source using Visual Studio’s Add As Link feature.

To use Add As Link in Visual Studio, follow these steps.

  1. Right-click on your project in Solution Explorer and choose Add | Existing Item.
    Visual Studio Add Existing Item
  2. Next navigate to your shared file and click to highlight the file.
  3. Next click the drop down arrow next to Add and choose Add As Link.
    Visual Studio Add As link
  4. Verify that the file was added as a link. You can tell because it has a different icon to distinguish it from other source files.Icon for Add As Link Source
  5. Verify that the Build Action is set to Compile. It should be as this is the default Build Action for a .cs file.
    Visual Studio Build Action Compile

You can now share source without using a dll.

Microsoft to Acquire Xamarin

XamarinMicrosoft is to acquire Xamarin. Read the article here. Xamarin is far and away the best tool for writing cross-platform mobile apps, but their business model greatly slowed the company’s customer acquisition.

A new mobile developer could easily install Eclipse for free and develop a mobile app without zero cost. The minimum Xamarin fee cost $25 a month but it did not work with Visual Studio. The minimum Xamarin version that worked with Visual Studio cost $1000 a month.

Better business models existed. I long recommended that Xamarin be completely free to for developers to download and use, but the compiled code should have been time-bombed for one day. Of course, with IL editors such time-bombing could be removed, but doing so would not be easy. This model would have allowed them to gather all the indie developers who had an idea and quickly get their application to work on iOS, Android, and Windows. Then at release time, charging a fee to publish the app would have been more palatable. In the long run it would have resulted in more customers and users. It would have skyrocketed the number of xamarin developers. I believe Xamarin would have ended up making far more money by charging less to way more users. But Xamarin disagreed.

Microsoft sees the need to make Xamarin the go to language from cross-platform apps. The flaky and hacked together html5 stack is the only other option for true cross-platform development. Microsoft and Visual Studio has a marge larger user base than Xamarin. If Microsoft’s intention to maintain Xamarin’s model, they would be making a huge mistake.

Microsoft should immediately add Xamarin to the Visual Studio Enterprise subscribers. Enterprise is the top-level and should get everything. There will be some loss of revenue as some Xamarin customers are also Enterprise subscribers, but that loss in negligible and would probably be made up by higher renewal rates and less downgrades. However, if Miocrosoft were to add all of Xamarin also to their Visual Studio Professional subscribers, Xamarin might lose a huge portion of revenue, as most Xamarin customers are also Visual Studio Subscribers. If they want to keep this revenue, then they could easily add a mobile subscription level for mobile only developers and then a professional plus mobile subscription level entices current professional developers to upgrade.

However, what if Microsoft doesn’t care about Xamarin’s revenue at all. What if what they care about is getting mobile developers to primarily use Visual Studio. What if they give Xamarin in its entirety away free in Community Edition so everyone at any Visual Studio level would have it. And what if they open source it?

How many more users would flock to Visual Studio Community Edition? This could be the catalyst to dethrone JavaScript. To bring thousands of users to the Microsoft development ecosystem that also includes Azure. What types of increases in their cloud users could this bring? Perhaps the Xamarin acquistion is not intended to continue to make its own revenue. Perhaps the acquisition is nothing more than a feature add to their existing technology stack.

Were I Microsoft’s CEO, Satya Nadella, I would go the Community Edition route. But I’m not him and I do not know what he is going to do. We are left to wait and see.


Your project’s ‘Getting Started’ tutorial sucks – Why time to success matters

I recently started to learn a new open source JavaScript library. It looked great at first. It had documentation on the library. It had a comprehensive demo. I immediately started through their “Getting Started.” After the first hour, with nothing successful, my excitement began to dim. I’d followed the documentation exactly. I did everything I was supposed to do. And it wasn’t working. After three hours, it still wasn’t working and I started looking for different JavaScript libraries that do the same thing.

How many of you have run across someone’s “Getting Started Tutorial”, felt an initial rush of excitement to learn something new, only to be dismally lost in errors and unclear examples a few hours later?

This isn’t the first time that I have experienced this. I experienced it with C# tutorials for years long before I experienced it with a JavaScript library tutorial. I’ll experience it in whatever language I learn next.

Are you running an op en source project? If so, there is a good chance that your example code sucks.

Why your example code sucks

Well, first off, you are a developer, not a technical writer. There are many little nuances that go into a good piece of technical writing and whether you think so or not, your “Getting Started Tutorial” is technical writing. But you don’t need a technical writing degree to understand why your example tutorial sucks. It is far simpler than that.

You example code sucks for four reasons. The first three are extremely well-known reasons to technical writers, but probably not to developers. The fourth is, for some reason, not obvious or well-known.

  1. You don’t know who your target audience is.
  2. You skip steps you assume are too easy.
  3. You didn’t focus and minimize your tutorial.
  4. *NEW* Your time to success in your tutorial is too long.

Knowing Your target audience

Look, this isn’t hard. If you are an open source project, or just writing a Getting Started tutorial, you need to know your audience. Do you know who they are? For a code tutorial, the audience is almost always the same, with very few exceptions.

Target Audience: Any Developer from one who is just starting out, either in college or in self-learning, to one that has been doing it a few years, to other who have been coding all their lives, and to the old codger who swears at your new modern techniques and bitterly talks of how Cobol is still the best language. Basically, any and all developers.

So now that you know your target audience, you may be confused. Which developer do I write for if I’m supposed to write for all of them?

Well, do you remember in math what you had to do to add or subtract fractions with different denominators. What did you do? You found the lowest common denominator. Yeah, it is the same when dealing with a target audience. You write to the lowest common knowledge level. If you are writing a tutorial or explaining example code assuming an experienced developer only, then your Getting Started tutorial sucks.

Remember the Easy Steps

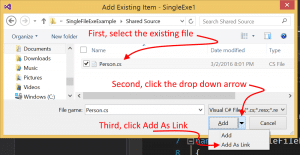
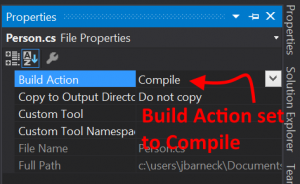
If you are doing an example in an specific IDE (Visual Studio, Eclipse, etc) and your first step is to create a project in the IDE, but you feel you can leave this step out. So your first step in your tutorial is what to do in the project. You just made your tutorial suck!

What if your user has never used Eclipse and your tutorial is their first experience? How successful are they going to be? The reader is going to be stuck trying to figure out how to even get to step 1.

Don’t skip steps. It doesn’t matter if it is an step-by-step tutorial or a video. If you skip the first step, your started off wrong.

Focus and Minimize Your Tutorial

This is often the worst mistake a tutorial writer can make.

Let’s start off with a bad JavaScript example. You just created a JavaScript library. It is the next best thing. It is going to replace JQuery, Knockout, and Angular. It is the bomb. So naturally your Tutorial for your demo code needs to include other libraries to properly demo your stuff, right? It needs Bootstrap, right? Wrong! If your getting starting example uses any other libraries that is not required for your tutorial, you are failing to minimize. Adding Bootstraps sounds awesome. And there is nothing wrong with a “My Library with BootStrap.js” tutorial. It just shouldn’t be your “Getting Started” tutorial. If you project isn’t Bootstrap or a library that requires bootstrap, leave it out. Minimize.

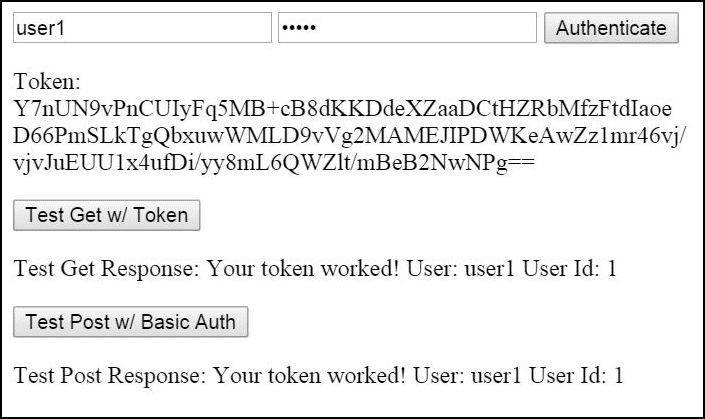
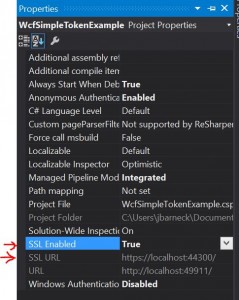
I recently saw a tutorial on the basics of WCF (Web Services in .NET). The author assumed that the reader already had a project created, an ORM (Entity Framework) installed and referenced, and a database available. Even if this was a more complex tutorial and not a “Getting Started” tutorial, skipping these steps is not good. He was trying to teach how to do something that only related to WCF. An ORM and a database were not necessary. His tutorial limited his audience and had tons of comments from users that were lost, had errors, and couldn’t get his code to work.

Time to Success

Probably the most important factor to a tutorial is time to success. How long does it take your readers to reach success using your project? This is your “Getting Started” tutorials time to success. How long is yours?

If your “Getting Started” tutorial has a time to success of one hour. Your tutorial probably sucks. Why do you think the first thing that every development languages uses as example code is the Hello, Word program? Authors of programming languages long ago inadvertently stumbled onto the fact to time to success matters. Most do it because “Hello, World” is common, not because they understand that time to success is probably the most important factor in their getting started tutorial.

There is not right answer for time to success. The more complex your project, the more dependencies your project has, the more difficult your getting started tutorial will be. However, for a JavaScript library with no dependencies, your time to success should be five minutes or less.

Also, you don’t have to finish your tutorial. You can put multiple success points in your tutorial. Often in coding tutorials, you will see the author tell you to compile and run and see what happens before moving on. This is important, because these compile and run steps are actually there to show that your are succeeding in the tutorial and these steps bring the time to success forward from the end of the tutorial to early on in the process.

Finding out your time to success

The easiest way to find out your time to success is to have a non-developer do it. I recommend you find some one still in High School who isn’t a self-taught coder. Any average high school student will do. My technically writing instructor in college had a daughter in Cheer leading. We had to write a tutorial and they had to successfully follow it. If they couldn’t follow the tutorial in under twenty minutes, we failed. If they could we passed. It was that simple.

An almost perfect example

Would you like an example of a really fast time to success tutorial? I have one for you. It is another JavaScript library. Of the four items above, it does all but skipping steps flawlessly. It has three for four. And the time to success is amazingly short.

In your browser, go here: https://qunitjs.com

Check out QUnit’s Getting Started tutorial. They have an html file and a javascript file. That is it. They know their audience. The example is focussed and minimal. Their time to success is about two minutes.

They do skip steps though. Would a newbie know what that the first step is to create an html file with the html content displayed? No, they wouldn’t. However, QUnit’s project is unique in that it is a library for testing other javascript. So before anyone would hit this library, they are likely already writing web code. See, QUnit knows its audience. And by knowing their audience, they knew (or got lucky) that they are an exception. Because their libraries tests other javascript code, only javascript developers are going to go their page. QUnit will never be the first javascript library a person learns. So they don’t need to cater to the first time newbie. So while, they did break #2 and forget easy steps, they are unique and they get away with it, mostly.

More importantly, their time to success if phenomenal.

Now please, go forth and alter your “Getting Started” tutorial to be equally as awesome.

How to easily access a web.config AppSettings value with a Type and a default value?

Update: This is now in my Rhyous.Collections NuGet package and you can see the source on GitHub: NameValueCollectionExtensions.cs

I wanted to make it easier to get a value from AppSettings in the web.config (or the app.config if you aren’t doing web) while converting to the proper type and having a default value.

Here is the syntax I started with that I didn’t like at all.

public static int MaxRetryAttempts = (string.IsNullOrWhiteSpace(ConfigurationManager.AppSettings["SmptRetries"]))
    ? int.Parse(ConfigurationManager.AppSettings["SmptRetries"])
    : 3;

I decided I wanted to have the following syntax:

ConfigurationManager.AppSettings.Get<T>(string key, T defaultValue)

I found a blog post that got me started. His syntax was very close to what I wanted already. He didn’t have the default value and he wasn’t an extension method, but wow, was this a real help. I was unaware of TypeDescriptor.GetConverter and was going to basically roll my own with an massively ugly case statement. So I am very happy I found his post.

I created the following NameValueCollectionExtensions.cs file.

using System.Collections.Specialized;
using System.ComponentModel;

namespace Rhyous.Extensions
{
    public static class NameValueCollectionExtensions
    {
        public static T Get<T>(this NameValueCollection collection, string key, T defaultValue)
        {
            var value = collection[key];
            var converter = TypeDescriptor.GetConverter(typeof(T));
            if (string.IsNullOrWhiteSpace(value) || !converter.IsValid(value))
            {
                return defaultValue;
            }

            return (T)(converter.ConvertFromInvariantString(value));
        }
    }
}

Details

  1. ConfigurationManager.AppSettings is of Type System.Collections.Specialized.NameValueCollection. So my extension method must be for that type.
  2. I changed the author’s method to be an extension method using the “this” keyword.
  3. I changed from using ConfirationManager.AppSettings to use the first parameter, collection, defined by the “this” keyword.
  4. I added a parameter for a default value.
  5. I changed the method code to return the default value, instead of throwing an exception, if the setting in the web.config is missing or empty.

Usage

I have to retry sending emails. I want the SmtpRetries to be an int obtained from the web.config’s AppSettings and have a default value of 3.

public static int MaxRetryAttempts = ConfigurationManager.AppSettings.Get("SmptRetries", 3);

Unit Tests

I really only wrote unit tests for int conversion. I expect that is sufficient. But if you want to write tests for a double or a other type feel free.

using System;
using System.Collections.Specialized;
using Microsoft.VisualStudio.TestTools.UnitTesting;

namespace Rhyous.Extensions.Tests
{
    [TestClass]
    public class NameValueCollectionExtensionsTests
    {
        private const string Name = "Retries";

        [TestMethod]
        public void IntValueExistsTest()
        {
            // Arrange
            const int defaultMaxRetries = 2;
            const int value = 3;
            var collection = new NameValueCollection { { Name, value.ToString() } };

            // Act
            var actual = collection.Get(Name, defaultMaxRetries);

            // Assert
            Assert.AreEqual(value, actual, "Valid value should return the valid value.");
        }

        [TestMethod]
        public void IntValueDoesNotExistTest()
        {
            // Arrange
            const int defaultMaxRetries = 2;
            var collection = new NameValueCollection();

            // Act
            var actual = collection.Get(Name, defaultMaxRetries);

            // Assert
            Assert.AreEqual(defaultMaxRetries, actual, "Missing value returns default.");
        }

        [TestMethod]
        public void IntValueIsEmptyStringTest()
        {
            // Arrange
            const int defaultMaxRetries = 2;
            var collection = new NameValueCollection { { Name, string.Empty } };

            // Act
            var actual = collection.Get(Name, defaultMaxRetries);

            // Assert
            Assert.AreEqual(defaultMaxRetries, actual, "Empty string returns default.");
        }

        [TestMethod]
        public void IntValueIsWhiteSpaceStringTest()
        {
            // Arrange
            const int defaultMaxRetries = 2;
            var collection = new NameValueCollection { { Name, "  " } };

            // Act
            var actual = collection.Get(Name, defaultMaxRetries);

            // Assert
            Assert.AreEqual(defaultMaxRetries, actual, "Whitespace string returns default.");
        }

        [TestMethod]
        public void IntValueIsDoubleTest()
        {
            // Arrange
            const int defaultMaxRetries = 2;
            const double value = 3.5; 
            var collection = new NameValueCollection { { Name, value.ToString() } };

            // Act
            var actual = collection.Get(Name, defaultMaxRetries);

            // Assert
            Assert.AreEqual(defaultMaxRetries, actual, "Invalid value returns default.");
        }

        [TestMethod]
        public void IntValueIsCharsTest()
        {
            // Arrange
            const int defaultMaxRetries = 2;
            const string value = "abc";
            var collection = new NameValueCollection { { Name, value } };

            // Act
            var actual = collection.Get(Name, defaultMaxRetries);

            // Assert
            Assert.AreEqual(defaultMaxRetries, actual, "Invalid value returns default.");
        }
    }
}

Authentication Token Service for WCF Services (Part 6 – A JavaScript client)

Drum roll please . . . This is the moment you’ve all been waiting for. The JavaScript client has finally arrived. In the past articles we have taken control of Authentication in WCF. The token authentication service was designed specifically for ReST like WCF services to be used by modern web and mobile apps. For modern web, that means the Basic Token Service for WCF Services has to work with JavaScript! Of course, it does. That is what it was designed for.

As for the WCF Services, I made a few improvements and fixed some bugs. I am not going to go over those changes. Just know it is a better example than what was delivered in part 6, but not much different.

Download this project here: WCF BTS JS Client

OK. So here is my little html and javascript example. I created a single html file, mostly. I added jquery and knockoutjs from NuGet. The rest is all in the TestPage/Index.html. Really, all you need to know is that there are three buttons. One to test authentication, one to test using the token for calling the test service, and one for using Basic Authentication instead of the token to call the test service.

Here is an image of the page rendered in a browser.

AuthenticationTokenService html and JavaScript

Here is the source code.

<!DOCTYPE html>
<html>
<head>
    <title>JavaScript Client</title>
    <meta charset="utf-8" />
    <script type="text/javascript" src="/Scripts/jquery-2.1.4.js"></script>
    <script type="text/javascript" src="/Scripts/knockout-3.4.0.debug.js"></script>
    <script type="text/javascript">
        var ViewModel = function () {
            var _vm = this;
            _vm.user = ko.observable();
            _vm.password = ko.observable();
            _vm.basicAuth = ko.computed(function () {
                return "Basic " + btoa(_vm.user() + ":" + _vm.password());
            });
            // I am just sticking the token in a local variable,
            // but you might want to save it in a cookie.
            _vm.token = ko.observable();
            _vm.getResponse = ko.observable();
            _vm.postResponse = ko.observable();
            _vm.onAuthClick = function () {
                $.ajax({
                    method: "POST",
                    url: "/Services/AuthenticationTokenService.svc/Authenticate",
                    contentType: "application/json",
                    context: document.body,
                    data: JSON.stringify({
                        User: _vm.user(),
                        Password: _vm.password()
                    }),
                    success: function (data) {
                        _vm.token(data);
                    },
                    failure: function (err) { alert(err.responseText); },
                    error: function (err) { alert(err.responseText); }
                });
            };
            _vm.onTestGetWithTokenClick = function () {
                $.ajax({
                    url: "/Services/Test1Service.svc/TestGet",
                    contentType: "application/json",
                    context: document.body,
                    beforeSend: function (request) { request.setRequestHeader("Token", _vm.token()); },
                    success: function (data) {
                        _vm.getResponse(data);
                    },
                    failure: function (err) { alert(err.responseText); },
                    error: function (err) { alert(err.responseText); }
                });
            };
            _vm.onTestPostWithBasicAuthClick = function () {
                $.ajax({
                    method: "POST",
                    url: "/Services/Test1Service.svc/TestPost",
                    contentType: "application/json",
                    context: document.body,
                    beforeSend: function (request) { request.setRequestHeader("Authorization", _vm.basicAuth()); },
                    success: function (data) {
                        _vm.postResponse(data);
                    },
                    failure: function (err) { alert(err.responseText); },
                    error: function (err) { alert(err.responseText); }
                });
            };
        };
        $(function () {
            ko.applyBindings(new ViewModel());
        });
    </script>
</head>
<body>
    <div>
        <input type="text" data-bind="value: user" placeholder="Enter your username here . . ." />
        <input type="password" data-bind="value: password" placeholder="Enter your password here . . ." />
        <input type="button" value="Authenticate" data-bind="click: onAuthClick" />
    </div>
    <p>Token: <span data-bind="text: token"></span></p>
    <input type="button" value="Test Get w/ Token" data-bind="click: onTestGetWithTokenClick" />
    <p>Test Get Response: <span data-bind="text: getResponse"></span></p>
    <input type="button" value="Test Post w/ Basic Auth" data-bind="click: onTestPostWithBasicAuthClick" />
    <p>Test Post Response: <span data-bind="text: postResponse"></span></p>
</body>
</html>

Authentication Token Service for WCF Services (Part 5 – Adding SSL)

In the previous article, Basic Token Service for WCF Services (Part 4 – Supporting Basic Authentication), we implemented Basic Authentication. And in the articles before that, our credentials were in the body of the http request. That means we have a huge security issue. Credentials are passing as clear text. This is very, very, very (insert a few thousand more very’s) bad. We need to enabled SSL.

I am going to assume that you know how to do this in production on IIS. I am going to show you how to do this in your development environment.

See this project on GitHub here: https://github.com/rhyous/Auth.TokenService

Setting Up Visual Studio for SSL

First, let’s get this working in your project. Visual Studio uses needs to launch your project in IIS Express as an SSL site.

  1. In Visual Studio, highlight your project in Solution Explorer.
  2. Press F4 to get the project properties.
  3. Set SSL to true. Notice an SSL url is created on a new port.
ProjectProperties

Setting Up Web Services for SSL

The web.config is where the WCF endpoints are configured. They are currently configured only for HTTP and not HTTPS. So let’s make some web.config edits.

  1. Add an Binding configuration with the security mode set to Transport.
  2. So set the clientCredentialType to none. Remember, we are not using IIS to handle authentication, but instead, we are handling authentication in the service.
  3. use webHttpBinding because We are using JSON and ReST-like (not full ReST) WCF services.
  4. Configure the endpoints to use the newly created Binding configuration.

Here is the complete web.config. The changed or added lines are highlighted.
Changed: Lines 17, 20
Added: Lines 47-55

<?xml version="1.0" encoding="utf-8"?>
<configuration>
  <configSections>
    <!-- For more information on Entity Framework configuration, visit http://go.microsoft.com/fwlink/?LinkID=237468 -->
    <section name="entityFramework" type="System.Data.Entity.Internal.ConfigFile.EntityFrameworkSection, EntityFramework, Version=6.0.0.0, Culture=neutral, PublicKeyToken=b77a5c561934e089" requirePermission="false" />
  </configSections>
  <appSettings>
    <add key="aspnet:UseTaskFriendlySynchronizationContext" value="true" />
  </appSettings>
  <system.web>
    <compilation debug="true" targetFramework="4.5" />
    <httpRuntime targetFramework="4.5" />
  </system.web>
  <system.serviceModel>
    <services>
      <service name="WcfSimpleTokenExample.Services.AuthenticationTokenService" behaviorConfiguration="ServiceBehaviorHttp">
        <endpoint address="" behaviorConfiguration="AjaxEnabledBehavior" binding="webHttpBinding" bindingConfiguration="webBindingSSL" contract="WcfSimpleTokenExample.Services.AuthenticationTokenService" />
      </service>
      <service name="WcfSimpleTokenExample.Services.Test1Service" behaviorConfiguration="ServiceRequiresTokenBehaviorHttp">
        <endpoint address="" behaviorConfiguration="AjaxEnabledBehavior" binding="webHttpBinding" bindingConfiguration="webBindingSSL" contract="WcfSimpleTokenExample.Services.Test1Service" />
      </service>
    </services>
    <behaviors>
      <endpointBehaviors>
        <behavior name="AjaxEnabledBehavior">
          <webHttp helpEnabled="true" />
        </behavior>
      </endpointBehaviors>
      <serviceBehaviors>
        <behavior name="ServiceBehaviorHttp">
          <serviceMetadata httpGetEnabled="true" httpsGetEnabled="true" />
          <serviceDebug includeExceptionDetailInFaults="true" />
        </behavior>
        <behavior name="ServiceRequiresTokenBehaviorHttp">
          <serviceMetadata httpGetEnabled="true" httpsGetEnabled="true" />
          <serviceDebug includeExceptionDetailInFaults="true" />
          <TokenValidationBehaviorExtension />
        </behavior>
      </serviceBehaviors>
    </behaviors>
    <extensions>
      <behaviorExtensions>
        <add name="TokenValidationBehaviorExtension"
          type="WcfSimpleTokenExample.Behaviors.TokenValidationBehaviorExtension, WcfSimpleTokenExample, Version=1.0.0.0, Culture=neutral"/>
      </behaviorExtensions>
    </extensions>
    <bindings>
      <webHttpBinding>
        <binding name="webBindingSSL">
          <security mode="Transport">
            <transport clientCredentialType="None"/>
          </security>
        </binding>
      </webHttpBinding>
    </bindings>
    <serviceHostingEnvironment aspNetCompatibilityEnabled="false" multipleSiteBindingsEnabled="true" />
  </system.serviceModel>
  <system.webServer>
    <modules runAllManagedModulesForAllRequests="true" />
    <directoryBrowse enabled="true" />
  </system.webServer>
  <entityFramework>
    <defaultConnectionFactory type="System.Data.Entity.Infrastructure.LocalDbConnectionFactory, EntityFramework">
      <parameters>
        <parameter value="v11.0" />
      </parameters>
    </defaultConnectionFactory>
    <providers>
      <provider invariantName="System.Data.SqlClient" type="System.Data.Entity.SqlServer.SqlProviderServices, EntityFramework.SqlServer" />
    </providers>
  </entityFramework>
  <connectionStrings>
    <add name="BasicTokenDbConnection" connectionString="data source=(LocalDB)\v11.0;attachdbfilename=|DataDirectory|\BasicTokenDatabase.mdf;integrated security=True;MultipleActiveResultSets=True;App=EntityFramework" providerName="System.Data.SqlClient" />
  </connectionStrings>
</configuration>

Configuring the SSL Certificate

An SSL certification was generated for me when I built and ran the project. I was able to choose via a pop-up to trust the certificate.

Go on and check out part 6 here: Basic Token Service for WCF Services (Part 6 – A JavaScript client)

Authentication Token Service for WCF Services (Part 4 – Supporting Basic Authentication)

In Authentication Token Service for WCF Services (Part 3 – Token Validation in IDispatchMessageInspector) we showed how to verify our token against a database. The token is a great tool. The authentication service also provides the token based on a post of credentials.

In this article, we are going to add support for Basic Authentication. We aren’t going to do it the standard WCF way, using Transport security. We will keep our security at none, expect the deployment to be https and roll our own code to handle Basic Authentication.

Download this project here: WCF Basic Auth

There are two features we want in order claim support Basic Authentication.

  1. Allow AuthenticationTokenService.svc to create the token by optionally using Basic Authentication.
  2. Allow Basic Authentication as an option to providing a token.

To provide these two features, first we have to understand Basic Authentication. Basic Authentication is a well-known standard that is defined.

Basic Authentication is an html request header. The header is named “Authorization” and the value is as follows:

Basic amFyZWQ6dGVzdHB3

The first part of the Authorization header value is just the word “Basic” followed by a space.
The second part is the username and password concatenated together with a semicolon separator and then Base64 encoded.

jared:testpw
Basic amFyZWQ6dGVzdHB3

Let’s start with a simple class to manage the Basic authentication header, and encoding and decoding it.

using System;
using System.Text;
using WcfSimpleTokenExample.Model;

namespace WcfSimpleTokenExample.Business
{
    public class BasicAuth
    {
        private readonly string _User;
        private readonly string _Password;
        private const string Prefix = "Basic ";

        #region Constructors
        public BasicAuth(string encodedHeader)
            : this(encodedHeader, Encoding.UTF8)
        {
        }

        public BasicAuth(string encodedHeader, Encoding encoding)
        {
            HeaderValue = encodedHeader;
            var decodedHeader = encodedHeader.StartsWith(Prefix, StringComparison.OrdinalIgnoreCase)
                ? encoding.GetString(Convert.FromBase64String(encodedHeader.Substring(Prefix.Length)))
                : encoding.GetString(Convert.FromBase64String(encodedHeader));
            var credArray = decodedHeader.Split(':');
            if (credArray.Length > 0)
                _User = credArray[0];
            if (credArray.Length > 1)
                _Password = credArray[1];
        }

        public BasicAuth(string user, string password)
            : this(user, password, Encoding.UTF8)
        {
        }

        public BasicAuth(string user, string password, Encoding encoding)
        {
            _User = user;
            _Password = password;
            HeaderValue = Prefix + Convert.ToBase64String(encoding.GetBytes(string.Format("{0}:{1}", _User, _Password)));
        }
        #endregion

        public Credentials Creds
        {
            get { return _Creds ?? (_Creds = new Credentials { User = _User, Password = _Password }); }
        }
        private Credentials _Creds;

        public string HeaderValue { get; }
    }
}

BasicAuth.cs has constructors that allow for encoding by passing in a username and password and encoding it, as well as constructors that allow for passing in the header value and decoding it to get the username and password.

If we add BasicAuth.cs to our existing WcfSimpleTokenExample project, we can easily use it to support Basic Authentication.

Feature 1 – Basic Authentication for AuthenticationTokenService.svc/Authenticate

By using the BasicAuth.cs class, we can provide support for Basic Authentication in our token service using only 3 lines of code. Below is our new AuthenticationTokenService.svc.cs. Lines 18-20 our the new lines we add.

using System.ServiceModel;
using System.ServiceModel.Activation;
using System.ServiceModel.Web;
using WcfSimpleTokenExample.Business;
using WcfSimpleTokenExample.Database;
using WcfSimpleTokenExample.Model;

namespace WcfSimpleTokenExample.Services
{
    [ServiceContract]
    [AspNetCompatibilityRequirements(RequirementsMode = AspNetCompatibilityRequirementsMode.Allowed)]
    public class AuthenticationTokenService
    {
        [WebInvoke(Method = "POST", RequestFormat = WebMessageFormat.Json, ResponseFormat = WebMessageFormat.Json, BodyStyle = WebMessageBodyStyle.Bare)]
        [OperationContract]
        public string Authenticate(Credentials creds)
        {
            if (creds == null && WebOperationContext.Current != null)
            {
                creds = new BasicAuth(WebOperationContext.Current.IncomingRequest.Headers["Authorization"]).Creds;
            }
            using (var dbContext = new BasicTokenDbContext())
            {
                return new DatabaseTokenBuilder(dbContext).Build(creds);
            }
        }
    }
}

Feature 2 – Using Basic Authentication instead of a token

In our TokenValidationInspector.cs file, we are already validating the token using DatabaseTokenValidator, Now we need to validate the crendentials. We can validate credentials using the DatabaseCrendentialsValidator object that is already being used by AuthenticationTokenBuilder. However, we have to add some conditionaly code to test if a token is provided or if Basic Authorization is provided. If both are ignored, the token takes priority.

To do this, I wrapped the existing lines calling DatabaseTokenValidator into a method called ValidateToken. THen I created a new method called ValidateBasicAuthentication, which we only attempt to call a token isn’t provided.

using System.Net;
using System.Security.Authentication;
using System.ServiceModel;
using System.ServiceModel.Channels;
using System.ServiceModel.Dispatcher;
using System.ServiceModel.Web;
using WcfSimpleTokenExample.Business;
using WcfSimpleTokenExample.Database;
using WcfSimpleTokenExample.Interfaces;

namespace WcfSimpleTokenExample.Behaviors
{
    public class TokenValidationInspector : IDispatchMessageInspector
    {
        public object AfterReceiveRequest(ref Message request, IClientChannel channel, InstanceContext instanceContext)
        {
            // Return BadRequest if request is null
            if (WebOperationContext.Current == null) { throw new WebFaultException(HttpStatusCode.BadRequest); }

            // Get Token from header
            var token = WebOperationContext.Current.IncomingRequest.Headers["Token"];
            if (!string.IsNullOrWhiteSpace(token))
            {
                ValidateToken(token);
            }
            else
            {
                ValidateBasicAuthentication();
            }
            return null;
        }
        
        private static void ValidateToken(string token)
        {
            using (var dbContext = new BasicTokenDbContext())
            {
                ITokenValidator validator = new DatabaseTokenValidator(dbContext);
                if (!validator.IsValid(token))
                {
                    throw new WebFaultException(HttpStatusCode.Forbidden);
                }
                // Add User ids to the header so the service has them if needed
                WebOperationContext.Current.IncomingRequest.Headers.Add("User", validator.Token.User.Username);
                WebOperationContext.Current.IncomingRequest.Headers.Add("UserId", validator.Token.User.Id.ToString());
            }
        }


        private static void ValidateBasicAuthentication()
        {
            var authorization = WebOperationContext.Current.IncomingRequest.Headers["Authorization"];
            if (string.IsNullOrWhiteSpace(authorization))
            {
                using (var dbContext = new BasicTokenDbContext())
                {
                    var basicAuth = new BasicAuth(authorization);
                    if (!new DatabaseCredentialsValidator(dbContext).IsValid(basicAuth.Creds))
                    {
                        throw new AuthenticationException();
                    }
                }
            }
        }

        public void BeforeSendReply(ref Message reply, object correlationState)
        {
        }
    }
}

The web.config

There are not changes needed for the web.config. Here is a copy of it though, for reference.

<?xml version="1.0" encoding="utf-8"?>
<configuration>
  <configSections>
    <!-- For more information on Entity Framework configuration, visit http://go.microsoft.com/fwlink/?LinkID=237468 -->
    <section name="entityFramework" type="System.Data.Entity.Internal.ConfigFile.EntityFrameworkSection, EntityFramework, Version=6.0.0.0, Culture=neutral, PublicKeyToken=b77a5c561934e089" requirePermission="false" />
  </configSections>
  <appSettings>
    <add key="aspnet:UseTaskFriendlySynchronizationContext" value="true" />
  </appSettings>
  <system.web>
    <compilation debug="true" targetFramework="4.5" />
    <httpRuntime targetFramework="4.5" />
  </system.web>
  <system.serviceModel>
    <services>
      <service name="WcfSimpleTokenExample.Services.AuthenticationTokenService" behaviorConfiguration="ServiceBehaviorHttp">
        <endpoint address="" behaviorConfiguration="AjaxEnabledBehavior" binding="webHttpBinding" contract="WcfSimpleTokenExample.Services.AuthenticationTokenService" />
      </service>
      <service name="WcfSimpleTokenExample.Services.Test1Service" behaviorConfiguration="ServiceRequiresTokenBehaviorHttp">
        <endpoint address="" behaviorConfiguration="AjaxEnabledBehavior" binding="webHttpBinding" contract="WcfSimpleTokenExample.Services.Test1Service" />
      </service>
    </services>
    <behaviors>
      <endpointBehaviors>
        <behavior name="AjaxEnabledBehavior">
          <webHttp helpEnabled="true" />
        </behavior>
      </endpointBehaviors>
      <serviceBehaviors>
        <behavior name="ServiceBehaviorHttp">
          <serviceMetadata httpGetEnabled="true" httpsGetEnabled="true" />
          <serviceDebug includeExceptionDetailInFaults="true" />
        </behavior>
        <behavior name="ServiceRequiresTokenBehaviorHttp">
          <serviceMetadata httpGetEnabled="true" httpsGetEnabled="true" />
          <serviceDebug includeExceptionDetailInFaults="true" />
          <TokenValidationBehaviorExtension />
        </behavior>
      </serviceBehaviors>
    </behaviors>
    <extensions>
      <behaviorExtensions>
        <add name="TokenValidationBehaviorExtension"
          type="WcfSimpleTokenExample.Behaviors.TokenValidationBehaviorExtension, WcfSimpleTokenExample, Version=1.0.0.0, Culture=neutral"/>
      </behaviorExtensions>
    </extensions>
    <serviceHostingEnvironment aspNetCompatibilityEnabled="false" multipleSiteBindingsEnabled="true" />
  </system.serviceModel>
  <system.webServer>
    <modules runAllManagedModulesForAllRequests="true" />
    <directoryBrowse enabled="true" />
  </system.webServer>
  <entityFramework>
    <defaultConnectionFactory type="System.Data.Entity.Infrastructure.LocalDbConnectionFactory, EntityFramework">
      <parameters>
        <parameter value="v11.0" />
      </parameters>
    </defaultConnectionFactory>
    <providers>
      <provider invariantName="System.Data.SqlClient" type="System.Data.Entity.SqlServer.SqlProviderServices, EntityFramework.SqlServer" />
    </providers>
  </entityFramework>
  <connectionStrings>
    <add name="BasicTokenDbConnection" connectionString="data source=(LocalDB)\v11.0;attachdbfilename=|DataDirectory|\BasicTokenDatabase.mdf;integrated security=True;MultipleActiveResultSets=True;App=EntityFramework" providerName="System.Data.SqlClient" />
  </connectionStrings>
</configuration>

Testing Basic Authentication with PostMan

Now we an test that this is working using PostMan. Our PostMan call is similar to what we did in previous articles, but instead of passing a token header, we set Basic Authentication, which sets the Authorization header for us (yes, you could have set the Authorization header manually.)

You could create the Authorization header yourself, but PostMan will create it for you if you click the Authorization and select Basic Auth. Enter your username and password and click update.

PostManBasicAuth

All this does it create an Authorization header for you. You can see this by clicking on the Headers tab in PostMan.

PostManBasicAuthHeader

Go ahead and click Send and you will get your authentication.

Notice the url is https in the image. I haven’t shown you how to do that yet. That is in part 5 here: Authentication Token Service for WCF Services (Part 5 – Adding SSL)

Handling input maxlength using knockout

I set out to handle maxlength with the following goals:

  • Set maxlength on an input field. That took about 10 seconds.

This wasn’t sufficient however. It had two problems:

  1. This prevents the UI from going over the maxlength, but not code. I preferred a solution that did both.
  2. Once the maxlength is reached, there is no indication of why the next character typed is ignored. I wanted the textbox to flash red.

So I decided to do the following:

  1. Have knockout handle the max length and not have maxlength in the html.
  2. Have knockout change the css style for 3 seconds.

Knockout allows for something called extenders. I quickly saw extenders as the way to solve my problem. I followed the documentation and modified the example for my needs. I used Plunker to develop this solution and have a working model here:

http://plnkr.co/edit/9SZzcIPUSwWjBttHDQ64

My extender is as follows:

ko.extenders.maxLength = function (target, maxLength) {
    var result = ko.computed({
        read: target,
        write: function (val) {
            if (maxLength > 0) {
                if (val.length > maxLength) {
                    var limitedVal = val.substring(0, maxLength);
                    if (target() === limitedVal) {
                        target.notifySubscribers();
                    }
                    else {
                        target(limitedVal);
                    }
                    result.css("errorborder");
                    setTimeout(function () { result.css(""); }, 500);
                }
                else { target(val); }
            }
            else { target(val); }
        }
    }).extend({ notify: 'always' });
    result.css = ko.observable();
    result(target());
    return result;
};

Now, as you see, I set the css to errorborder, then I remove it 500 milliseconds (1/2 second) later. In order to make this work, I need an errorborder css style. Here is my first quick stab at that.

.errorborder {
  outline: none;
  border: 2px solid red;
}

.errorborder:focus {
  outline: none;
  border: 2px solid red;
  border-color: red;
  box-shadow: 0 0 3px red;
}

The user will see the border of the text box go red for half a second as they try to type more. Having validation text pop-up saying that maxlength has been reached can be done with this as well, but is probably not necessary. This red border should be sufficient visual feedback.

10 signs you are a Senior Software Developer

Signs of a Senior Software Developer:

  1. Acquires a large foundation of knowledge and continues to learn.
    (Spends as much as 1 hour a day learning more about code. Which is why the Senior dev gets more done. Example: “That project was going to take two weeks. But while studying a came across this open source library that already does that. I solved this problem in an hour by referencing this project and using only a few lines of code.)
  2. Learns what the industry best practices are for a specific project before starting to code.
    (Humble, willing to learn, understands better developers exist.)
  3. Avoids code debt.
    (Frugal with time and code. Understands that debt piles up. Coding it correctly now will, sometime in the future, make a 2-week job take 1 day. Doing it wrong now will, sometime in the future, make a 1-day job take 2 weeks.)
  4. Follows the keep it super simple (KISS) rule.
    (Simplicity is so much more elegant than complexity.)
  5. Follows the 10/100 rule.
    (Code blocks are short. No classes over 100 lines, no methods over 10 lines. You code will natural turn into well-designed code just by following this one principle. You will likely end up using well-known design patterns. If you recognize those design patterns, that is even another sign that you are a senior.)
  6. Uses interface-based design.
    (IoC containers or not, the code is decoupled and uses interfaces, not concrete references that are hard to test.)
  7. Follows the don’t repeat yourself (DRY) principle and recognizes when they do repeat themselves.
    (Writing code takes time. Why would anyone want to write the same code twice?)
  8. Knows what SOLID stands for AND can show an example in actual code of each principle and why it makes sense.
  9. Writes unit tests to test code.
    (Are you still putting your tests in the Program.cs file of a Console Application? You’re not, right? Oh, you are? Seriously?)
  10. Doesn’t outshine coworkers, but instead, makes his coworkers shine, too.
    (When a quarterback wins the Super Bowl, even if named MVP, the rest of the team wins the Super Bowl too. Similarly, when a project is a huge success, you might be the MVP, but everyone in the project participated and contributed to its success, and everyone improved their skills in the process.)

Are you a Senior Software Developer?

My Thoughts

It baffles me that many developers don’t think that acquiring a foundation of knowledge is necessary. In 2010, I read the entire Pro C# 2010 and the .NET 4 Platform: http://www.amazon.com/2010-NET-Platform-Experts-Voice/dp/1430225491. I read it over time. One or two chapters a week and it took less than a year. I did the first 6 chapters really fast. However, I only did a handful of the coding examples. Still, I feel that it made me very knowledgeable in C#. Since then, I always read the “What is new” when a .NET version is released. I’m loving the new multiple level null check feature.

When I started working with WPF, I also watched every single WPF single video available on the now discontinued WindowsClient.net site as well as all the Videos on the Expression Blend site.

I think the key to being a Senior developer is always making the better decisions. Many developers accomplish a task and move on. Some developers design a solution and build upon it. The accomplished task usually is hard to maintain code and everyone wishes it had been done a different way or that it was part of a bigger solution. The designed solution is something that developers can work with, enhance, and improve easily.

Hidden Cyclomatic Complexity due to Parameter Value Coverage

Cyclomatic Complexity

Cyclomatic complexity is the number of branches found in code.

For example:

public int Add(int x, int y)
{
     return x + y;
}

This appears to have a cyclomatic complexity of 1 as there are no branches in your code. One test will give you 100% code coverage.

Detecting Hidden Cyclomatic Complexity

If you have read about Parameter Value Coverage (PVC) you would be aware that some code will do different things without branching in your code. Perhaps the branch occurs in the underlying code. This is still complexity that your code needs to be tested for.

Example 1

Look at the above Add(int x, int y) method. This appears to have a cyclomatic complexity of 1 as there are no branches in this code. One test will provide 100% code coverage if you count coverage by lines.

However, what if your coverage includes different possibilities for the different possible values of your method parameters? What are the possibilities for an int? Well, this example is in C#, so we will assume C# rules. In C#, an int can’t be null. It can be positive, negative or 0. It also has a max value and a minimum value. That is 5 different options that may be involved in Cyclomatic Complexity.

int result = Add(2147483647, 1);

The above code will not result in the answer being 2147483648.

However, the code doesn’t branch if the options are positive, negative, or 0. They code only behaves different if the combination of both values overflow the integer by going above int.MaxValue or below int.MinValue. So the Cyclomatic complexity is 3. It isn’t 1 as most people would assume at first glance.

Example 2

Also look at this simple divide method. This appears to have a cyclomatic complexity of 1 as there are no branches in this code. One test will provide 100% code coverage if you count coverage by lines. However, your code does react differently due to different possibilities for the different possible values of your method parameters.

public int divide(int x, int y)
{
     return x / y;
}

In the above method what happens when either parameter value is 0? Will your code behave the same as if two non-zero values are passed in? Or is there hidden cyclomatic complexity?

Taking into account the hidden cyclomatic complexity, do you still feel this code will never branch? Or do different parameter values cause it to branch? What is the Cylomatic complexity of this method?

If the second value is 0, the code is going to throw a DivideByZeroException. Really, that is the only difference. Since this is divide, it is impossible to overflow the integer, so int.MaxValue and int.MinValue don’t come into play. So the cyclomatic complexity is 2, not 1.

Conclusion

Cyclomatic Complexity is a great tool to measure the complexity of you code. However, failure to test and measure for different possible parameter values can give one a false sense of simplicity and an incorrect Cyclomatic Complexity score.

Branching can occur even in a single line of code. You have been warned!

Html and css for simple banner layout

As many of you know, html and css still hasn’t figured out how to make layout simple and easy. No wonder banners are images. Trying to do a banner that isn’t an image is like beating your head against the wall.

Here is a very basic and very common use case:

  • Banner should not be a full-width image.
  • There is html content on the left that is left justified, html content in the center that is center justified, html content on the right that is right justified.
  • If the screen shrinks, the content in the middle and the right should not wrap.

Failure 1 – The intuitive approach

<div id="frame-banner" style="min-width: 800px">
  <div style="float: left; min-width: 200px">Left Content</div>
  <div style="float: center; min-width: 400px">Middle content</div></div>
  <div style="float: right;min-width: 200px">right content</div>
</div>

Well, even though it seems intuitive to have something float in the center, float: center doesn’t exist, so that just doesn’t work. Would have been cool. I of course, knew float: center didn’t exist.

Left Content
Middle content
Right content


Failure 1 – Simple divs

So let’s actually spend some time trying to make this work. Here is what I actually thought should work. Unfortunately, it doesn’t. Some weird formatting happens.

<!DOCTYPE html>
<html>
<head>
<title>html fails at layout</title>
</head>
<body>
<div style="width: 100%;height: 100px;background: gray;margin: 0;padding: 0;">
    <div style="width: 800px;margin: 0 auto;height: 100%;">
        <div style="width: 25%;height: 90%;display: inline-block;background: lightblue;"><div style="background: blue;color: white;margin: 10px;height: 80%;">left<img alt="Image Alt" style="width: 32px; height: 32px;" /></div></div><!-- no space
     --><div style="width: 50%;height: 90%;display: inline-block;background: orange;text-align: center;"><div style="width: 25%;margin: 10px auto;background: blue;color: white;height: 80%;">middle</div></div><!-- no space
     --><div style="width: 25%;height: 90%;display: inline-block;background: lightblue;text-align: right;"><div style="background: blue;color: white;margin: 10px;height: 80%;text-align: right;">right</div></div>
    </div>
</div>
</body>
</html>

I added some hacks to eliminate spacing that shouldn’t exist, but does.

left
middle
right

That looks so good. You think that is going to work right?

Well, let’s add an image and see how that works.

<div style="width: 100%;height: 100px;background: gray;margin: 0;padding: 0;">
    <div style="width: 800px;margin: 0 auto;height: 100%;">
        <div style="width: 25%;height: 90%;display: inline-block;background: lightblue;"><div style="background: blue;color: white;margin: 10px;height: 80%;">left<img alt="Image Alt" style="width: 32px; height: 32px;" /></div></div><!-- no space
     --><div style="width: 50%;height: 90%;display: inline-block;background: orange;text-align: center;"><div style="width: 25%;margin: 10px auto;background: blue;color: white;height: 80%;">middle</div></div><!-- no space
     --><div style="width: 25%;height: 90%;display: inline-block;background: lightblue;text-align: right;"><div style="background: blue;color: white;margin: 10px;height: 80%;text-align: right;">right<img alt="rss" src="https://www.rhyous.com/wp-content/plugins/social-media-widget/images/default/32/rss.png" /></div></div>
    </div>
</div>
left
middle
rightrss

See, as soon as you try to use this layout by adding an image, the layout breaks. Do they do any layout testing in browsers? I’ve heard rumors that the W3C doesn’t believe in supporting layout.

Epic fail. Come on w3C people as well as HTML and CSS developers. There is no excuse for this after twenty years.

Failure 2 – All floats

<!DOCTYPE html>
<html>
<head>
<title>html fails at layout</title>
</head>
<body style="margin: 0; padding: 0;">
<div style="width: 100%;height: 100px;background: gray;margin: 0;padding: 0;">
    <div style="width: 800px;margin: 0 auto;height: 100%;">
        <div style="width: 25%;height: 90%;float: left;background: lightblue;"><div style="background: blue;color: white;margin: 10px;height: 80%;float: left;">left</div></div>
        <div style="width: 50%;height: 90%; background: orange;float:left;"><div style="margin: 10px;height: 80%;"><div style="width: 25%;background: blue;color: white;height: 100%;float: left; position: relative; right: -50%; margin: 0px auto;text-align: center;">middle</div></div></div>
        <div style="width: 25%;height: 90%;float: right;background: lightblue;text-align: right;"><div style="background: blue;color: white;margin: 10px;height: 80%;text-align: right;float:right;">right</div></div>
    </div>
</div>
</body>
</html>

This almost looks right, but wait. How do we actually get it centered? Notice it isn’t centered. It is right of center.

left

right

middle

I can make it left of center, but I have to put the middle after the right and that is a hack:

left
right
middle

But I can’t make it centered. This is not a solution.

Failure 3 – Middle doesn’t float

So what if just the middle element doesn’t float?

<!DOCTYPE html>
<html>
<head>
<title>html fails at layout</title>
</head>
<body style="margin: 0; padding: 0;">
<div style="width: 100%;height: 100px;background: gray;margin: 0;padding: 0;">
    <div style="width: 800px;margin: 0 auto;height: 100%;">
        <div style="width: 25%;height: 90%;float: left;background: lightblue;">
            <div style="background: blue;color: white;margin: 10px;height: 80%;float: left;">left</div>
        </div>
        <div style="width: 50%;height: 90%; background: orange;margin: 0 auto;">
            <div style="margin: 10px;height: 80%;">
                <div style="width: 25%;background: blue;color: white;height: 100%; margin: 0px auto;text-align: center;">middle</div>
            </div>
        </div>
        <div style="width: 25%;height: 90%;float: right;background: lightblue;text-align: right;">
            <div style="background: blue;color: white;margin: 10px;height: 80%;text-align: right;float: right;">right</div>
        </div>
    </div>
</div>
</body>
</html>

That looks horrible.

left

middle

right

Now I have two problems:

  1. The right side is down below my banner.
  2. The top margin of center is applying above the banner, not inside it.

Finally – Success with middle doesn’t float and extra div elements

Well, the final html looks horrible and the center ends up being wrapped in four divs.

To center, you use width: 99%; margin: 0 auto” where the width has to be less than 100%. How is that intuitive. It isn’t. It is horrible. Come on W3C, how hard would it be to add proper intuitive alignment to the html and css spec?

<!DOCTYPE html>
<html>
    <head>
        <title>html fails at layout</title>
    </head>
    <body style="margin: 0; padding: 0;">
        <div style="width: 100%;height: 100px;background: gray;margin: 0;padding: 0px;">
            <div style="width: 800px;margin: 0 auto;height: 100%;">
                <div style="width: 25%;height: 90%;float: left;background: lightblue;">
                    <div style="background: blue;color: white;margin: 10px;height: 80%;float: left;">left</div>
                </div>
                <div style="width: 25%;height: 90%;float: right;background: lightblue;text-align: right;">
                    <div style="background: blue;color: white;margin: 10px;height: 80%;text-align: right;float: right;">Right</div>
                </div>
                <div style="width: 50%;margin: 0 auto;height: 80%; background: orange;padding-top:10px">
                    <div style="text-align:center;width: 90%; margin: 0 auto; background: blue;color: white; height: 80%;">Center</div>
                </div>
            </div>
        </div>
    </body>
</html>

The result is finally acceptable.

left

Right

Center

Let’s add some content to make sure:

Rhyous
top

Follow Us on FacebookFollow Us on Google+Follow Us on TwitterFollow Us on LinkedInFollow Us on RSS
Your Awesome Page Title


cube

Rant on html, css, and W3C

I get that you are trying to do new things with HTML5, but until you actually draw the common layouts, such as two column fixed, three column fixed, and two column liquid, and three column liquid, and actually define the spec to layout properly, it will never work.

Also, without over-wrapping div in div in div, you can’t make html work. That is why all the html and css for the examples on the web look so horrible, because they have to be to work around the terrible job done with html and css layouts.

Layout failures starting with the W3C provided specs are the primary reason why HTML is not the answer for business. I could have written a separate UI for a banner in every platform Android, iOS, Windows, Windows Phone, and Linux, all in less than the time it took me to hack around and figure out what needed to be done in html.