Archive for the ‘JavaScript’ Category.

Authentication Token Service for WCF Services (Part 6 – A JavaScript client)

Drum roll please . . . This is the moment you’ve all been waiting for. The JavaScript client has finally arrived. In the past articles we have taken control of Authentication in WCF. The token authentication service was designed specifically for ReST like WCF services to be used by modern web and mobile apps. For modern web, that means the Basic Token Service for WCF Services has to work with JavaScript! Of course, it does. That is what it was designed for.

As for the WCF Services, I made a few improvements and fixed some bugs. I am not going to go over those changes. Just know it is a better example than what was delivered in part 6, but not much different.

Download this project here: WCF BTS JS Client

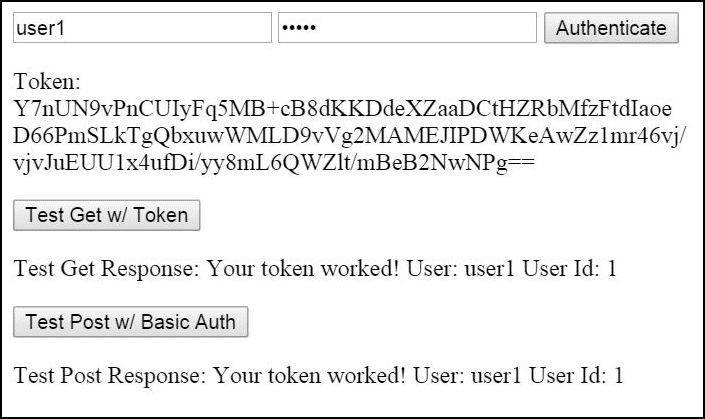
OK. So here is my little html and javascript example. I created a single html file, mostly. I added jquery and knockoutjs from NuGet. The rest is all in the TestPage/Index.html. Really, all you need to know is that there are three buttons. One to test authentication, one to test using the token for calling the test service, and one for using Basic Authentication instead of the token to call the test service.

Here is an image of the page rendered in a browser.

AuthenticationTokenService html and JavaScript

Here is the source code.

<!DOCTYPE html>
<html>
<head>
    <title>JavaScript Client</title>
    <meta charset="utf-8" />
    <script type="text/javascript" src="/Scripts/jquery-2.1.4.js"></script>
    <script type="text/javascript" src="/Scripts/knockout-3.4.0.debug.js"></script>
    <script type="text/javascript">
        var ViewModel = function () {
            var _vm = this;
            _vm.user = ko.observable();
            _vm.password = ko.observable();
            _vm.basicAuth = ko.computed(function () {
                return "Basic " + btoa(_vm.user() + ":" + _vm.password());
            });
            // I am just sticking the token in a local variable,
            // but you might want to save it in a cookie.
            _vm.token = ko.observable();
            _vm.getResponse = ko.observable();
            _vm.postResponse = ko.observable();
            _vm.onAuthClick = function () {
                $.ajax({
                    method: "POST",
                    url: "/Services/AuthenticationTokenService.svc/Authenticate",
                    contentType: "application/json",
                    context: document.body,
                    data: JSON.stringify({
                        User: _vm.user(),
                        Password: _vm.password()
                    }),
                    success: function (data) {
                        _vm.token(data);
                    },
                    failure: function (err) { alert(err.responseText); },
                    error: function (err) { alert(err.responseText); }
                });
            };
            _vm.onTestGetWithTokenClick = function () {
                $.ajax({
                    url: "/Services/Test1Service.svc/TestGet",
                    contentType: "application/json",
                    context: document.body,
                    beforeSend: function (request) { request.setRequestHeader("Token", _vm.token()); },
                    success: function (data) {
                        _vm.getResponse(data);
                    },
                    failure: function (err) { alert(err.responseText); },
                    error: function (err) { alert(err.responseText); }
                });
            };
            _vm.onTestPostWithBasicAuthClick = function () {
                $.ajax({
                    method: "POST",
                    url: "/Services/Test1Service.svc/TestPost",
                    contentType: "application/json",
                    context: document.body,
                    beforeSend: function (request) { request.setRequestHeader("Authorization", _vm.basicAuth()); },
                    success: function (data) {
                        _vm.postResponse(data);
                    },
                    failure: function (err) { alert(err.responseText); },
                    error: function (err) { alert(err.responseText); }
                });
            };
        };
        $(function () {
            ko.applyBindings(new ViewModel());
        });
    </script>
</head>
<body>
    <div>
        <input type="text" data-bind="value: user" placeholder="Enter your username here . . ." />
        <input type="password" data-bind="value: password" placeholder="Enter your password here . . ." />
        <input type="button" value="Authenticate" data-bind="click: onAuthClick" />
    </div>
    <p>Token: <span data-bind="text: token"></span></p>
    <input type="button" value="Test Get w/ Token" data-bind="click: onTestGetWithTokenClick" />
    <p>Test Get Response: <span data-bind="text: getResponse"></span></p>
    <input type="button" value="Test Post w/ Basic Auth" data-bind="click: onTestPostWithBasicAuthClick" />
    <p>Test Post Response: <span data-bind="text: postResponse"></span></p>
</body>
</html>

Handling input maxlength using knockout

I set out to handle maxlength with the following goals:

  • Set maxlength on an input field. That took about 10 seconds.

This wasn’t sufficient however. It had two problems:

  1. This prevents the UI from going over the maxlength, but not code. I preferred a solution that did both.
  2. Once the maxlength is reached, there is no indication of why the next character typed is ignored. I wanted the textbox to flash red.

So I decided to do the following:

  1. Have knockout handle the max length and not have maxlength in the html.
  2. Have knockout change the css style for 3 seconds.

Knockout allows for something called extenders. I quickly saw extenders as the way to solve my problem. I followed the documentation and modified the example for my needs. I used Plunker to develop this solution and have a working model here:

http://plnkr.co/edit/9SZzcIPUSwWjBttHDQ64

My extender is as follows:

ko.extenders.maxLength = function (target, maxLength) {
    var result = ko.computed({
        read: target,
        write: function (val) {
            if (maxLength > 0) {
                if (val.length > maxLength) {
                    var limitedVal = val.substring(0, maxLength);
                    if (target() === limitedVal) {
                        target.notifySubscribers();
                    }
                    else {
                        target(limitedVal);
                    }
                    result.css("errorborder");
                    setTimeout(function () { result.css(""); }, 500);
                }
                else { target(val); }
            }
            else { target(val); }
        }
    }).extend({ notify: 'always' });
    result.css = ko.observable();
    result(target());
    return result;
};

Now, as you see, I set the css to errorborder, then I remove it 500 milliseconds (1/2 second) later. In order to make this work, I need an errorborder css style. Here is my first quick stab at that.

.errorborder {
  outline: none;
  border: 2px solid red;
}

.errorborder:focus {
  outline: none;
  border: 2px solid red;
  border-color: red;
  box-shadow: 0 0 3px red;
}

The user will see the border of the text box go red for half a second as they try to type more. Having validation text pop-up saying that maxlength has been reached can be done with this as well, but is probably not necessary. This red border should be sufficient visual feedback.

Simpler inheritance in Javascript

I’ve been working more in JavaScript and decided I need some inheritance. I had a couple of classes that need to inherit the properties and methods of a base class. I’ve learned inheritance methods in javascript. The prototype inheritance just never really felt right.

Well, today it just dawned on me that I might not so much want inheritance as I want one place to implement my fields and methods. The prototypal inheritance method doesn’t exactly work for what I want. I don’t want to add methods to the prototype.

See this project fully unit tested with qunit here: Simpler Javascript Inheritance

The inheritance template

To make this method of JavaScript inheritance work, all you have to do is define an objects members using a method. I will use an init method.

// The template
var TemplateBaseClass = function(child) {
  var _self = this;
  _self.init = function(obj) {
    // define all members here using obj.member syntax.
  };
  _self.init(_self); // instantiates fields and method to itself
  if (child)
    _self.init(child); // instantiates fields and method to child
};

With this template we can now implement inheritance with far more simplicity than the prototypal method.

Example base class and inheritance

Let’s look at an example BaseClass that uses the Inheritance template

// Non-abstract base class
// You can use new BaseClass() or any child. 
var BaseClass = function(child) {
  var _self = this;
  _self.init = function(obj) {
    obj.field1 = null;
    obj.field2 = null;
    obj.action1 = function() {
      return true;
    };
    obj.action2 = function() {
      return true;
    };
  };
  _self.init(_self); // instantiates fields and method to itself
  if (child)
    _self.init(child); // instantiates fields and method to child
};

The above BaseClass creates a few fields and methods. It uses the template we’ve created. It allows inheritance. Let’s inherit from it. Check out this ChildClass below.

// A child of BaseClass
var ChildClass = function(child) {
  var _self = this;
  var _base = new BaseClass(_self);
  _self.init = function(obj) {

    // Overriding a base method
    obj.action1 = function() {
      return _base.action1() && _self.truefalse; // can call base.action1()
    };

    // Child class fields and methods
    obj.field5 = null;
    obj.truefalse = false;
    obj.action5 = function() {
      return true;
    };

    // expose base class
    obj.getBase = function() {
      return _base;
    }
  }
  _self.init(_self); // instantiates fields and method to itself
  if (child)
    _self.init(child); // instantiates fields and method to child
}

As you see, ChildClass inherits BaseClass(). They have all the same field and method signatures. Methods can be defined in the base class and don’t have to be redefined. Also notice that we didn’t have to mess with the clunky object.prototype or object.Create() syntax.

Note: Well, this is sort of inheritance. BaseClass and ChildClass actually have completely separate instances of the fields and methods. We can fix this for methods (I’ll show you later) but we can’t really fix this for members. Still, that limitation doesn’t really cause any immediate problems.

Example abstract base class and inheritance

Well since we don’t really need the base class to actually have the fields and methods, let’s implement it so it doesn’t. Notice that we don’t call _self.init(_self).

// Abstract base class (like an Interfaces but with the implementation)
// While you can call new AbstractBaseClass(), it doesn't have any
// of its members.
var AbstractBaseClass = function(child) {
  var _self = this;
  _self.init = function(obj) {
    obj.field3 = null;
    obj.field4 = null;
    obj.action3 = function() {
      return true;
    };
    obj.action4 = function() {
      return true;
    };
  };
  if (child)
    _self.init(child); // only instantiates fields and method to child
};

This is pretty identical to the code above, only the base class doesn’t implement any of the fields or methods it defines. I like to think of this as an Abstract class, or an interface that also includes implementation.

Let’s inherit from AbstractBaseClass.

// A child of the AbstractBaseClass
var ChildOfAbstractClass = function(child) {
  var _self = this;
  AbstractBaseClass(_self); // not saving AbstractBaseClass as it can't be used

  _self.init = function(obj) {
    // Overriding a base method
    obj.action1 = function() {
      // cannot call base.action1() because it doesn't exist
      return obj.truefalse;
    };

    // Child class fields and methods
    obj.field6 = null;
    obj.truefalse = false;
    obj.action6 = function() {
      return true;
    };
  }
  _self.init(_self); // instantiates fields and method to itself
  if (child)
    _self.init(child); // instantiates fields and method to child
}

As you see, inheriting from an abstract class is the same with the exception that you cannot call any base members or methods as the base object doesn’t have them.

Implementation where base class and child class share fields and methods

Well, to share a method, the syntax is simple. Here is our original BaseClass from above, changed so methods in a child are the same as the method in the base class.

// Non-abstract base class
// You can use new BaseClass() or any child. 
var BaseClass = function(child) {
  var _self = this;
  _self.init = function(obj) {
    obj.field1 = null;
    obj.field2 = null;
    obj.action1 = _self.action1 || function() {
      return true;
    };
    obj.action2 = _self.action1 || function() {
      return true;
    };
  };
  _self.init(_self); // instantiates fields and method to itself
  if (child)
    _self.init(child); // instantiates fields and method to child
};

How simple was that. We just assign the object _self.action1 if it exists, if not we assign it a new function. This works because both the base class and child class have a reference to the same method. However, with fields, this wont’ work because the calling _self.field1 would return a value of null, not a reference. They will have the same value initially, but changing the value in the child class won’t change the value in the base class.

One nice way to fix this is to implement the Property object. This is nice as it is basically a wrapper around the ubiquitous get/set methods familiar to all languages. Here is a simple implementation of a Property.

// A property class 
var Property = function() {
  var _self = this;
  var _backingField = null;
  _self.get = function() {
    return _backingField;
  }
  _self.set = function(value) {
    _backingField = value;
  }
}

Now let’s implement a base class using Properties instead of fields.

var BaseClassWithProperties = function(child) {
  var _self = this;
  _self.init = function(obj) {
    obj.prop1 = _self.prop1 || new Property();
    obj.prop2 = _self.prop1 || new Property();
  };
  _self.init(_self); // instantiates fields and method to itself
  if (child)
    _self.init(child); // instantiates fields and method to child
};

As you see, instead of assigning the fields a null value, we assign them a new object. Notice we can use our syntax, _self.prop1 || new Property();, to make sure that the base class and the child class share the same get/set Property.

Let’s implement a child class that also uses properties.

// A child of the BaseClassWithProperties 
var ChildProperties = function(child) {
  var _self = this;
  var _base = new BaseClassWithProperties(_self); // not saving AbstractBaseClass as it can't be used

  _self.init = function(obj) {
    // Child class properties
    obj.prop3 = new Property();

    // expose base class
    obj.getBase = function() {
      return _base;
    }
  }
  _self.init(_self); // instantiates fields and method to itself
  if (child)
    _self.init(child); // instantiates fields and method to child
}

Now if I create a new ChildProperties object and call it’s setter, the value is set for both the parent and the child object.

A sealed class

The idea of a sealed class is one that can’t be inherited from. Simply don’t implement the template and you have a sealed class.

// A child of the BaseClassWithProperties 
// since it doesn't implement the child parameter and the init function, it is sealed and not usable for inheritance.
var SealedClass = function() {
  var _self = this;
  var _base = new BaseClassWithProperties(_self); 
  
  // Child class properties
  _self.prop3 = new Property();

  // expose base class
  _self.getBase = function() {
    return _base;
  }
}

I want many child class that inherit the same

How to populate MailTo link with a form action using Javascript

Someday you might want to have a form where the submit button goes to a MailTo: link. You might want to populate the email’s To: Subject: and Body.

Here is a plunk to do it:
http://plnkr.co/edit/HWkMHhlaN5MO82wQfa0q

Here is the html and javascript:

<html>
<head>
<script>
function sendemail()
{
    var body = "First name: " + document.getElementById("fn").value + "\n";
    body +=  "Last name: " + document.getElementById("ln").value;
    var email = document.getElementById("email").value;
    var location = "mailto:" + email + "?subject=Hello world&body=" + encodeURIComponent(body);
    window.location.href = location;
}
</script>
</head>
<body>
<form action="javascript: sendemail()">
First name:<br>
<input id="fn" type="text" name="firstname">
<br>
Last name:<br>
<input id="ln" type="text" name="lastname">
<br>
Email:<br>
<input id="email" type="text" name="email">
<input type="submit" value="Submit">
</form>
</body>

Select Option Web Control with Knockout.js and MVVM

<!-- Step 1 - Create the HTML File or the View -->
<!DOCTYPE html>
<html>
<head>
    <!-- Step 2 - Include jquery and knockout -->
    <script type="text/javascript" src="http://code.jquery.com/jquery-latest.pack.js"></script>
    <script type="text/javascript" src="http://knockoutjs.com/downloads/knockout-3.0.0.js"></script>
     
    <!-- Step 3 - Add script to run when page loads -->
    <script type="text/javascript" >
        $(document).ready(function(){
 
 
            <!-- Step 4 - Create a data model -->
            var SelectableListDataModel = function () {
                // Private
                var _self = this;

                // Public
                _self.labels = new Array(); // Should have same count as values
                _self.values = new Array(); // Should have same count as Labels
                _self.defaultValue = 0;
                _self.canSelectMethod = function () { return true; },
                _self.push = function (label, value) {
                    _self.labels.push(label);
                    _self.values.push(value);
                };
            };
 
            <!-- Step 5 - Add an OptionViewModel -->
            var OptionViewModel = function(parent, label, value, canSelectMethod) {
                // private
                var _self = this;
                var _parent = parent;

                // public
                _self.id = ko.observable();
                _self.class = ko.observable();
                _self.label = label ? ko.observable(label) : ko.observable();
                _self.value = value ? ko.observable(value) : ko.observable();
                _self.isSelected = ko.computed(function () {
                    return (_parent && _parent.selectedValue) ? _parent.selectedValue() == _self.value() : false;
                }, _self);
                _self.canSelect = canSelectMethod ? ko.computed(canSelectMethod) : ko.computed(function () { return true; });
            };

            <!-- Step 6 - Add an SelectViewModel -->
            var SelectViewModel = function (selectableListDataModel) {
                // private
                var _self = this;
                var _defaultDataModel = new SelectableListDataModel();
                var _dataModel = selectableListDataModel ? selectableListDataModel : _defaultDataModel;

                // Public
                _self.canSelect = (_dataModel.canSelectMethod)? ko.computed(_dataModel.canSelectMethod) : ko.computed(_defaultDataModel.canSelectMethod);
                _self.list = ko.observableArray();
                _self.selectedValue = _dataModel.defaultValue ? ko.observable(_dataModel.defaultValue) : ko.observable();
                
                if (_dataModel.labels && _dataModel.values) {
                    for (var i = 0; i < _dataModel.labels.length; i++) {
                        _self.list.push(new OptionViewModel(_self, _dataModel.labels[i], _dataModel.values[i], _self.canSelect));
                    }
                }
                
                _self.selectedIndex = ko.computed(function () {
                    var index = 0;
                    var foundIndex = -1;
                    ko.utils.arrayForEach(_self.list(), function (item) {
                        if (_self.selectedValue() == item.value()) {
                            foundIndex = index;
                        }
                        index++;
                    });
                    return foundIndex;
                }, _self);

                _self.selectedText = ko.computed(function () {
               _self.selectedText = ko.computed(function () {
                    var index = _self.selectedIndex();
                    return (_self.list()[index]) ? _self.list()[index].label() : "";
                }, _self);
                }, _self);
                
                _self.clear = function (value) {
                    _self.selectedValue(value ? value : "");
                };
            }
 
            <!-- Step 7 - Create ViewModel for whatever you need -->
            function SurveyAnswerViewModel() {
                var self = this;
                 
                <!-- Step 8 - Create an observable list instance -->
                self.dataModel = new SelectableListDataModel();
                self.dataModel.labels = new Array("Good", "Average", "Poor");
                self.dataModel.values = new Array(10,5,1);
                self.dataModel.selectedValue = 10;
                
                <!-- Step 9 - Create a SelectViewModel instance -->
                self.selectGroup1 = new SelectViewModel(self.dataModel);                       
                 
                <!-- Step 10 - Create a computed value to require a selection before submitting -->
                self.canClick = ko.computed( function() {
                    return self.selectGroup1.selectedValue() != "";
                }, self);
                
                <!-- Step 11 - Make some button methods for this example -->
                self.submitClick = function(){
                    // Do something here
                }
                
                self.resetClick = function(){
                    self.selectGroup1.clear();
                }
            }
            
            <!-- Step 12 - Create a computed value to require a selection before submitting -->   
            ko.applyBindings(new SurveyAnswerViewModel());
        });
    </script>
</head>
<body>
    <!-- Step 13 - Create a drop down select item -->
    <select data-bind="options: selectGroup1.list, optionsText: 'label', optionsValue: 'value', value: selectGroup1.selectedValue"></select>
    <br />
    
    <!-- Step 14 - Add html elements to see other properties -->
    <p data-bind="text: 'Index: ' +  selectGroup1.selectedIndex()"></p>
    <p data-bind="text: 'Value: ' +  selectGroup1.selectedValue()"></p>
    <p data-bind="text: 'Text: ' +  selectGroup1.selectedText()"></p>
     
    <!-- Step 15 - Add a button and bind its to methods -->
    <button type="submit" id="btnSubmit" data-bind="enable: canClick, click: submitClick">Submit</button>
    <button type="reset" id="btnReset" data-bind="enable: canClick, click: resetClick">Reset</button>
 
</body>
</html>

RadioButton web control with Knockout.js and MVVM

Here is an example of a RadioButton control using Knockout and MVVM. Hope this helps anyone looking.

<!-- Step 1 - Create the HTML File or the View -->
<!DOCTYPE html>
<html>
<head>
    <!-- Step 2 - Include jquery and knockout -->
    <script type="text/javascript" src="http://code.jquery.com/jquery-latest.pack.js"></script>
    <script type="text/javascript" src="http://knockoutjs.com/downloads/knockout-3.0.0.js"></script>
     
    <!-- Step 3 - Add script to run when page loads -->
    <script type="text/javascript" >
        $(document).ready(function(){
 
            <!-- Step 4 - Add a RadioButtonModel -->
            var RadioButtonModel = function(parent, inText, inValue, inGroupName, canClickMethod) {
                    // Private
                    var _self = this;
                    var _canClickMethod = (canClickMethod) ? canClickMethod : function() { return true; };
                    var _parent = parent;

                    // Public
                    this.text = ko.observable(inText);
                    this.value = ko.observable(inValue);
                    this.group = ko.observable(inGroupName);
                    this.class = ko.observable();
                    this.isSelected = ko.computed(function() {
                        return (_parent && _parent.selectedValue) ? _parent.selectedValue() == _self.value() : false;
                    }, _self);
                    _self.canClick = ko.computed(function() { return _canClickMethod(); });
                };
                
                
            <!-- Step 5 - Add a RadioButtonViewModel -->
            var RadioButtonViewModel = function (rbLabels, rbValues, group, defaultValue) {
                // Private
                var _self = this;
                var _rbLables = rbLabels;
                var _rbValues = rbValues;
                var _group = group;
                var _defaultValue = defaultValue;                

                // Public
                _self.selectedValue = ko.observable(_defaultValue);
                
                _self.list = ko.observableArray();
                for (var i = 0; i < _rbLables.length; i++) {
                    _self.list.push(new RadioButtonModel(_self, _rbLables[i], _rbValues[i], _group));
                }

                _self.selectedIndex = ko.computed(function () {
                    var i = 0;
                    var foundIndex = -1;
                    ko.utils.arrayForEach(_self.list(), function (item) {
                        if (_self.selectedValue() == item.value()) {
                            foundIndex = i;
                        }
                        i++;
                    });
                    return foundIndex;
                }, _self);

                _self.selectedText = ko.computed(function () {
                    return (_self.list()[_self.selectedIndex()]) ? _self.list()[_self.selectedIndex()].text() : "";
                }, _self);
                
                _self.clear = function(value){
                    _self.selectedValue(value ? value : "");
                }
                
            }
 
            <!-- Step 6 - Create ViewModel for whatever you need -->
            function SurveyAnswerViewModel() {
                var self = this;
                 
                <!-- Step 7 - Create an observable list instance -->
                self.rbGroup1 = new RadioButtonViewModel(new Array("Good", "Average", "Poor"), new Array(10,5,1), "Group1", 10);                           
                 
                <!-- Step 8 - Create a computed value to require a selection before submitting -->
                self.canClick = ko.computed( function() {
                    return self.rbGroup1.selectedValue() != "";
                }, self);
                
                <!-- Step 9 - Make some button methods for this example -->
                self.submitClick = function(){
                    // Do something here
                }
                
                self.resetClick = function(){
                    self.rbGroup1.clear();
                }                 
            }
            
            <!-- Step 10 - Create a computed value to require a selection before submitting -->   
            ko.applyBindings(new SurveyAnswerViewModel());
        });
    </script>
</head>
<body>
    <!-- Step 11 - Create a div containing the html for one radio button and bind to foreach: list -->
    <div data-bind="foreach: rbGroup1.list">
        <div>
            <input type="radio" data-bind="attr: {name: group}, value: value, checked: $root.rbGroup1.selectedValue, checkedValue: value" />
            <span data-bind="text: $index() + '. ' + text()"></span>
            <span data-bind="text: 'Is selected: ' + isSelected()"></span>
        </div>
    </div>
    <br />
    
    <!-- Step 12 - Add html elements to see other properties -->
    <p data-bind="text: rbGroup1.selectedValue"></p>
    <p data-bind="text: rbGroup1.selectedText"></p>
     
    <!-- Step 13 - Add a button and bind its to methods -->
    <button type="submit" id="btnSubmit" data-bind="enable: canClick, click: submitClick">Submit</button>
    <button type="reset" id="btnReset" data-bind="enable: canClick, click: resetClick">Reset</button>
 
</body>
</html>

Using slideToggle with Knockout’s MVVM

I recommend you use the third option: Option 3 – Boolean binding using a custom binding handler called slideToggle

See it live here: http://plnkr.co/edit/1YGchAyjkNSjYzmXFfK2

<!-- Step 1a - Create the HTML File or the View -->
<!DOCTYPE html>
<html>
<head>
    <!-- Step 2 - Include jquery and knockout -->
    <script type="text/javascript" src="http://code.jquery.com/jquery-latest.pack.js"></script>
    <script type="text/javascript" src="http://knockoutjs.com/downloads/knockout-3.0.0.js"></script>
     
    <!-- Step 3 - Add script to run when page loads -->
    <script type="text/javascript">
        $(document).ready(function(){
         
            <!-- Step 4 - Create a ViewModel -->           
            function viewModel() {
                _self = this;
                _self.showHideChild = function(viewModel, event) {
                    $(event.currentTarget).children('div').slideToggle()
                };
                _self.showHideNextSibling = function(viewModel, event) {
                    var siblings = $(event.currentTarget).siblings('div');
                    for (var i=0;i<siblings.length;i++) {
                        if (siblings[i].previousElementSibling == event.currentTarget ) {
                            $(siblings[i]).slideToggle();
                        }
                    }                 
                };
                _self.isVisible = ko.observable(false);
                _self.showHide = function() {
                    _self.isVisible(!_self.isVisible());
                }
            };
           
            ko.bindingHandlers.slideToggle = {
                init: function (element, valueAccessor) {
                    var value = valueAccessor();
                    $(element).toggle(ko.utils.unwrapObservable(value));
                },
                update: function (element, valueAccessor) {
                    var value = valueAccessor();
                    var isVisible = element.offsetWidth > 0 && element.offsetHeight > 0;
                    if (ko.utils.unwrapObservable(value) != isVisible) {
                        $(element).slideToggle();
                    }
                }
            };
           
            <!-- Step 5 -  Activates knockout.js bindings -->
          ko.applyBindings(new viewModel());
        });
    </script>
</head>
<!-- Step 4 - Create a HTML Elements with bindings -->
<body style="">
    <div>
        Option 1 - Child div
        <div id="child1" data-bind="click: showHideChild" style="border:2px solid;">
        Click me
            <div id="child2" style="display: none;">
              Now you see me!
            </div>
        </div>
        
        Option 2 - Siblings div
        <div id="sib1" style="border:2px solid;">
            <div id="sib2" data-bind="click: showHideNextSibling" >
            Click me
            </div>
            <div id="sib3" style="display: none;">
            Now you see me!
            </div>
            <div id="sib4">
            You should always see me.
            </div>
        </div>
        Option 3 - Boolean binding using a custom binding handler called slideToggle 
        <div id="bool1" style="border:2px solid;">
            <div id="bool2" data-bind="click: showHide" >
            Click me
            </div>
            <div id="bool3" data-bind="slideToggle: isVisible">
            Now you see me!
            </div>
        </div>
    </div>
</body>
</html>

HTML Search using MVVM with knockout.js

<!DOCTYPE html>
<html>
<head>
    <script type="text/javascript" src="http://code.jquery.com/jquery-latest.pack.js"></script>
    <script type="text/javascript" src="http://knockoutjs.com/downloads/knockout-3.0.0.js"></script>
     
    <script type="text/javascript" >
        $(function(){
         
            // custom binding handler so pressing enter in a textbox is the same
            // as clicking the button.
            ko.bindingHandlers.enterKey = {
                init: function(element, valueAccessor, allBindings, vm) {
                    ko.utils.registerEventHandler(element, "keyup", function(event) {
                        if (event.keyCode === 13) {
                            ko.utils.triggerEvent(element, "change");
                            valueAccessor().call(vm, vm);
                        }                        
                        return true;
                    });
                }         
            };
         
            var fakeSearch = function(args, callback) {
                var data = args;
                callback(data);
                return args;
            };

            var ButtonViewModel = function(text, searchMethod, canSearchMethod) {
                var _self = this;
                _self._canSearchMethod = canSearchMethod;
                _self.text = ko.observable(text);
                _self.onClick = searchMethod;
                _self.canClick = ko.computed(_self._canSearchMethod);                
            };

            var SearchParametersViewModel = {
                'SearchTerm': ko.observable(''),
                'SearchOption': ko.observable(''), // Not used in example
                'StartDate': ko.observable(''),    // Not used in example
                'EndDate': ko.observable('')       // Not used in example
            };

            var SearchViewModel = function(searchMethod, searchArgs) {
                // private properties
                var _self = this;
                _self._searchMethod = searchMethod;
                _self._searchArgs = searchArgs;
                _self._canSearch = function() {
                    return _self.searchParameters.SearchTerm() != null && _self.searchParameters.SearchTerm() != '';
                };

                // public properties
                _self.searchParameters = SearchParametersViewModel;

                _self.results = ko.observable('');
                
                _self.searchCallBack = function (data) {
                    _self.results(JSON.stringify(data));
                };

                _self.searchButton = new ButtonViewModel("Search", 
                function () {
                    _self._searchMethod(_self._searchArgs, _self.searchCallBack);
                }, _self._canSearch);
                
            };
           
          ko.applyBindings(new SearchViewModel(fakeSearch, {a: "1", b: "2"}));
        });
    </script>
</head>
<body>
    <input data-bind="value: searchParameters.SearchTerm, valueUpdate: 'afterkeydown', enterKey: searchButton.onClick" />
    <button type="button" id="btnSearch" data-bind="text: searchButton.text, enable: searchButton.canClick, click: searchButton.onClick"></button>
    <p data-bind="text: results"></p>
</body>
</html>

ASP.NET, JavaScript, and HTML Element ID attributes

Today I had to fix some legacy code. It is ASP.NET code and it has both ASP.NET elements and ASP.NET Controls. The plan was to replace a large portion of code behind with JavaScript. The ASP.NET code needed to be a UserControl that could appear twice on the same page. This created some problems:

  1. ASP.NET creates some html controls but changes the id and the name attributes. While it is possible to run the web page and see what the attributes will be changed to and then use those strings statically in JavaScript, the JavaScript could easily break with slight changes to the ASP.NET code. This is not scalable or maintainable.
  2. ASP.NET does NOT rename the the id or the name attributes for normal HTML tags. First, that is a consistency issue. Second it is an issue using the same control multiple times. Third, if you want to get the value of a form element, doing so uses the name attribute and so each form element needs a separate name.

So lets explain the is problem with a real world scenario.

Lets say you have the following requirements:

  1. Create a UserControl, called PersonControl, that accepts person’s basic info: First name, Last name, and Birthdate.
  2. The form also has a button and it should only be enabled if all three fields are populated.
  3. The Birthdate should use JQuery’s DateTimePicker.
  4. The First name and Last name should be ASP.NET text boxes.

Now imagine the site already exists and you have to add this requirement:

  1. A web page should exist that has multiple PersonControls showing: for example: Employee, Emergency Contact.

The problem with ASP.NET, JavaScript, and HTML Element ID attributes

So let’s build this project using a single control and static id and name attributes and see how it works. Later we will see what we need to do to get this working with multiple PersonControls.

  1. Open Visual Studio and create a new ASP.NET Empty Web Application.
  2. Add JQuery and JQuery-UI. Do this as follows:
    1. Right-click on the project and choose Manage NuGet Packages.
    2. In the Manage NuGet Packages window, on the left, click Online.
    3. On the right, in the search field, type JQuery.
    4. Install JQuery and JQuery UI.
  3. Create new Web Form called PersonForm.
  4. Add the following into your PersonForm.aspx file:
    <%@ Page Language="C#" AutoEventWireup="true" CodeBehind="PersonForm.aspx.cs" Inherits="AspAndJavaScriptExample.PersonForm" %>
    
    <%@ Register Src="~/PersonControl.ascx" TagPrefix="uc1" TagName="PersonControl" %>
    
    <!DOCTYPE html>
    
    <html xmlns="http://www.w3.org/1999/xhtml">
    <head runat="server">
        <title>ASP.NET, JavaScript, and HTML id Attributes</title>
    </head>
    <body>
        <form id="form1" runat="server">
            <div>
                <h2>Employee</h2>
                <uc1:PersonControl runat="server" ID="PersonControlEmployee" />
            </div>
            <%--<div>
                <uc1:PersonControl runat="server" ID="PersonControlEmergencyContact" />
            </div>--%>
        </form>
    </body>
    </html>
    
  5. Create a new Web User Control called PersonControl.
  6. Add the following into your PersonControl.ascx file:
    <%@ Control Language="C#" AutoEventWireup="true" CodeBehind="PersonControl.ascx.cs" Inherits="AspAndJavaScriptExample.PersonControl" %>
    <%@ Control Language="C#" AutoEventWireup="true" CodeBehind="PersonControl.ascx.cs" Inherits="AspAndJavaScriptExample.PersonControl" %>
    <link href="Content/themes/base/minified/jquery.ui.datepicker.min.css" rel="stylesheet" />
    <script src="scripts/jquery-2.0.0.min.js"></script>
    <script src="scripts/jquery-ui-1.10.3.min.js"></script>
    <script src="scripts/ButtonManager.js"></script>
    <script>
        $(function () {
            $(".datepicker").datepicker();
        });
    </script>
    
    <div style="border: solid; padding: 2px">
        First name:
        <asp:TextBox ID="FirstName" runat="server"></asp:TextBox><br />
        Last name:
        <asp:TextBox ID="LastName" runat="server"></asp:TextBox><br />
        Birthdate:
        <input type="text" name="BirthDate" id="BirthDate" class="datepicker" /><br />
        <asp:Button ID="SubmitPerson" runat="server" Text="Submit" OnClick="SubmitPerson_Click" />
    </div>
    
  7. Add the following button SubmitPerson_Click method into your PersonControl.ascx file:
            protected void SubmitPerson_Click(object sender, EventArgs e)
            {   // Put break point here            
                var firstName = FirstName.Text;
                var laststName = LastName.Text;
                var birthdate = Request.Form["Birthdate"];
            }
    
  8. Now add this ButtonManager.js file.
    jQuery(document).ready(function () { 
        $("#PersonControlEmployee_FirstName").bind("propertychange keyup input paste", setButtonState);
        $("#PersonControlEmployee_LastName").bind("propertychange keyup input paste", setButtonState);
        $("#BirthDate").change(setButtonState);
        setButtonState();
    });
    
    var setButtonState = function () {
        if (!areValuesPopulated())
            $("#PersonControlEmployee_SubmitPerson").attr("disabled", "disabled");
        else
            $("#PersonControlEmployee_SubmitPerson").removeAttr("disabled");
    }
    
    var areValuesPopulated = function () {
        return $("#PersonControlEmployee_FirstName").val() != ""
             && $("#PersonControlEmployee_LastName").val() != ""
             && $("#BirthDate").datepicker().val() != "";
    }
    
  9. Now run the project and look at the source code of the html. It looks as follows:


    <!DOCTYPE html>
    
    <html xmlns="http://www.w3.org/1999/xhtml">
    <head><title>
    	ASP.NET, JavaScript, and HTML id Attributes
    </title></head>
    <body>
        <form method="post" action="PersonForm.aspx" id="form1">
    <div class="aspNetHidden">
    <input type="hidden" name="__VIEWSTATE" id="__VIEWSTATE" value="nkizDAjcAtd96A9EOpli0xdG3n6zTXVaM/5t2fmcAI5+LPQ6OzzIV2wUpisxoUTMFxIKkUwKDY4Xk36/NouRsiE81gq5z3Ch/tz3DlxJW9g=" />
    </div>
    
    <div class="aspNetHidden">
    
    	<input type="hidden" name="__EVENTVALIDATION" id="__EVENTVALIDATION" value="XCB0fxwKvdqEXpUBaICUtf6EzkAvBeahq0bywZekyukCuzvGVagqOnVHUWFHF2Cycd2xkg/UhNh/B3qNqabkBI+Flj52GkM3p6SF5eL/M4SnnfwmFBjWVOaTZ+IlwMvkR1bGuMxomyeJJ5HaU1FXWSYDYHVtgM9tdsVi31EireM=" />
    </div>
            <div>
                <h2>Employee</h2>
                
    <link href="Content/themes/base/minified/jquery.ui.datepicker.min.css" rel="stylesheet" />
    <script src="scripts/jquery-2.0.0.min.js"></script>
    <script src="scripts/jquery-ui-1.10.3.min.js"></script>
    <script src="scripts/ButtonManager.js"></script>
    <script>
        $(function () {
            $(".datepicker").datepicker();
        });
    </script>
    
    <div style="border: solid; padding: 2px">
        First name:
        <input name="PersonControlEmployee$FirstName" type="text" id="PersonControlEmployee_FirstName" /><br />
        Last name:
        <input name="PersonControlEmployee$LastName" type="text" id="PersonControlEmployee_LastName" /><br />
        Birthdate:
        <input type="text" name="BirthDate" id="BirthDate" class="datepicker" /><br />
        <input type="submit" name="PersonControlEmployee$SubmitPerson" value="Submit" id="PersonControlEmployee_SubmitPerson" />
    </div>
    
            </div>
            
        </form>
    </body>
    </html>
    

Problems

  1. Notice the id and name attributes on the tags. The ASP.NET controls have been altered by ASP.NET with a prefix. This is not the problem. This is good. If the control is used multiple times, then this keeps the id and name attributes unique and they are supposed to be unique. However, the problem is, if the id is changed in this line . . .
    <uc1:PersonControl runat="server" ID="PersonControlEmployee" />
    

    . . . then id and name attributes in the child control will change. Since we are using those values statically in the ManageButton.js, any such change also breaks in the javascript. Also, we aren’t using a master page, but if you decided to add a master page, that add an additional prefix, which would create different id and name attributes, again causing the javascript to break. In fact, any such nesting change will change the id and name attributes breaking the javascript.

  2. The control that is not an ASP.NET control, the JQuery datepicker control, did not have the same modifications made to the Birthdate. So this tag won’t work if the control is used multiple times.

Do you want to see the problem?

Update your form in PersonForm.aspx to include multiple controls.

    <form id="form1" runat="server">
        <div>
            <h2>Employee</h2>
            <uc1:PersonControl runat="server" ID="PersonControlEmployee" />
        </div>
        <div>
            <h2>Emergency Contact</h2>
            <uc1:PersonControl runat="server" ID="PersonControlEmergencyContact" />
        </div>
    </form>

Now give it try. See the problems? Ok. So now you have a simulation of the problematic code that I faced today.

Solution to ASP.NET, JavaScript, and HTML Element ID attributes

So we are going to fix this in parts. We are going to use a variable in the ASP.NET control called ClientID, that is basically the prefix used.

  1. Fix html elements to use the same prefix as the ASP.NET controls
  2. Fix the javascript to receive the ClientID as a parameter
  3. Fix the datepicker attributes

    First, let’s fix the ASP.NET and HTML so that all the id and name attributes are consistently changed.

    Change the datepicker line and add some code so it will have the same prefix as ASP.NET created html controls.

    <input type="text" name="<%=ClientID%>$BirthDate" id="<%=ClientID%>_BirthDate" class="datepicker" /><br />
    

    Pass the prefix into the JavaScript

    1. In the PersonControl.ascx file, add a little snippet of JavaScript code to pass the ClientID into the JavaScript files.
      <script>
          $(function () {
              $(".datepicker").datepicker();
          });
          jQuery(document).ready(function () {
              startManagingButton("<%=ClientID%>");
          });
      </script>
      
    2. Now update your JavaScript file to use that ClientID as the prefix. Notice, this is used in the events. I created a simple buildId method that I use throughout now.
      var startManagingButton = function (inIdPrefix) {
          $(buildId(inIdPrefix, "_FirstName")).bind("propertychange keyup input paste", inIdPrefix, setButtonState);
          $(buildId(inIdPrefix, "_LastName")).bind("propertychange keyup input paste", inIdPrefix, setButtonState);
          $(buildId(inIdPrefix, "_BirthDate")).change(inIdPrefix, setButtonState);
          setButtonState(inIdPrefix);
      }
      
      var setButtonState = function (inIdPrefix) {
          if (inIdPrefix.data)
              inIdPrefix = inIdPrefix.data;
          
          if ($(buildId(inIdPrefix, "_FirstName")).val() == "" || $(buildId(inIdPrefix, "_LastName")).val() == "" || $(buildId(inIdPrefix, "_BirthDate")).val() == "")
              $(buildId(inIdPrefix, "_SubmitPerson")).attr("disabled", "disabled");
          else
              $(buildId(inIdPrefix, "_SubmitPerson")).removeAttr("disabled");
      };
      
      var buildId = function (inIdPrefix, idSuffix) {
          return "#" + inIdPrefix + idSuffix;
      };
      

      Now no matter how you update or move this web page, the Id values always work.

    Use the ClientID in ASP.NET SubmitPerson_Click method

    Update the code to look as follows:

        protected void SubmitPerson_Click(object sender, EventArgs e)
        {   // Put break point here            
            var firstName = FirstName.Text;
            var laststName = LastName.Text;
            var birthdate = Request.Form[ClientID + "$Birthdate"];
        }
    

    Using the PersonControl multiple times

    Now everything should be working and you should be able to include as many instances of your control in your web page as you want.

    Update your form in PersonForm.aspx to include many of these controls.

        <form id="form1" runat="server">
            <div>
                <h2>Employee</h2>
                <uc1:PersonControl runat="server" ID="PersonControlEmployee" />
            </div>
            <div>
                <h2>Spouse</h2>
                <uc1:PersonControl runat="server" ID="PersonControlSpouse" />
            </div>
            <div>
                <h2>Emergency Contact</h2>
                <uc1:PersonControl runat="server" ID="PersonControlEmergencyContact" />
            </div>
        </form>
    

    Now give it try. All instances of the PersonControl are now working. The dynamic id and name attributes are not a problem as we are handling them; in fact, they are part of the ultimate solution to make the control reusable.

    Conclusion

    ASP.NET, JavaScript, and HTML Element ID attributes can all be used to work together to make a nice cohesive application.

    If you have a better solution, please post a comment and let me know.

    Downloads

    Here is the project in both states:

    AspAndJavaScriptExample-problematic.zip

    AspAndJavaScriptExample-working.zip

    Bugs

    Now the only bug I can find is on clicking submit the JQuery datepicker field is cleared. I’ll try to fix that and post the solution in another post.

Using knockout.js and MVVM with RadioButtons

In the example below, radio buttons selection list is created by binding to a list in the view model. I show how to bind to both the selected radio button’s value and name. I also show how to disable a button unless the radio button is selected.

<!-- Step 1 - Create the HTML File or the View -->
<!DOCTYPE html>
<html>
<head>
    <!-- Step 2 - Include jquery and knockout -->
    <script type="text/javascript" src="scripts/jquery-1.9.1.min.js"></script>
    <script type="text/javascript" src="scripts/knockout-2.2.1.js"></script>
    
    <!-- Step 3 - Add script to run when page loads -->
    <script type="text/javascript" >
        $(document).ready(function(){

			<!-- Step 4 - Add a RadioButtonModel -->
            function RadioButtonModel(inText, inValue, inGroupName) {
                this.text = inText;
				this.value = inValue;
				this.name = inGroupName;
            }

			<!-- Step 5 - Create ViewModel -->
            function SurveyViewModel() {
                var self = this;
                
				<!-- Step 7 - Create an observable list -->
                this.list = ko.observableArray([
                    new RadioButtonModel("Good", 10, "Q1"),
                    new RadioButtonModel("Average", 5, "Q1"),
                    new RadioButtonModel("Poor", 1, "Q1")
                ]);
				
				<!-- Step 8 - Create a selected item -->
				this.selected = ko.observable(0);
				
				<!-- Step 9 - (Optional) Create a computed value to get the selected text -->
				this.selectedtext = ko.computed(function() {
					var text = "";
				    ko.utils.arrayForEach(this.list(), function(item) {
						var selectedItem = self.selected();
						if (selectedItem == item.value)
							text = item.text;
					});
					return text;
				}, this);
				
				
				<!-- Step 10 - Create a computed value to require a selection before submitting -->
			    this.canClick = ko.computed( function() {
                    return this.selectedtext() != "";
                }, this);
                
            }
            
            <!-- Step 10 - Create a computed value to require a selection before submitting -->    
            ko.applyBindings(new SurveyViewModel());
        });
    </script>
</head>
<body>
    <!-- Step 11 - Create a div containing the html for one radio button and bind to foreach: list -->
    <div data-bind="foreach: list">
        <input type="radio" data-bind="attr: {name: name}, value: value, checked: $root.selected" /><span data-bind="text: text"></span>
    </div>

    <!-- Step 12 - Add html elements to see other properties -->
    <p data-bind="text: selected"></p>
    <p data-bind="text: selectedtext"></p>
    
    <!-- Step 13 - Add a button and bind its enable state -->
    <button type="submit" id="btnSubmit" data-bind="enable: canClick">Submit</button>

</body>
</html>

Hope this helps you.

Using MVVM with HTML5 and JavaScript

The MVVM pattern is an excellent pattern for separating the UI or View and the Code or ViewModel and Model.

With Knockout.js the MVVM pattern can be used with HTML5.

Previously I wrote this post: Using jQuery to enable/disable a button based a text box

This same thing could be done using binding and the MVVM pattern, with jQuery and Knockout.js.

Here is a single file example of using knockout.js and with databinding.

<!-- Step 1a - Create the HTML File or the View -->
<!DOCTYPE html>
<html>
<head>
    <!-- Step 2 - Include jquery and knockout -->
    <script type="text/javascript" src="scripts/jquery-1.9.1.min.js"></script>
    <script type="text/javascript" src="scripts/knockout-2.2.1.js"></script>
    
    <!-- Step 3 - Add script to run when page loads -->
    <script type="text/javascript" >
        $(document).ready(function(){
        
            <!-- Step 4 - Create a ViewModel -->
            function BasicViewModel() {
            
                <!-- Note: In this case the model is just a string and a bool -->
                <!-- Step 5 - Create a text property to bind the text to -->
                this.text = ko.observable('');
                
                <!-- Step 6 - Create a bool property to bind the button enabled state to -->
                this.canClick = ko.computed(function() {
                    return this.text() != null && this.text() != '';  
                    }, this);
                }
          
            <!-- Step 7 -  Activates knockout.js bindings -->
          ko.applyBindings(new BasicViewModel());
        });
    </script>
</head>
<body>

    <!-- Step 8 - Create a HTML Elements with bindings -->
    <input data-bind="value: text, valueUpdate:'afterkeydown'" />
    <button type="button" id="btnEnter" data-bind="enable: canClick">Enter</button>
</body>
</html>

Anyone who knows MVVM will surely realize that while this example is all in a single file, it is likely that you will have a separate viewmodel javascript file in a production environment.

Creating a QUnit Test Project in Visual Studio 2010

You may want to Unit Test your JavaScript code and one library to do this with is QUnit.

QUnit is based on the idea of opening a web page to run your JavaScript tests. So here is how I create a new QUnit project in Visual Studio.

This article assumes that you have the following installed already:

  • Visual Studio 2010 or later
  • The NuGet Add-in for Visual Studio

Step 1 – Create a Visual Studio Project

  1. Open Visual Studio.
  2. Go to File | New | Project.
  3. Select ASP.NET Empty Web Application.
  4. Give the project a name:
    Note: For this walk-thru, I named mine QUnitExample
  5. Click OK.

Step 2 – Import QUnit

Method 1 – Using NuGet

This step requires internet access.

  1. Right-click on your Project and choose Manage NuGet Packages.
  2. Search for QUnit and locate QUnit for ASP.NET MVC.
  3. Click Install next to QUnit for ASP.NET MVC.
  4. Click Close.

You should now see a folder called Content with a QUnit.css file and a folder called Scripts with a QUnit.js file.

Note: The NuGet package had old files, so I had to update them manually following Method 2.

Method 2 – Just downloading the files

If the NuGet package is not up to date, you may want to download the files manually. Follow the steps above to get QUnit through NuGet and if it doesn’t work, download the latest files from the QUnit web site and replace the ones NuGet added to your project with the latest ones.

Step 3 – Create an HTML file to display test results

  1. Right-click on the project and Choose Add | New Item.
  2. Find and choose HTML Page.
  3. Give the page a name.
    Note: I named mine QUnitTestResults.htm.
  4. Open the QUnitTestResults.htm file for editing.
  5. I made the DOCTYPE tag simpler in line 1:
  6. Enter something in the Title: Line 4.
    Note: I called mine QUnit Test Results.
  7. Add a Link to the qunity.css file: Line 5.
  8. Add a script in the body that calls the qunit.js file: Line 8.
<!DOCTYPE html>
<html>
<head>
  <meta charset="utf-8">
  <title>QUnit Test Results</title>
  <link rel="stylesheet" href="/Content/qunit.css">
</head>
<body>
  <div id="qunit"></div>
  <div id="qunit-fixture"></div>
  <script src="/Scripts/qunit.js"></script>
  <script src="/Scripts/tests.js"></script>
</body>
</html>

Step 4 – Create your first QUnit Test

  1. Right-click on the Project and choose Add | New Folder.
  2. Rename the folder to TestScripts.
    Note: I like to keep the test scripts separate from the other scripts.
  3. Right-click on the TestScripts folder and Choose Add | New Item.
  4. Find and choose JScript File.
  5. Give the JavaScript file a name.
    I named mine ExampleTests.js.
  6. Open the ExampleTests.js file for editing.
  7. Add a test method to the ExampleTests.js file.
test("hello test", function () {
    ok(1 == "1", "Passed!");
});

Note: This test is straight from the QUnit home page.

Step 5 – Add the Tests to your HTML file

  1. Open the QUnitTestResults.htm file for editing.
  2. Add a script in the body that calls the ExampleTests.js file: Line 9.
<!DOCTYPE html>
<html>
<head>
  <meta charset="utf-8">
  <title>QUnit Test Results</title>
  <link rel="stylesheet" href="/Content/qunit.css">
</head>
<body>
  <div id="qunit"></div>
  <div id="qunit-fixture"></div>
  <script src="/Scripts/qunit.js"></script>
  <script src="/Scripts/tests.js"></script>
  <script src="/TestScripts/ExampleTests.js"></script>
</body>
</html>

Step 6 – Run the tests

  1. Right-click on the QUnitExample project and choose Set as StartUp Project.
  2. Right-click on QUnitTestResults.htm and choose Set As Start Page.
  3. Click Debug | Start Debugging.

Step 7 – Start testing your JavaScript files

Now you probably want to recreate this project in as an additional project to your production solution (if you haven’t done this already).

It is time to start testing your JavaScript file. If you add the script to your project as a link, then you don’t have to maintain two copies of it.

  1. Right-click on the Scripts folder and choose Add | Existing Item.
  2. Browse to the JavaScript file that you want to test and select it but don’t add it yet.
  3. Click the down arrow next to Add and choose Add as link.
  4. Right-click on the TestScripts folder and Choose Add | New Item.
  5. Find and choose JScript File.
    Note: My file is called MySample.js.
  6. Give the JavaScript file a name.
    Note: I named mine MySampleTests.js.
  7. Open the ExampleTests.js file for editing.
  8. Start adding tests.

Conclusion

This method allows for rudimentary testing of your JavaScript. However, it does not integrate with Visual Studio, or Code Coverage, or Gated Check-ins. So there is a lot more work that needs to be done.

Using jQuery to enable/disable a button based on a text box

Since this is an html file, just create a blank file on your desktop called Test.html and copy and past the code below.

The steps for doing this are comments in the code.

Note: This should handle typing, pasting, code change, etc…

<!-- Step 1a - Create HTML File (see step 1b way below) -->
<!DOCTYPE html>
<html>
<head>
    <!-- Step 2 - Include jquery -->
    <script type="text/javascript" src="http://code.jquery.com/jquery-latest.pack.js"></script>
 
    <!-- Step 3 - Add script to run when page loads -->
    <script  type="text/javascript">
        jQuery(document).ready(function () { 
            <!-- Step 4 - Bind method to text box -->    
            $("#txtField").bind("propertychange keyup input paste", setButtonState);
			
            <!-- Step 4 - Set the default state -->
			setButtonState();
        });
		var setButtonState = function () {
			if ($("#txtField").val() == "")
				$("#btnEnter").attr("disabled","disabled");
			else
				$("#btnEnter").removeAttr("disabled"); 
		}
    </script>
</head>
<body>
<!-- Step 1b - Add HTML elements --> 
<input type="text" id="txtField" size="50"/>
<button type="button" id="btnEnter">Enter</button>
</body>

Update: 5/22/2013: Fixed example. Before if it was used on a page with links, going forward and back could result in the button being disabled even if the text box was populated. This new example solves this issue.

See a MVVM version of this here:
Using MVVM with HTML5 and JavaScript