Archive for the ‘Visual Studio’ Category.

How to document a function so Visual Studio's Intellisense displays it?

So, when I code, I am usually in Visual Studio and I am used to writing documentation above my functions as follows:

        /*
         * The is SomeFunction that does some action.
         */
        private void SomeFunction(int inSomeValue)
        {
                // write code here
        }

However, it annoys me that this information doesn’t show up in Visual Studio’s Intellisense. So I took time to look up the proper way to make function documentation show up in Intellisense.

It turns out that you can type /// above a function and Visual Studio will automagically populate the markup needed to have your comments show up in intellisense.

        /// <summary>
        ///  The is SomeFunction that does some action.
        /// </summary>
        /// <param name="inSomeValue">Enter an integer as some value here.</param>
        private void SomeFunction(int inSomeValue)
        {
                // write code here
        }

So it seems if you use this syntax, the function documentation will now show up in Visual Studio’s Intellisense.

How to determine the project type of an existing Visual Studio project?

Ok, so I have an existing C++ Visual Studio project (at my new position here as a Developer at LANDesk) and who knows who created it or when it was created.  Anyway, I wanted to start a new project and use the same project type.

So how do I find out the project type.

In Visual Studio, I opened the ProjectName.vcproj file and found this information near the top:

<?xml version="1.0" encoding="Windows-1252"?>
<VisualStudioProject
	ProjectType="Visual C++"
	Version="9.00"
	Name="MSICheckForPatch"
	ProjectGUID="{0793FB88-8BED-4297-8615-9408EA2FBE74}"
	Keyword="AtlProj"
	TargetFrameworkVersion="196613"
	>
	<Platforms>
		<Platform
			Name="Win32"
		/>
	</Platforms>
	...

So I noticed the Keyword was AtlProj, so that clued me in.

Looks like it was as easy as opening a text file and looking.

If there is a better or easier way, please comment and let me know.

Notepad++ and the XML Tools plugin

Ok, so I do a lot with Xml files.  Between working with my company’s product LDMS and all the Xmls it uses, to my own code using Serialization, I seem to always have an Xml file open.

I hate it when I open and Xml File and it is all on one line.  Or every element is a separate line but not a single line is indented.

Visual Studio can fix these for me rather easily.  But I have a lot of different machines in my lab and often work in other’s labs, or on customer’s computers while remote controlling them for support reasons. I can’t just quickly download an install Visual Studio. While yes, there is a free Express Edition version, it is just an overkill for the simple job of making an Xml file look pretty in text.  I need a small simple, quick to download and install tool.

The solution was right in front of me the whole time: Notepad++ and the XML Tools plugin

I always use Notepad++ as my random text editor on windows.  I already use its Compare plugin constantly, so I am very familiar with it.  It finally donned on me to check if it had an plugin that could help me with Xmls and sure enough, it did.

The XML Tools plugin, has almost all the features I wanted.

Notepad++ is just over 3 megabytes and download rather quickly.  The XML Tools plugin is not installed by default but can quickly be installed using the Plugin Manager.  Don’t worry about the additional download, the XML Tools plugin is only just over 300 kilobytes.

So I can now prettify my Xml files with a small, quick to download and install, windows tool.

Here is the menu this plugin provides, so you can see a list of some of the features.

So the Pretty pring (XML only – with line breaks) will take an Xml that is all on one single line, and expand it to have line breaks and also give it the proper indents.

There is also a tool to make sure the Syntax is correct.

The only feature I want that it doesn’t have is a tool to sort child elements and attributes.


Copyright ® Rhyous.com – Linking to this page is allowed without permission and as many as ten lines of this page can be used along with this link. Any other use of this page is allowed only by permission of Rhyous.com.

How to create a custom class template for Xml Serializable classes?

Ok, so you don’t always want a default class template for every type of class.  I have to create a bunch of classes that implement Serializable and if the class template assumed this, that would be great.  However, I don’t want my default class template to assume this.

So here is what I did broken down into four simple steps.

  1. Open or create a c# project.
  2. Create a class file.
  3. Add the text and the variables to replaced.
  4. Export the item as a template.

Step 1 – Open or create a c# project.

Ok, so any project will do.  I used an existing project, but you can create a new one if you want.  Any C# project should allow this to happen.

Step 2 – Create a class file.

In one of my C# projects in Visual Studio, I created a new class called XmlClass.cs.

Step 3 – Add the text and the variables to replaced

I put the following text into my new class:

using System;
using System.Collections.Generic;
using System.Xml.Serialization;

namespace $rootnamespace$
{
	[Serializable]
	public class $safeitemrootname$
	{
		#region Member Variables
		#endregion

		#region Constructors

		/*
		 * The default constructor
 		 */
		public $safeitemrootname$()
		{
		}

		#endregion

		#region Properties
		#endregion

		#region Functions
		#endregion

		#region Enums
		#endregion
	}
}

Step 4 – Export the item as a template

  1. In Visual Studio, chose File | Export Template.  This starts a wizard that is extremely easy to follow.Note: If you have unsaved files in your project, you will be prompted to save them.
  2. Chose Item template, select your project, and click Next.
  3. In the next screen there was a tree view of check boxes for all my objects.  I checked the box next to my XmlClass.cs.
  4. In the next screen, provide references.Note: I added only System and System.Xml.
  5. In the next screen, provide a Template name and a Template description.
  6. Click finish.

You should now have the option under My Templates when you add a new item to your project.

This class will be  useful and will save you and your team some typing when you are in the class creation phase of your project and you are creating all your Serializable classes.


Copyright ® Rhyous.com – Linking to this page is allowed without permission and as many as ten lines of this page can be used along with this link. Any other use of this page is allowed only by permission of Rhyous.com.

Changing the prop snippet for creating a Property in C#

Ok, so it is very common for the c# member variables to start with either an _ (underscore) or an m.  So when creating a property, you can save a lot of time by changing it to assume this as well.

For example, your class may look as follows:

namespace AgentConfigurationPlugin
{
    public class Class1
    {
        #region Member Variables
        String _MemberString;
        int _MemberInt;
        #endregion

        #region Constructors

        /*
		 * The default constructor
 		 */
        public Class1()
        {
        }

        #endregion

        #region Properties
        public String MemberString
        {
            get { return _MemberString; }
            set { _MemberString = value; }
        }

        public int Memberint
        {
            get { return _MemberInt; }
            set { _MemberInt = value; }
        }
        #endregion
    }
}

Note: I use the _ character even though it is hard to type (being up to the right of my pinky finger), so if you prefer, use the letter “m”, which is easy to type (being just below my pointer finger) and it also stands for “member variable”.

        #region Member Variables
        String mMemberString;
        int mMemberInt;
        #endregion

Anyway, whether it is an “m” or “_” or any other character, it is common to prefix member variables. So it would be useful if the property snippet assumed that prefix character as well.

The default snippet for creating a Property is located here:

C:\Program Files (x86)\Microsoft Visual Studio 9.0\VC#\Snippets\1033\Visual C#\prop.snippet

The contents looks as follows.

<?xml version="1.0" encoding="utf-8" ?>
<CodeSnippets  xmlns="http://schemas.microsoft.com/VisualStudio/2005/CodeSnippet">
	<CodeSnippet Format="1.0.0">
		<Header>
			<Title>prop</Title>
			<Shortcut>prop</Shortcut>
			<Description>Code snippet for an automatically implemented property</Description>
			<Author>Microsoft Corporation</Author>
			<SnippetTypes>
				<SnippetType>Expansion</SnippetType>
			</SnippetTypes>
		</Header>
		<Snippet>
			<Declarations>
				<Literal>
					<ID>type</ID>
					<ToolTip>Property type</ToolTip>
					<Default>int</Default>
				</Literal>
				<Literal>
					<ID>property</ID>
					<ToolTip>Property name</ToolTip>
					<Default>MyProperty</Default>
				</Literal>
			</Declarations>
			<Code Language="csharp"><![CDATA[public $type$ $property$ { get; set; }$end$]]>
			</Code>
		</Snippet>
	</CodeSnippet>
</CodeSnippets>

Change it to be like this:

<?xml version="1.0" encoding="utf-8" ?>
<CodeSnippets  xmlns="http://schemas.microsoft.com/VisualStudio/2005/CodeSnippet">
	<CodeSnippet Format="1.0.0">
		<Header>
			<Title>prop</Title>
			<Shortcut>prop</Shortcut>
			<Description>Code snippet for an automatically implemented property</Description>
			<Author>Microsoft Corporation</Author>
			<SnippetTypes>
				<SnippetType>Expansion</SnippetType>
			</SnippetTypes>
		</Header>
		<Snippet>
			<Declarations>
				<Literal>
					<ID>type</ID>
					<ToolTip>Property type</ToolTip>
					<Default>int</Default>
				</Literal>
				<Literal>
					<ID>property</ID>
					<ToolTip>Property name</ToolTip>
					<Default>MyProperty</Default>
				</Literal>
			</Declarations>
			<Code Language="csharp"><![CDATA[public $type$ $property$
		{
    			get { return _$property$; }
    			set { _$property$ = value; }
		}
$end$]]>
			</Code>
		</Snippet>
	</CodeSnippet>
</CodeSnippets>

The key section that fixes this is:

			<Code Language="csharp"><![CDATA[public $type$ $property$
		{
    			get { return _$property$; }
    			set { _$property$ = value; }
		}
$end$]]>

Or if you use “m” instead of “_” as I do, of course you would replace the “_” with an “m”.

			<Code Language="csharp"><![CDATA[public $type$ $property$
		{
    			get { return m$property$; }
    			set { m$property$ = value; }
		}
$end$]]>

Now when you create a member variable and then a property that matches it exactly except for the prefix character, the works is done for you, making you a more efficient programmer.

You may want to change the propg snippet as well.


Copyright ® Rhyous.com – Linking to this page is allowed without permission and as many as ten lines of this page can be used along with this link. Any other use of this page is allowed only by permission of Rhyous.com.

How to use relative paths when debugging in Visual Studio 2008?

Hello everyone,

I have a project one computer in the My Documents folder. When I copy it to another user computer (under their My Documents directory) I want it to work with no tweaking.

Do Macros work? No.

My build process uses build events to copy files to an Install directory and since build events uses macros so it works perfectly. I want to use these same Macros in either or both of two debugging options:

  • Start external program
  • Working directory

So I attempt to use the same Macros:

Start external program: $(SolutionDir)\Install\Program.exe

This fails with the following error:

Working Directory:
The working directory you entered does not exist.  Please enter a valid working directory.

Same failure pretty much if I try to use a macro int he Working directory text field.

Well, that is a let down.

Do Environment Variables Work? No.

So I tried to use environment variables. They didn’t work either.

Start external program:    “%USERPROFILE%\My Documents\My Project\Install\Program.exe”

That wasn’t a good solution anyway, cause I want it to work whether copied to a Desktop or a D: drive or whatever.

What can I do?

Well, I loaded up Process Monitor for Sysinterals Suite and checked where we look. I configured it to just look for the executable.

Start external program:    Program.exe

Turns out we check for the executable relative to either of two paths:

  • In the YourProjectDir\bin\debug\Program.exe (or if you are doing a release build, YourProjectDir\bin\release\Program.exe)
  • The current working directory for Visual Studio 2008’s devenv.exe process.
    • Ok, so if Visual Studio 2008 was launched by double-clicking the the solution file, the working directory is the directory the solution file is in.
    • If you open Visual Studio using the Start | All Programs | Microsoft Visual Studio 2008 | Launch Microsoft Visual Studio 2008 shortcut, then the working directory is “C:\Program Files (x86)\Microsoft Visual Studio 9.0\Common7\IDE\” (or the equivalent 32 bit path).

Ok, so it will check relative to the Project directory without putting in a macro if I open Visual Studio by double-clicking the the solution file. I can work with that.

So if I have an Install directory that contains the Program.exe and if I open Visual Studio by double-clicking the the solution file, I can put this in the Start external program:

Start external program:    Install\Program.exe

I left the Working directory blank.

It worked!

To bad if I ever forget to open by double-clicking the the solution file, and I instead use the shortcut it doesn’t work.  But no biggie, I can close and re-open correctly.

What else did I try?

I thought that if I added a relative path, it would check there.  So I should be able to put something like this:

Start external program:   Program.exe
Working Directory:    Install

But the relative path doesn’t work the same way.  Anything put there is only relative to YourProjectDir\bin\debug (or if you are doing a release build, YourProjectDir\bin\release), so this didn’t work.

I tried to use environment variables, but they didn’t work either.

I tried Macros, they didn’t work either.

I tried this:

Start external program:   Program.exe
Working Directory:    ..\..\..\Install

Nope, that didn’t work.

So what is the working directory when debugging/running from Visual Studio 2008?

I loaded up a project with an Install directory and debugging set to run the executable from the install directory.  I added this line to the program and put a break point on it:

string workingDirectory = Directory.GetCurrentDirectory();

The working directory appears to remain this:

YourProjectDir\bin\debug\ (or if you are doing a release build, YourProjectDir\bin\release\)

Oh well.

In a few weeks I am going to try Visual Studio 2010 and I will have to check if they improved this.

A snippet for handling each native type in C# and Visual Studio…when generics won't work.

So sometimes you have to have a function that can do something to any native type.

Below are two snippets to speed up the coding for you.

Ok, so of course there are times when you can use Generics.

public class myclass<T>
{
	myclass(T inT)
	{
		// your class
	}
}

However, there are functions that don’t work with a generic type T.

public class myclass<T>
{
	myclass(T inT1, T inT2)
	{
		if (inT1 < inT2)
		{
			// do something
		}
	}
}
&#91;/sourcecode&#93;

This results in an error:   Error 1 Operator '<&#39; cannot be applied to operands of type &#39;T&#39; and &#39;T&#39;.

Maybe you need to handle all the native data types.  So it is annoying to type them in, so I created an iftype snippet.

Create a file called iftype.snippet in this directory: C:\Program Files (x86)\Microsoft Visual Studio 9.0\VC#\Snippets\1033\Visual C#\
Copy in this source and save the file.

&#91;sourcecode language="csharp"&#93;
<?xml version="1.0" encoding="utf-8" ?>
<CodeSnippets  xmlns="http://schemas.microsoft.com/VisualStudio/2005/CodeSnippet">
	<CodeSnippet Format="1.0.0">
		<Header>
			<Title>iftype</Title>
			<Shortcut>iftype</Shortcut>
			<Description>Code snippet for an automatically implemented an 'if' statement for each native type.</Description>
			<Author>Jared Barneck</Author>
			<SnippetTypes>
				<SnippetType>Expansion</SnippetType>
			</SnippetTypes>
		</Header>
		<Snippet>
			<Declarations>
				<Literal>
					<ID>varName</ID>
					<ToolTip>Variable name</ToolTip>
					<Default>t</Default>
				</Literal>
			</Declarations>
			<Code Language="csharp"><!&#91;CDATA&#91;
				if ($varName$.Equals(typeof(bool)))
                {
					throw new NotImplementedException();
                }
                else if ($varName$.Equals(typeof(Byte)))
                {
					throw new NotImplementedException();
                }
                else if ($varName$.Equals(typeof(Char)))
                {
					throw new NotImplementedException();
                }
                else if ($varName$.Equals(typeof(DateTime)))
                {
					throw new NotImplementedException();
                }
                else if ($varName$.Equals(typeof(Decimal)))
                {
					throw new NotImplementedException();
                }
                else if ($varName$.Equals(typeof(Double)))
                {
					throw new NotImplementedException();
                }
                else if ($varName$.Equals(typeof(Int16)))
                {
					throw new NotImplementedException();
                }
                else if ($varName$.Equals(typeof(Int32)))
                {
					throw new NotImplementedException();
                }
                else if ($varName$.Equals(typeof(Int64)))
                {
					throw new NotImplementedException();
                }
                else if ($varName$.Equals(typeof(SByte)))
                {
					throw new NotImplementedException();
                }
                else if ($varName$.Equals(typeof(Single)))
                {
					throw new NotImplementedException();
                }
                else if ($varName$.Equals(typeof(String)))
                {
					throw new NotImplementedException();
                }
                else if ($varName$.Equals(typeof(TimeSpan)))
                {
					throw new NotImplementedException();
                }
                else if ($varName$.Equals(typeof(UInt16)))
                {
					throw new NotImplementedException();
                }
                else if ($varName$.Equals(typeof(UInt32)))
                {
					throw new NotImplementedException();
                }
                else if ($varName$.Equals(typeof(UInt64)))
                {
					throw new NotImplementedException();
                }
$end$&#93;&#93;>
			</Code>
		</Snippet>
	</CodeSnippet>
</CodeSnippets>

However, you prefer a switch statement to an if statement. Here is the same thing using the switch statement.

Create a file called switchtype.snippet in this directory: C:\Program Files (x86)\Microsoft Visual Studio 9.0\VC#\Snippets\1033\Visual C#\
Copy in this source and save the file.

<?xml version="1.0" encoding="utf-8" ?>
<CodeSnippets  xmlns="http://schemas.microsoft.com/VisualStudio/2005/CodeSnippet">
	<CodeSnippet Format="1.0.0">
		<Header>
			<Title>switchtype</Title>
			<Shortcut>switchtype</Shortcut>
			<Description>Code snippet for an automatically implemented a switch statement for each native type.</Description>
			<Author>Jared Barneck</Author>
			<SnippetTypes>
				<SnippetType>Expansion</SnippetType>
			</SnippetTypes>
		</Header>
		<Snippet>a
			<Declarations>
				<Literal>
					<ID>varName</ID>
					<ToolTip>Variable name</ToolTip>
					<Default>varName</Default>
				</Literal>
			</Declarations>
			<Code Language="csharp"><!&#91;CDATA&#91;
			Type t = $varName$;
            switch (t.ToString())
            {
                case "System.Boolean":
                    throw new NotImplementedException();
                    break;
                case "System.Byte":
                    throw new NotImplementedException();
                    break;
                case "System.Char":
                    throw new NotImplementedException();
                    break;
                case "System.DateTime":
                    throw new NotImplementedException();
                    break;
                case "System.Decimal":
                    throw new NotImplementedException();
                    break;
                case "System.Double":
                    throw new NotImplementedException();
                    break;
                case "System.Int16":
                    throw new NotImplementedException();
                    break;
                case "System.Int32":
                    throw new NotImplementedException();
                    break;
                case "System.Int64":
                    throw new NotImplementedException();
                    break;
                case "System.SByte":
                    throw new NotImplementedException();
                    break;
                case "System.Single":
                    throw new NotImplementedException();
                    break;
                case "System.String":
                    throw new NotImplementedException();
                    break;
                case "System.TimeSpan":
                    throw new NotImplementedException();
                    break;
                case "System.UInt16":
                    throw new NotImplementedException();
                    break;
                case "System.UInt32":
                    throw new NotImplementedException();
                    break;
                case "System.UInt64":
                    throw new NotImplementedException();
                    break;
            }
$end$&#93;&#93;>
			</Code>
		</Snippet>
	</CodeSnippet>
</CodeSnippets>

How to process command line parameters or arguments in a WPF application?

UPDATE 10/25/2010:
Avoid using Environment.CommandLine. It appears much easier, but isn’t as robust. I learned a while ago that the command line arguments can be accessed using Environment.CommandLine. This is only different than the process below in that it is way easier and the first argument is the full path of the executable. So all this work is not exactly necessary, right? Wrong! I tried Environment.CommandLine for a while and it didn’t last. There are times when this executable is launched by another executable and the Environment.CommandLine is not set even though the other executable launched this executable with parameters. So I had to return to using the steps below anyway.


Ok, so I wanted to handle command line parameters, which is easy in every other language, however, the need for easy was overlooked in WPF. It is not obvious and you are not going to figure it out without being told how to do it.

Microsoft provides a sample here, you can look at.
http://msdn.microsoft.com/en-us/library/aa972153.aspx

I am going to walk you through creating a new WPF Project in Visual Studio 2008. Then I will walk you through handling command line parameters (arguments).

  1. Open Visual Studio 2008.
  2. Go to File | New | Project.
  3. Under Visual C#, choose WPF Application and give the project a name and then hit OK.
  4. Go to Project | ProjectName Properties (where ProjectName is the name of your project).
  5. In the Properties of you project, click on Debug.
  6. Enter three parameters intothe Command line arguments text field: Param1 Param2 Param3
  7. Close the properties window.
  8. Double-click on App.xaml to open it. It looks like this:
    <Application x:Class="ParametersForWPF.App"
        xmlns="http://schemas.microsoft.com/winfx/2006/xaml/presentation"
        xmlns:x="http://schemas.microsoft.com/winfx/2006/xaml"
        StartupUri="Window1.xaml">
        <Application.Resources>
    
        </Application.Resources>
    </Application>
    
  9. Add a carriage return after StartupUri=”Window1.xaml” and start type inside the bracket the word Startup=. As soon as you see an equals sign you will get a pop up with the words . Double-click on that. The name Application_Startup will automatically be added.
    <Application x:Class="ParametersForWPF.App"
        xmlns="http://schemas.microsoft.com/winfx/2006/xaml/presentation"
        xmlns:x="http://schemas.microsoft.com/winfx/2006/xaml"
        StartupUri="Window1.xaml"
        Startup="Application_Startup">
        <Application.Resources>
    
        </Application.Resources>
    </Application>
    

    Note: This will also automatcially update the App.xaml.cs file which originally looks as follows:

    using System.Windows;
    
    namespace ParametersForWPF
    {
        /// <summary>
        /// Interaction logic for App.xaml
        /// </summary>
        public partial class App : Application
        {
        }
    }
    

    But after adding the Startup=”Application_Startup” line, a function called Application_Startup is automatically added.

    using System;
    using System.Collections.Generic;
    using System.Configuration;
    using System.Data;
    using System.Linq;
    using System.Windows;
    
    namespace ParametersForWPF
    {
        /// <summary>
        /// Interaction logic for App.xaml
        /// </summary>
        public partial class App : Application
        {
    
            private void Application_Startup(object sender, StartupEventArgs e)
            {
    
            }
        }
    }
    
  10. Now we only want to work with arguments if there are some, so lets add an if statement inside the Application_Startup function as shown:
            private void Application_Startup(object sender, StartupEventArgs e)
            {
                if (e.Args.Length > 0)
                {
    
                }
            }
    
  11. Ok, so the next step is to create a public static string[] member variable to hold the arguments and assign the arguments array to it. I called my member variable mArgs. I use prefix it with m so I know it is a member variable.
    using System;
    using System.Collections.Generic;
    using System.Configuration;
    using System.Data;
    using System.Linq;
    using System.Windows;
    
    namespace ParametersForWPF
    {
        /// <summary>
        /// Interaction logic for App.xaml
        /// </summary>
        public partial class App : Application
        {
            public static String[] mArgs;
    
            private void Application_Startup(object sender, StartupEventArgs e)
            {
    
                if (e.Args.Length > 0)
                {
                    mArgs= e.Args;
                }
            }
        }
    }
    
  12. Now, in order to access the data in Windows1.xaml.cs, just call the App.mArgs array in the constructor as shown.
            public Window1()
            {
                InitializeComponent();
                String[] args = App.mArgs;
    
            }
    
  13. Put a break point on the line and start with debugging and sure enough you will see your arguments properly assigned to the String[] args variable. So you now have your parameters accessible in your WPF application.Hope this helps you.

    Copyright ® Rhyous.com – Linking to this article is allowed without permission and as many as ten lines of this article can be used along with this link. Any other use of this article is allowed only by permission of Rhyous.com.

How to modify the default new class template for C# in Visual Studio 2008 or 2010?

Updated: 5/17/2010 using information aquired from here: How To: Edit Visual Studio Templates

Ok, so I don’t like the way that the default new class template in Visual Studio 2008/2010 looks. I end up typing a lot of things over and over again.

Here is what it a new class looks like:

using System;
using System.Collections.Generic;
using System.Linq;
using System.Text;

namespace MyNameSpace
{
	class MyClass
	{
	}
}

Here is what I want it to look like:

using System;
using System.Collections.Generic;
using System.Linq;
using System.Text;

namespace MyNameSpace
{
	public class MyClass
	{
		#region Member Variables
		#endregion

		#region Constructors

		/// <summary>
		/// The default Constructor.
		/// </summary>
		public MyClass()
      		{
		}

		#endregion

		#region Properties
		#endregion

		#region Functions
		#endregion

		#region Enums
		#endregion
	}
}

So making this change is easy to do. All you have to do is edit a text file that is compressed.

Copy the zip file file located here to the desktop:
Visual Studio 2008

  • For 64 bit: C:\Program Files (x86)\Microsoft Visual Studio 9.0\Common7\IDE\ItemTemplates\CSharp\Code\1033\Class.zip
  • For 32 bit: C:\Program Files\Microsoft Visual Studio 9.0\Common7\IDE\ItemTemplates\CSharp\Code\1033\Class.zip

Visual Studio 2010

  • For 64 bit: C:\Program Files (x86)\Microsoft Visual Studio 10.0\Common7\IDE\ItemTemplates\CSharp\Code\1033\Class.zip
  • For 32 bit: C:\Program Files\Microsoft Visual Studio 10.0\Common7\IDE\ItemTemplates\CSharp\Code\1033\Class.zip

Extract the zip file.

Using a text editor, open the Class.cs file.

The file will have the following text:

using System;
using System.Collections.Generic;
$if$ ($targetframeworkversion$ >= 3.5)using System.Linq;
$endif$using System.Text;

namespace $rootnamespace$
{
	class $safeitemrootname$
	{
	}
}

Change it to have this text:

using System;
using System.Collections.Generic;
$if$ ($targetframeworkversion$ >= 3.5)using System.Linq;
$endif$using System.Text;

namespace $rootnamespace$
{
	public class $safeitemrootname$
	{
		#region Member Variables
		#endregion

		#region Constructors

		/// <summary>
		/// The default Constructor.
		/// </summary>
		public $safeitemrootname$()
		{
		}

		#endregion

		#region Properties
		#endregion

		#region Functions
		#endregion

		#region Enums
		#endregion
	}
}

Save the file.

Rebuild the zip file with the new Class.cs.  Be careful to build the zip file correctly.

Copy the new zip file back here and overwrite the existing one:
Visual Studio 2008

  • For 64 bit: C:\Program Files (x86)\Microsoft Visual Studio 9.0\Common7\IDE\ItemTemplates\CSharp\Code\1033\Class.zip
  • For 32 bit: C:\Program Files\Microsoft Visual Studio 9.0\Common7\IDE\ItemTemplates\CSharp\Code\1033\Class.zip

Visual Studio 2010

  • For 64 bit: C:\Program Files (x86)\Microsoft Visual Studio 9.0\Common7\IDE\ItemTemplates\CSharp\Code\1033\Class.zip
  • For 32 bit: C:\Program Files\Microsoft Visual Studio 9.0\Common7\IDE\ItemTemplates\CSharp\Code\1033\Class.zip

Now, you have to rebuild the template classes.  To do this:

  1. Open a command prompt as Administrator.
  2. Change to the appropriate directory:
    Visual Studio 2008
    64-bit

    cd C:\Program Files (x86)\Microsoft Visual Studio 9.0\Common7\IDE\

    32-bit

    cd C:\Program Files\Microsoft Visual Studio 9.0\Common7\IDE\

    Visual Studio 2010
    64-bit

    cd C:\Program Files (x86)\Microsoft Visual Studio 10.0\Common7\IDE\

    32-bit

    cd C:\Program Files\Microsoft Visual Studio 10.0\Common7\IDE\
  3. Run this command:
    devenv.exe /installvstemplates

Now any new class you create will have your new format.


Copyright ® Rhyous.com – Linking to this article is allowed without permission and as many as ten lines of this article can be used along with this link. Any other use of this article is allowed only by permission of Rhyous.com.

How to compile a wxWidgets application in Visual Studio 2008?

Step 1 – Install Visual Studio 2008

  1. If you don’t have it, get the express edition here: http://www.microsoft.com/Express/VC/
  2. Run through the installer, not much else to do.

Step 2 – Install wxWidgets

  1. Download wxWidgets (select the wxMSW installer file) from here:
    http://www.wxwidgets.org/downloads/
  2. I choose to install to c:\dev\wxwidgets\wxWidgets-2.8.10 but you can choose a different path if you want.

Step 3 – Create an environment variable for the wxWidgets path.

  1. Click the Start icon.
  2. Right click on Computer and choose Properties.
  3. Click Advanced system settings.
  4. Click the Environment variables button.
  5. Under System Variables, click New.
  6. Enter the Variable name: WXWIN
  7. Enter the Variable Value: C:\Dev\wxWidgets-2.8.10
  8. Click OK, click OK, click OK (yes three times).

Step 4 – Compile the wxWidgets Libraries.

  1. Browse to the following folder: C:\Dev\wxWidgets-2.8.10\build\msw
  2. Located the file called wx.dsw and open it with Visual Studio. (I just double-clicked on it.)
  3. Choose “Yes to all” when Visual Studio prompts you to convert the project.
  4. Build the project.
  5. Wait for the build to complete. It took approximately two minutes on my Lenovo T61p (dual core, 4 GB, Windows 7 64 bit). You should a line like this when it finishes successfully.
    ========== Build: 20 succeeded, 0 failed, 0 up-to-date, 0 skipped ==========
  6. Close Visual Studio.

Step 5 – Create a new project

  1. In Visual Studio 2008, go to File | New Project.
  2. Select Visual C++ | Empty Project.
  3. Give the project a name and click OK. I named this wxTest.

Step 6 – Create/Copy your source to this project.

  1. Right-click on the Project name and choose Open Folder in Windows Explorer. This will open to the home folder of your project. (Don’t right click the Solution name, make sure to right click the project under the solution name.)
  2. Open a second Windows Explore window.
  3. In the second window, browse to the wxWidgets sample directory and open the Minimal folder: C:\Dev\wxWidgets-2.8.10\samples\Minimal
    Note: You can choose other projects but you may want to start with Minimal and move on from there.
  4. Copy only the minimal.cpp and minimal.rc files to your project directory (the rest are not needed).
  5. Close the second window pointing to the C:\Dev\wxWidgets-2.8.10\samples\Minimal directory, it is not needed anymore.
  6. From the explorer window open to your project directory, use ctrl+click to highlight both the minimal.cpp and minimal.rc files.
  7. Drag both highlighted files into the Visual Studio Window and drop them over the project name.
    The minimal.cpp file should automatically be placed under the Source files section of your project.
    The minimal.rc file should automatically be placed under the Resource files section of your project.

Step 7 – Customize the project properties

  1. Right-click on the wxTest project and select Properties. (Don’t right click the Solution name, make sure to right click the project under the solution name.)
  2. In the top left of the properties window there is a Configuration drop down menu. Select All Configurations.
  3. Click to expand Configuration Properties.
  4. Click to expand C/C++.

    Note: If you don’t see a C/C++ section, then you don’t have any source files.  You need at least one C++ source file for this section to show up.

  5. Click to highlight General.
  6. Enter the following in Additional Include Directories.
    $(WXWIN)\include;$(WXWIN)\lib\vc_lib\mswd
  7. Click to highlight Preprocessor.
  8. Enter the following in Preprocessor Definitions.
    WIN32;__WXMSW__;_WINDOWS;_DEBUG;__WXDEBUG__
  9. Click to expand Linker.
  10. Click to highlight General.
  11. Enter the following in Additional Library Directories.
    $(WXWIN)\lib\vc_lib
  12. Click to highlight Input.
  13. Enter the following in Additional Dependencies.
    wxmsw28d_core.lib wxbase28d.lib wxtiffd.lib wxjpegd.lib wxpngd.lib wxzlibd.lib wxregexd.lib wxexpatd.lib winmm.lib comctl32.lib rpcrt4.lib wsock32.lib odbc32.lib

    Note: Not all of these libraries are required for this project, however, I list all of these because you may use some of them at some point. If you don’t think one is needed, remove it and recompile and if you don’t get errors, you were right, you probably didn’t need it.

  14. Click to expand Resources. (If you don’t see a Resources option, then you don’t have any files under resources so that is normal. Did you skip Step 5 because you probably should have added a resource in Step 5.)
  15. Click to highlight General.
  16. Enter the following in Preprocessor Definitions.
    _DEBUG;__WXMSW__;__WXDEBUG__;_WINDOWS;NOPCH
  17. Enter the following in Additional Include Directories.
    $(WXWIN)\include;$(WXWIN)\lib\vc_lib\mswd

You are now ready to build your wxWidgets application using Visual Studio 2008 on Windows 7.

Build your project and if you get any errors, go through it again, you probably missed a step (or I did, since I have already been caught with one step left out).


Copyright ® Rhyous.com – Linking to this article is allowed without permission and as many as ten lines of this article can be used along with this link. Any other use of this article is allowed only by permission of Rhyous.com.

Tool to create keyboard shortcuts that paste common data because code snippets don't work for C++ in Visual Studio 2008

So I was quite annoyed that code snippets doesn’t work for C++ in Visual Studio 2008.

So I have used a download of a program called KeyText for years. Since probably 2001. However, they no longer have a free version and so I set off to find a new program that was Open Source or FreeWare.

So far it is a no go. I think that such a tool is indispensable so I will probably have to purchase such a tool. Here is a list of tools I have found.

KeyText – $29.95 – http://www.keytext.com

Keyboard Express – $24.99 – http://www.keyboardexpress.com/download.htm

QuickPhrase – $14.90 (download only) – http://www.typingmaster.com/individuals/quickphrase

Hot Keyboard – $29.95 – http://www.hot-keyboard.com

Template Manager – $9.95 – http://www.comfort-software.com/template-manager.html

Flash Paste – $29.95 – http://flashpaste.com

SourceForge.net let me down…either that or I just did a poor job searching. While I still haven’t found an open source keyboard macro text pasting tool, there are some quality options above that are all low priced.

How to find the file and line number of memory leaks using C++ with wxWidgets in Visual Studio 2008?

Ok, so I am coding with C++ and wxWidgets using Visual Studio 2008 as the IDE.

I got the following output when my my program was launched in debug mode and it exited.

Detected memory leaks!
Dumping objects ->
{1535} normal block at 0x005C1920, 18 bytes long.
 Data: <                > 00 00 00 00 00 00 00 00 00 00 00 00 00 00 CD CD

I can’t have memory leaks and while they aren’t a big deal and are with objects I create once so they really aren’t that bad, my obsessive compulsiveness (I’m just a little OC but not OCD) wouldn’t let me move on with the program or do anything else until I had solved these memory leaks.

I did some researching and tried a lot of things before I finally found this website:
http://www.litwindow.com/Knowhow/wxHowto/wxhowto.html#debug_alloc

So I gave the steps a try. I had a little bit of a problem but I got them to work, so I am re-writing the steps so that I remember how to do it again and don’t run into the same problem.

Steps for Finding Memory Leaks in C++ and wxWidgets using Visual Studio 2008

  1. Create a new header (.h) file called: stdwx.h 
    // wxWidgets precompiled / standard headers
    #include "wx/wxprec.h"
    
    // When debugging changes all calls to "new" to be calls to "DEBUG_NEW" allowing for memory leaks to
    // give you the file name and line number where it occurred.
    #ifdef _DEBUG
    	#include <crtdbg.h>
    	#define DEBUG_NEW new(_NORMAL_BLOCK ,__FILE__, __LINE__)
    	#define new DEBUG_NEW
    #else
    	#define DEBUG_NEW new
    #endif
    

    Note: The site I linked to had much more in the header file, but I like to know the minimal requirements for the task at hand and so I commented out the lines that I thought didn’t matter and tested by recompiling and running in debug and sure enough, only the above lines are needed. However, that shouldn’t stop you from adding #includes you always use to your header file. Notice the use of #ifdef _DEBUG which means that this code will only be used when debugging and so your release code will not contain this debugging code (which is useless for release builds).

  2. Create a new .cpp file called: stdwx.cpp. Add A single line including stdwx.h.Yes, it is really only supposed to be one #include line as shown:
    #include "stdwx.h"
    
  3. Now add that same #include line to every .cpp file in your project:
    // Include the stdwx.h in every .cpp file
    #include "stdwx.h"
    
  4. Now in Visual Studio 2008, under Solution Explorer, right-click on the Project (my test project happens to be Dice at the moment) and choose Properties.
  5. Expand Configuration Properties | C/C++ and select Precompiled headers.
  6. Use the drop down for Create/Use Precompiled Header to select Create Precompiled Header (/Yc).
  7. Under Create/Use PCH Through File, type in stdwx.h.Note: The Precompiled Header File setting should auto-popluate with the correct value of $(IntDir)\$(TargetName).pch.
  8. Click OK to save the project properties.

A screen shot is included to provide further help on these settings:

Precompiled Headers Settings

Precompiled Headers Settings

You should now be ready to recompile your program and now instead of seeing just vague memory locations of memory leaks, you should see the exact file and line number, which is key in detecting and deleting the allocated memory.

Detected memory leaks!
Dumping objects ->
{1535} normal block at 0x005C1920, 18 bytes long.
 Data: <                > 00 00 00 00 00 00 00 00 00 00 00 00 00 00 CD CD
c:\users\jbarneck\documents\visual studio 2008\projects\dice\dice\die.cpp(183) : {1529} normal block at 0x005C18D0, 20 bytes long.
 Data: <          \ . \ > 00 00 00 00 CD CD CD CD 20 19 5C 00 2E 19 5C 00

Copyright ® Rhyous.com – Linking to this article is allowed without permission and as many as ten lines of this article can be used along with this link. Any other use of this article is allowed only by permission of Rhyous.com.

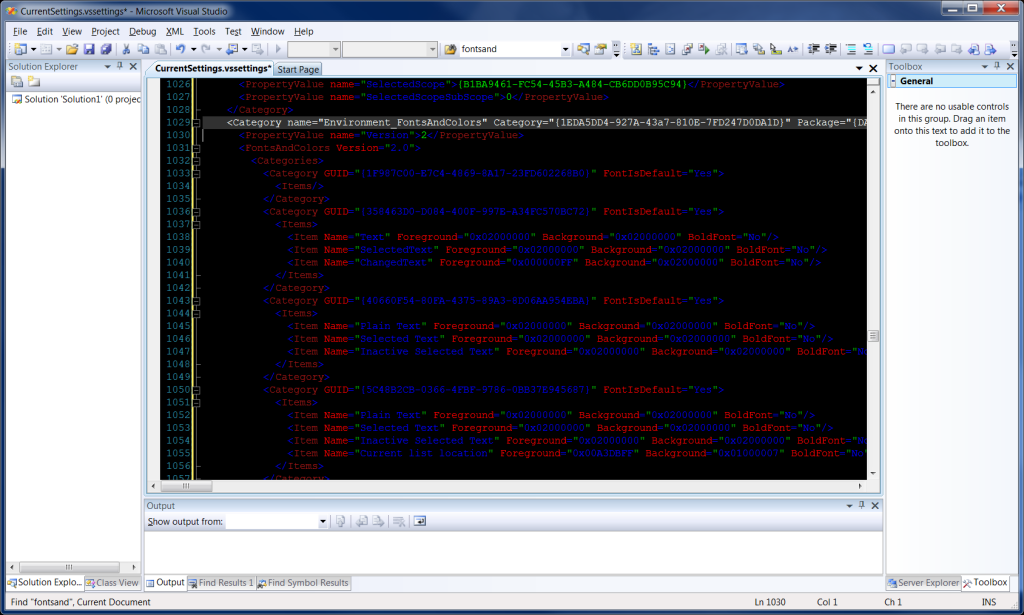
Visual Studio 2008 editor colors set to use a black background and how to add these settings yourself or keep your color settings on re-install?

So I recently installed Windows 7 64 bit on my laptop. Before I was using XP Pro SP3 32 bit. I had visual studio 2008 installed and had the editor using a black background exactly how I like it.

So really, all I wanted was my colors in my editor. So it turns out you can export them.

  1. On you current install, go to Tools | Import and Export Settings.
  2. Choose Export selected environment settings and click next.
  3. Click the top box to remove the check box from everything.
  4. Expand All Settings | Options | Environment.
  5. Click to check the box next to Fonts and Colors
  6. Click next and save your file

I won’t walk you through importing it because you should be competent enough to do that on your own having now exported it.

Want it in a download?

Visual Studio Black Theme

Want just the XML? For those of you who also want a black background and just want the XML, here is my Environment_FontsAndColors section and a screen shot of it.

Visual Studio 2008 Text Editor with black background

Visual Studio 2008 Text Editor with black background

Here is the xml code, you can copy and paste:


      2


Copyright ® Rhyous.com – Linking to this article is allowed without permission and as many as ten lines of this article can be used along with this link. Any other use of this article is allowed only by permission of Rhyous.com.