Authentication Token Service for WCF Services (Part 5 – Adding SSL)
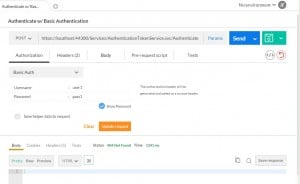
In the previous article, Basic Token Service for WCF Services (Part 4 – Supporting Basic Authentication), we implemented Basic Authentication. And in the articles before that, our credentials were in the body of the http request. That means we have a huge security issue. Credentials are passing as clear text. This is very, very, very (insert a few thousand more very’s) bad. We need to enabled SSL.
I am going to assume that you know how to do this in production on IIS. I am going to show you how to do this in your development environment.
See this project on GitHub here: https://github.com/rhyous/Auth.TokenService
Setting Up Visual Studio for SSL
First, let’s get this working in your project. Visual Studio uses needs to launch your project in IIS Express as an SSL site.
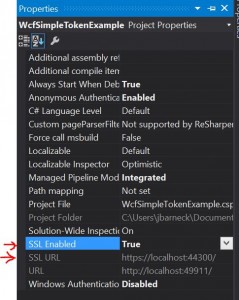
- In Visual Studio, highlight your project in Solution Explorer.
- Press F4 to get the project properties.
- Set SSL to true. Notice an SSL url is created on a new port.
Setting Up Web Services for SSL
The web.config is where the WCF endpoints are configured. They are currently configured only for HTTP and not HTTPS. So let’s make some web.config edits.
- Add an Binding configuration with the security mode set to Transport.
- So set the clientCredentialType to none. Remember, we are not using IIS to handle authentication, but instead, we are handling authentication in the service.
- use webHttpBinding because We are using JSON and ReST-like (not full ReST) WCF services.
- Configure the endpoints to use the newly created Binding configuration.
Here is the complete web.config. The changed or added lines are highlighted.
Changed: Lines 17, 20
Added: Lines 47-55
<?xml version="1.0" encoding="utf-8"?>
<configuration>
  <configSections>
    <!-- For more information on Entity Framework configuration, visit http://go.microsoft.com/fwlink/?LinkID=237468 -->
    <section name="entityFramework" type="System.Data.Entity.Internal.ConfigFile.EntityFrameworkSection, EntityFramework, Version=6.0.0.0, Culture=neutral, PublicKeyToken=b77a5c561934e089" requirePermission="false" />
  </configSections>
  <appSettings>
    <add key="aspnet:UseTaskFriendlySynchronizationContext" value="true" />
  </appSettings>
  <system.web>
    <compilation debug="true" targetFramework="4.5" />
    <httpRuntime targetFramework="4.5" />
  </system.web>
  <system.serviceModel>
    <services>
      <service name="WcfSimpleTokenExample.Services.AuthenticationTokenService" behaviorConfiguration="ServiceBehaviorHttp">
        <endpoint address="" behaviorConfiguration="AjaxEnabledBehavior" binding="webHttpBinding" bindingConfiguration="webBindingSSL" contract="WcfSimpleTokenExample.Services.AuthenticationTokenService" />
      </service>
      <service name="WcfSimpleTokenExample.Services.Test1Service" behaviorConfiguration="ServiceRequiresTokenBehaviorHttp">
        <endpoint address="" behaviorConfiguration="AjaxEnabledBehavior" binding="webHttpBinding" bindingConfiguration="webBindingSSL" contract="WcfSimpleTokenExample.Services.Test1Service" />
      </service>
    </services>
    <behaviors>
      <endpointBehaviors>
        <behavior name="AjaxEnabledBehavior">
          <webHttp helpEnabled="true" />
        </behavior>
      </endpointBehaviors>
      <serviceBehaviors>
        <behavior name="ServiceBehaviorHttp">
          <serviceMetadata httpGetEnabled="true" httpsGetEnabled="true" />
          <serviceDebug includeExceptionDetailInFaults="true" />
        </behavior>
        <behavior name="ServiceRequiresTokenBehaviorHttp">
          <serviceMetadata httpGetEnabled="true" httpsGetEnabled="true" />
          <serviceDebug includeExceptionDetailInFaults="true" />
          <TokenValidationBehaviorExtension />
        </behavior>
      </serviceBehaviors>
    </behaviors>
    <extensions>
      <behaviorExtensions>
        <add name="TokenValidationBehaviorExtension"
          type="WcfSimpleTokenExample.Behaviors.TokenValidationBehaviorExtension, WcfSimpleTokenExample, Version=1.0.0.0, Culture=neutral"/>
      </behaviorExtensions>
    </extensions>
    <bindings>
      <webHttpBinding>
        <binding name="webBindingSSL">
          <security mode="Transport">
            <transport clientCredentialType="None"/>
          </security>
        </binding>
      </webHttpBinding>
    </bindings>
    <serviceHostingEnvironment aspNetCompatibilityEnabled="false" multipleSiteBindingsEnabled="true" />
  </system.serviceModel>
  <system.webServer>
    <modules runAllManagedModulesForAllRequests="true" />
    <directoryBrowse enabled="true" />
  </system.webServer>
  <entityFramework>
    <defaultConnectionFactory type="System.Data.Entity.Infrastructure.LocalDbConnectionFactory, EntityFramework">
      <parameters>
        <parameter value="v11.0" />
      </parameters>
    </defaultConnectionFactory>
    <providers>
      <provider invariantName="System.Data.SqlClient" type="System.Data.Entity.SqlServer.SqlProviderServices, EntityFramework.SqlServer" />
    </providers>
  </entityFramework>
  <connectionStrings>
    <add name="BasicTokenDbConnection" connectionString="data source=(LocalDB)\v11.0;attachdbfilename=|DataDirectory|\BasicTokenDatabase.mdf;integrated security=True;MultipleActiveResultSets=True;App=EntityFramework" providerName="System.Data.SqlClient" />
  </connectionStrings>
</configuration>
Configuring the SSL Certificate
An SSL certification was generated for me when I built and ran the project. I was able to choose via a pop-up to trust the certificate.
Go on and check out part 6 here: Basic Token Service for WCF Services (Part 6 – A JavaScript client)