Archive for April 2012

Beginning Unit Testing Tutorial in C# with NUnit (Part 2)

Continued from Beginning Unit Testing Tutorial in C# with NUnit (Part 1)

Step 4 – Create your first NUnit test

  1. Choose a method from the class you want to test. For example, SimpleAddSubtractTool has the Add() method.
  2. Create a corresponding test method.  Try to name your test as follows: Method_Param1_Param2_Test() and you can add any other words to help clarify the test.
  3. Place the [Test] attribute above the test function.
  4. Add code to test the Add function.
    Note: A common testing method is Arrange Act Assert (AAA). Lets write the code in our method with this in mind.

            [Test]
            public void Add_1_And_2_Test()
            {
                // Step 1 - Arrange (Basically create the objects)
                SimpleAddSubtractTool tool = new SimpleAddSubtractTool();
    
                // Step 2 - Act
                int actual = tool.Add(1, 2);
    
                // Step 3 - Assert
                int expected = 3; // This makes it clear what you expect.
                Assert.AreEqual(expected, actual);
            }
    
  5. Now Create a similar test for the Subtract method.

You are now ready to run your test.

Step 5 – Run the test

You might think you can just right-click on the project and choose Run Tests. However, by default you cannot do this. To add a plugin called TestDriven.NET that provides this right-click Run Tests functionality,  see this post.

How to run a Unit Tests in Visual Studio?

Now you should be able to run your tests.

Step 6 – Check your code coverage

Code Coverage is basically the number of lines of code tested divided by the total number of lines of code.  If you have 10 lines of code but your test only touches five lines of code, you have 50% code coverage. Obviously the goal is 100%.

Again, by default you cannot just right-click and run the Unit Tests unless you have installed TestDriven.NET.

You should now see your code coverage. The Add() method should be 100% covered.

Step 7 – Parameter Value Coverage

You may think that you are good to go. You have unit tests, and your code is 100% covered (based on line coverage). Well, there are bugs in the code above and you haven’t found them, so you are not done. In order to find these bugs you should research the possible parameter values. You will find some more tests to run. I coined the term Parameter Value Coverage (PVC). Most code coverage tools completely ignore PVC.

Both parameters are of the type int or System.Int32. So these are 32 bit integers.

How many possible values should be tested to have 100% PVC? You should have at least these five:

  1. Positive value: 1, 2, 3, …, 2147483647.
  2. Negative vlaue: -1, -2, -3, …, -2147483648.
  3. Zero
  4. int.MaxValue or 2147483647.
  5. int.MinValue or -2147483648.
So while we have 100% code coverage we only have 20% PVC.
So looking at these five possible values, the following questions come to mind.
  • What happens if you add 1 (or any number for that matter) to int.MaxValue?
  • What happens if you subtract 1 (or any number for that matter) from int.MinValue?

Well, write unit tests to answer these questions. Adding 1 to 2,147,483,647 will fail if the expected value is the positive integer 2,147,483,648. In fact, the answer is the negative integer -2,147,483,648. Figure out why this is. Determine where the bug is, then decide how to handle it.

[Test]
        public void Add_Int32MaxValue_and_1_Test()
        {
            // Step 1 - Arrange (Basically create the objects and prepare the test)
            SimpleAddSubtractTool tool = new SimpleAddSubtractTool();

            // Step 2 - Act (Bacically call the method)
            int actual = tool.Add(int.MaxValue, 1);

            // Step 3 - Assert (Make sure what you expect is true)
            int expected = 2147483648; // This won't even compile...
            Assert.AreEqual(expected, actual);
        }

It is up to you to decide how to fix this bug, as the right way to fix this bug is not part of this article.

Return to C# Unit Test Tutorial

Beginning Unit Testing Tutorial in C# with NUnit (Part 1)

So how do you get started with Unit Testing? Well, you need a Unit Testing framework and some basic know how. This article will help you with both.

NUnit is a commonly used testing framework for C#. Well, NUnit has a guide  but I found it incomplete for a newbie, though perfectly acceptable for an experienced developer.
http://nunit.org/index.php?p=quickStart&r=2.6

Lets assume that you have a project with this class:

namespace NUnitBasics
{
    public class SimpleAddSubtractTool
    {
        public int Add(int value1, int value2)
        {
            return value1 + value2;
        }

        public int Subtract(int value1, int value2)
        {
            return value1 - value2;
        }
    }
}

You need to test these methods and find bugs in them and despite how simple they appear, there are bugs in the above methods.

Step 1 – Install NUnit

  1. Go to this url and download the latest version of NUnit.
    http://nunit.org/?p=download
  2. Run the installer.

Step 2 – Create an NUnit testing project in Visual Studio

You can do this manually, as described below, or you can download my templates: NUnit Project Template for Visual Studio

Part 1 – Creating the Project

  1. In Visual Studio, open the solution that holds the project and code that needs to be tested.
  2. Right-click on the solution and choose Add | New Project.
  3. In the tree on the left, select Visual C# | Windows.
    Note: You would think you would select a Test project, but that is for the testing framework built into Visual Studio, MSTest.
  4. Click to highlight Class Library.
  5. Provide a project name.
    Important: It is usually best practice to give the test project the same name as the project it is test only with the word “test” at the end. For example, a project called MyProject would have a corresponding test project called MyProjectTests.
  6. Click Ok.

Part 2 – Configuring the project

  1. Click Reference | Add Reference.
  2. Click the first tab: .NET
  3. Find and add nunit.framework and nunit.mocks.
  4. Click Reference | Add Reference (again).
  5. Choose Projects.
  6. Select the project that is being tested.
  7. Click Ok.
  8. Delete the Class1.cs as it is not used.

Step 3 – Start your first Unit Test

You can add a class and manually change it to be an NUnit test class as described below, or you can download my template: NUnit Item Template for Visual Studio

Part 1 – Create the class file

  1. Right-click on your project and choose Add | Class.
  2. Name the class after the class you are going to test. For example, a class called SimpleAddSubtractTool would have a corresponding test class called SimpleAddSubtractToolTests.
  3. Click OK.

Part 2 – Convert to an NUnit class file

  1. Add a using reference to NUnit.Framwork.
  2. Add the [TestFixture] attribute above the class name.
  3. Add Setup and Tear down attributes and methods if needed.
using System;
using System.Collections.Generic;
using System.Linq;
using System.Text;
using NUnit.Framework;

namespace NUnitBasicsTests
{
    /// <summary>
    /// A test class for ...
    /// </summary>
    [TestFixture]
    public class SampleTest
    {
        #region Setup and Tear down
        /// <summary>
        /// This runs only once at the beginning of all tests and is used for all tests in the
        /// class.
        /// </summary>
        [TestFixtureSetUp]
        public void InitialSetup()
        {

        }

        /// <summary>
        /// This runs only once at the end of all tests and is used for all tests in the class.
        /// </summary>
        [TestFixtureTearDown]
        public void FinalTearDown()
        {

        }

        /// <summary>
        /// This setup funcitons runs before each test method
        /// </summary>
        [SetUp]
        public void SetupForEachTest()
        {
        }

        /// <summary>
        /// This setup funcitons runs after each test method
        /// </summary>
        [TearDown]
        public void TearDownForEachTest()
        {
        }
        #endregion
    }
}

You are now ready to create your first test.

Note: For this basic class you can actually delete the Setup and Tear down region as it won’t be used, however, it is good to know how to use it when you get started.

Beginning Unit Testing Tutorial in C# with NUnit (Part 2)

Return to C# Unit Test Tutorial

How to run Unit Tests in Visual Studio?

NUnit does not currently have a plugin for Visual Studio that allows you to run test right from Visual Studio. However, it can be done.

You can use a number of tools but the tool I prefer is TestDriven.NET.

Step 1 – Download and Installation

  1. Go to the TestDriven.NET web site.
  2. Click the download link.
  3. Download the appropriate version (Enterprise, Professional, or Personal).
  4. Close Visual Studio.
  5. Install TestDriven.NET.

Step 2 – Running Unit Tests

  1. Open your solution that has a test project in Visual Studio.
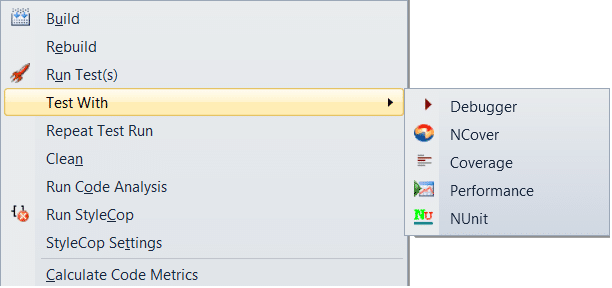
  2. Right-click on your test project and you should see a Run Test(s) and a Test With option.
  3. Select Run Test(s).
You are now running tests just by right-clicking in Visual Studio.

Notice that you can also run tests in the Debugger and with Coverage and with Performance.

Utah Open Source Conference 2012

Install Telnet.exe from the command line

I have a previous post about installing telnet.exe in windows 7, however, I explain how to do it using the UI. You may need to install telnet.exe from the command line.

To install telnet.exe on Windows 7 from the command line, run this command:

C:\Windows\system32>dism.exe /online /Enable-Feature:TelnetClient

Now telnet to a machine:

c:\> telnet 10.1.1.1

Yes, it is that easy. Of course, you may think about using ssh these days as telnet just isn’t that secure. However, telnet is used for other things, such as port testing.

You can telnet using a different port or test that a port is open just by adding the port number.

c:\> telnet 10.1.1.1 3389

Unit Test Stub Code Generator for Covering Arrays

Download Unit Test Stub Code Generator for Covering Arrays

The software can be downloaded here. Sorry, there is not an installer yet.

Installing Unit Test Stub Code Generator for Covering Arrays

  1. Copy the folder “Unit Test Stub Code Generator for Covering Arrays 1.0” to anywhere on a Windows computer.
  2. Copy the Config directory to %ProgramData%\UnitTestGenerator. You will likely have to create that directory manually first.

That is it.

Try these sample method signatures.

public void MyFunction(string inString, bool inBool)

public void MyFunction(string inString, int inInt, bool inBool)

public void MyFunction(Person inPerson, string inString, int inInt)
{
    // Do some stuf
}

Return to C# Unit Test Tutorial

NUnit Project and Item Templates for Visual Studio

Here is an NUnit Project Template for Visual Studio.

  1. Download this template: NUnit Project
  2. Place this zip file into the %USERPROFILE%\Documents\Visual Studio 2010\Templates\ProjectTemplates\Visual C#.
  3. Create a new Visual Studio Project and choose NUnit Project from the list of C# projects.

Here is an NUnit Item Template for Visual Studio.

  1. Download this template: NUnit Test
  2. Place this zip file into the %USERPROFILE%\Documents\Visual Studio 2010\Templates\ItemTemplates\Visual C#.
  3. Add a new item to an NUnit Project and choose NUnit Test from the list of C# items.

My Coding Guidelines

Everyone has their own style guide and mine has just grown naturally. I didn’t used to do all of these so many of my early posts don’t follow these formats exactly, but I now very much prefer these coding styles.

Also, it annoys me to no end when someone calls there style good and another style bad. I will do no such thing. I will mark the styles as “My style” and “Not my style”. Just because it is “No my style” doesn’t mean it isn’t a good style for you.

Some basic guidelines

  • Follow the rules of grammar whenever possible.
  • Make code as self-documenting as possible.
  • Make code easy to copy and paste.

Indentation

Use four spaces tabs when tabbing. Remember this, scrolling up and down is easier than scrolling side to side.

Do not tab brackets but tab code inside brackets.

My Style

for (i = 0; i < 10; i++)
{
    DoSomething();
}

Not my style

for (i = 0; i < 10; i++)
    {
        DoSomething();
    }

Whitespace

Add spaces after commas in method parameters but don’t space around the parenthesis.
My style

public void DoSomething(string inString, bool inValue)
{
   string a = "a";
   string b = "b";
   SomeWork(a, b);
}

Not my style

public void DoSomething ( string inString, bool inValue )
{
   string a = "a";
   string b = "b";
   SomeWork( a, b );
}

No space when declaring an array.

My Style

string[] myArray = new string[] {"String1", "String2"};

Not my style

string [] myArray = new string [] {"String1", "String2"};

Curly Brackets

Always put the curly brackets on the next line. Why? Think of the brackets as left-most column. The opening bracket should be directly above the closing bracket, in the left-most column. Or think of the brackets as a section you want to isolate from everything else. The brackets (start section) should never share a line. You should be able to easily highlight all the lines in the bracketed section and not include any code outside the brackets.

My Style

for (i = 0; i < 10; i++)
{
    if (SomeBoolCheck())
    {
        DoSomething();
    }
}

Not my style

for (i = 0; i < 10; i++) {
    if (SomeBoolCheck()) {
        DoSomething();
    }
}

Again, in every instance where you use a curly bracket, put it on the next line.

if

Almost always use brackets even if it is only one line.

My Style

if (SomeBoolCheck())
{
    DoSomething();
}

Not my style

if (SomeBoolCheck())
    DoSomething();

The only time I use a one line if statement is when it really is only one line. And when I do this, I always have an empty line afterwards.

My Style

public void DoSomething(object inParam)
{
    if (inParam == null) return;

    DoSomething();
}

Not my style

public void DoSomething(object inParam)
{
    if (inParam == null)
        return;
    DoSomething();
}

Variable names

Member variables or fields

All public variables are in camel case with the first letter uppercase. I feel that having the first letter lowercase is distracting in most instances.

My style

public string FirstName;
public string LastName;

All private member variables start with an underscore and are in camel case with the first letter uppercase.

My style

private string _FirstName;
private string _LastName;

Not my style

private string _firstName;
private string _lastName;

Properties

I don’t really differentiate public or private properties, as I rarely have private properties and in the rare instances where I do, I don’t change the syntax in any way. Also, I always have a space between properties.

My style

public string FirstName {get; set;}

public string LastName {get; set;}

Always use an autoproperty unless you have at least one line of code to add to the get or set.

A Property that must have a manual backing field should have the backing field right under the property. Why, because if you think about it, it is part of the property and if you copy it (or just copy the contents on the lines with and within the brackets), the backing property should come along with the copy and paste.

My Style

public string FirstName
{
    get { return _FirstName; }
    set
    {
        _FirstName = value;
        NotifyPropertyChanged("FirstName");
    }
} private string _FirstName;

Not my style

private string _FirstName;

// .... more code

public string FirstName
{
    get { return _FirstName; }
    set
    {
        _FirstName = value;
        NotifyPropertyChanged("FirstName");
    }
}

Note: In my example, I am using a property for a ViewModel in the MVVM format. I would really prefer the following syntax. Someday, I will figure out how to do this without including 3rd party software.

[NotifyPropertyChanged]
public string FirstName {get; set;}

[NotifyPropertyChanged]
public string LastName {get; set;}

Methods

Naming

Methods should be named very clearly based on what they do. Length is not a problem due to intellisense. For example, imaging you want to have a function that eats a cookie. You would name it as follows. Also, I don’t do anything different for public verses private (or protected or internal) methods. They are all camel case with the first letter uppercase.

public void EatACookie()
{
    // ... code to eat a cookie
}

Parameters

All parameters in functions are in lowercamel case. Remember, having the first letter of a name be lowercase is distracting to me. However, I get by this by and mark the variable with the preposition “in”. In rare cases where I use a ref or an out for a parameter, I use those prepositions where “in” would be.

This also adds an additional benefit of marking the parameter variables differently than internal variables.

My style

public void EatACookie(Cookie inCookie)
{
    // ... code to eat a cookie
}

Not my style

public void EatACookie(Cookie cookie)
{
    // ... code to eat a cookie
}

Variables declared in a method

I basically just go all lowercase using the same name as the object when possible, or the most self documenting variable name as possible.

public void EatACookie(Cookie inCookie)
{
    Mouth mouth = new Mouth()
    mouth.Teeth.Chew(inCookie, 27);
    mouth.Swallow();
}

However, if the word needs camel case, I often add a short tag in front similar to method parameters only I usually use “loc” or “tmp” to mark them as local or temporary variables. Again, I use the same name as the object when possible, or the most self documenting variable name as possible.

My style

public void EatACookie(Cookie inCookie)
{
    CookieMonster tmpCookieMonster = new CookieMonster ()
    tmpCookieMonster.EatCookie(inCookie);
}

Final remarks

I am sure I have more styles I use, and I will add them as I go.

Using FreeBSD inside a controlled network – A required HTTP Proxy and No FTP

Inside a controlled network, it is a little harder to use FreeBSD. The simple things become hard, such as running “portsnap fetch extract” or running “make install” on a port.

In a certain network, I am experiencing certain security settings that I must make FreeBSD work around:

  1. An HTTP proxy is required to access external sites
  2. No FTP access.

Working with a required HTTP proxy on FreeBSD

You cannot bypass the proxy. Most ports are blocked with HTTP/HTTPS forced through the proxy. Even worse, DNS only responds for internal addresses  and the proxy handles the external sites, so your local box never actually resolves names to IP addresses and the browser only works because the proxy makes it work.

Setting a global proxy on FreeBSD

You can configure FreeBSD to use a proxy. You can set a global proxy, sort of. It looks like you can set a global proxy per shell. However, not all apps respect that proxy.

csh/tcsh

To add a global proxy to any csh or tcsh shell, add the following line to this file: /etc/csh.cshrc

setenv HTTP_PROXY http://ProxyNameOrIp:8080

sh

To add a global proxy to any sh shell, add the following lines to this file: /etc/profile

HTTP_PROXY=http://ProxyNameOrIp:8080
export HTTP_PROXY

Now that you have made these settings, your proxy should be working and any tool that uses HTTP/HTTPS, such as fetch, portsnap, make fetch, etc., should now properly use the proxy to access the internet.

fetch and tools that use it (ports, portsnap, etc…)

Any HTTP source should now work. Both ports and portsnap and other such FreeBSD tools use fetch so as soon as the environment variable is set, fetch and any tool that uses it will work.

Tools that don’t use fetch (Subversion, etc…)

Other tools, such as subversion, may not support the HTTP_PROXY environment variable and must be manually configured. For Subversion, I couldn’t find a global setting, instead it was a user setting. The file in your home directory. It usually exists by default but contains only comments. The following is the minimal lines you need.

[global]
http-proxy-host = ProxyNameOrIP
http-proxy-port = 8080

Working with no FTP access on FreeBSD

This problem is easy to get around. Always use HTTP or HTTPS. FreeBSD has usually made it that simple as all the common tools that use FTP seem to have HTTP options as well.

Ports

Most ports have an HTTP site as a backup download location. The best case, you run make install and it just finds an HTTP site and downloads the port for you. In the worst case, you may have to manually edit the Makefile and add an http source.

Portsnap uses http by default.

Decoupling settings from /etc/rc.conf in FreeBSD

The rc.conf file can have a lot of settings that quite important. In fact, I would say it has so many settings that it often gets very bloated. Have you ever made a huge mistake and wiped out the rc.conf when it is huge and full of many settings. Or have you ever had a system crash that wiped out the rc.conf? I have! A large rc.conf can be difficult to recover without a backup. On a production server, I will have such a backup but in my lab and on my PC-BSD desktop, I don’t.

My personal experiences of erasing the rc.conf are silly but they happened. Feel free to laugh but I have been using FreeBSD since 2001 (11 years as of the writing of this post) and each of these happened in lab environments or on my personal laptop where I was less careful and none of them ever happened on a production server.

  1. I accidentally ran a command that wiped it because I used > which overwrites the file, instead of >>, which appends to the file.
    $ sudo echo ‘someapp_enable=”yes”‘ > /etc/rc.conf
  2. PC-BSD wireless settings are written to the /etc/rc.conf file and once while managing my wireless settings, the system crashed, rebooted, and my /etc/rc.conf was empty.
  3. I once was going to delete the hosts file and add a new one and I am so used to typing /etc/rc.conf that I typed that instead of /etc/hosts. Oops!
    $ rm -f /etc/rc.conf
  4. While writing a script to update a setting in /etc/rc.conf, my script wiped it. Maybe the reason was similar to #1, maybe it was different, I don’t remember.

How to store settings in separate files on FreeBSD

If you do a quick read of the man 5 rc.conf, it will tell you that you can put setting in rc.conf, rc.conf.local, or in any filename residing in a folder called /etc/rc.conf.d and all these files can store settings.

Moving all your settings to rc.conf.local just moves the problem I described above, it doesn’t actually fix it, so I am not going to use that solution. However, using a separate file per setting in the /etc/rc.conf.d directory is quite a great idea.

Step 1 – Create the /etc/rc.conf.d directory

  1. Create a /etc/rc.conf.d directory:
    # sudo mkdir /etc/rc.conf.d

Step 2 – Create a file to hold a setting

Example 1 – Hostname

  1. Create a file in /etc/rc.conf.d and name it hostname.
  2. Add the hostname=”SystemName.domain.tld” setting to the file.

Note: You can do both steps at the same time with one command:

# sudo echo ‘hostname=”SystemName.domain.tld”‘ > /etc/rc.conf.d/hostname

Example 2 – SSH

  1. Create a file in /etc/rc.conf.d and name it ssh.
  2. Add the sshd_enable=”YES” setting to the file.

Note: You can do both steps at the same time with one command:

# sudo echo ‘sshd_enable=”YES””‘ > /etc/rc.conf.d/ssh

Example 3 – Default Gateway

Yes, on FreeBSD the default route setting is called defaultrouter, not gateway or defaultroute as one would expect.

  1. Create a file in /etc/rc.conf.d and name it defaultrouter, or if you want to name it gateway or defaultroute.
  2. Add the defaultrouter=”192.168.0.1″ setting to the file.

Note: You can do both steps at the same time with one command:

# sudo echo ‘defaultrouter=”192.168.0.1″‘ > /etc/rc.conf.d/defaultroute

Conclusion

If you use the /etc/rc.conf.d file, then if you ever accidentally overwrite a file, it is not that hard to deal with because every setting is decoupled in its own file. You only lose one setting.

From now on, in my posts, I will tell likely suggest adding settings using a separate file in /etc/rc.conf.d.